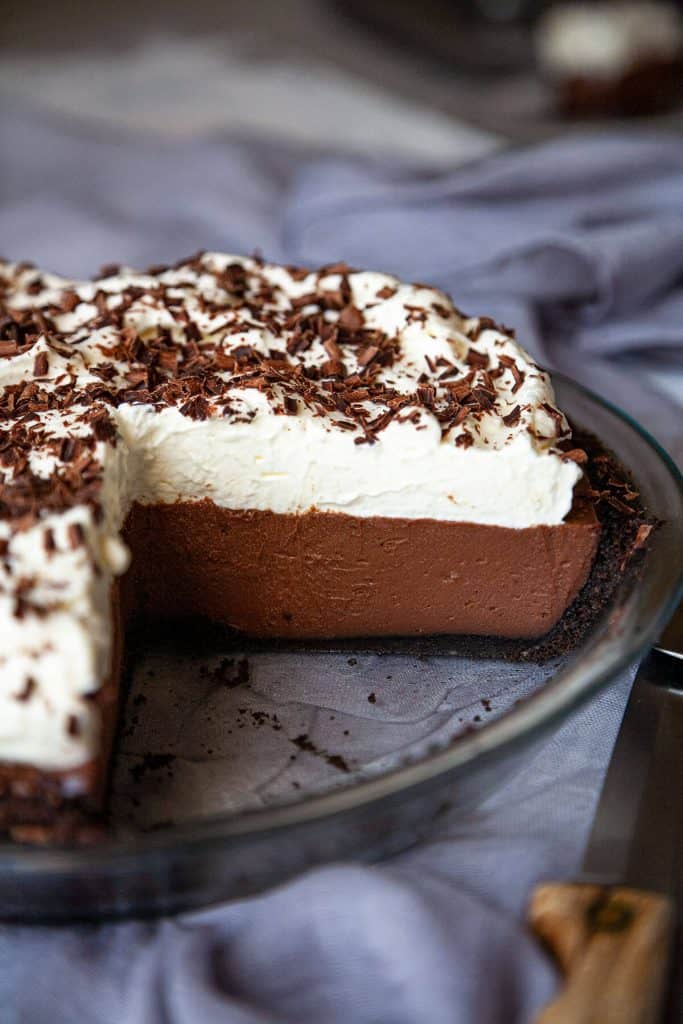
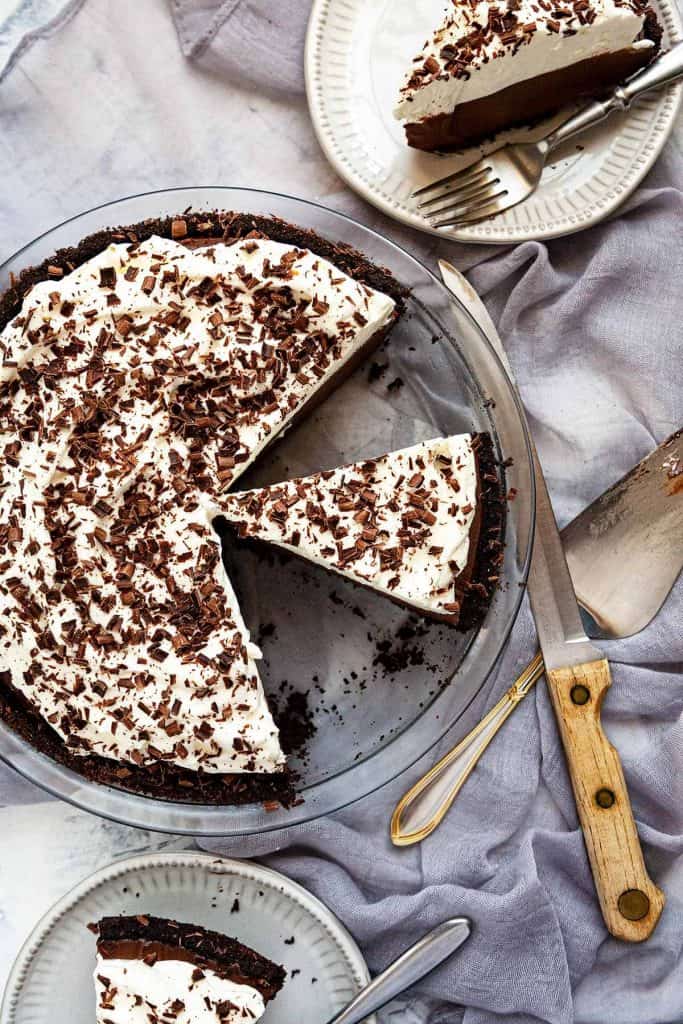
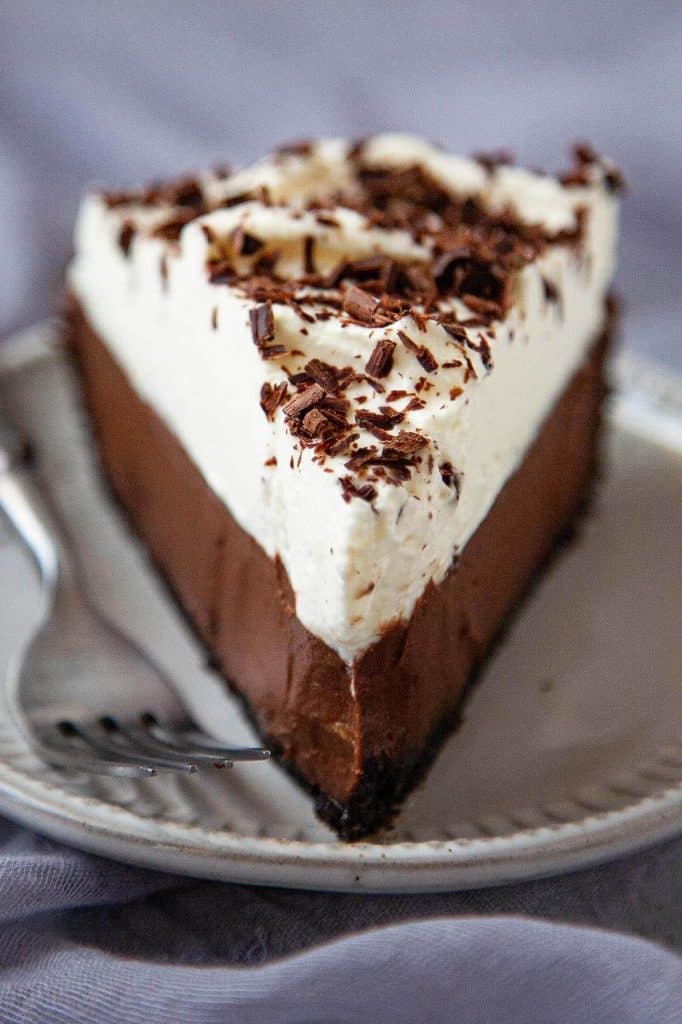
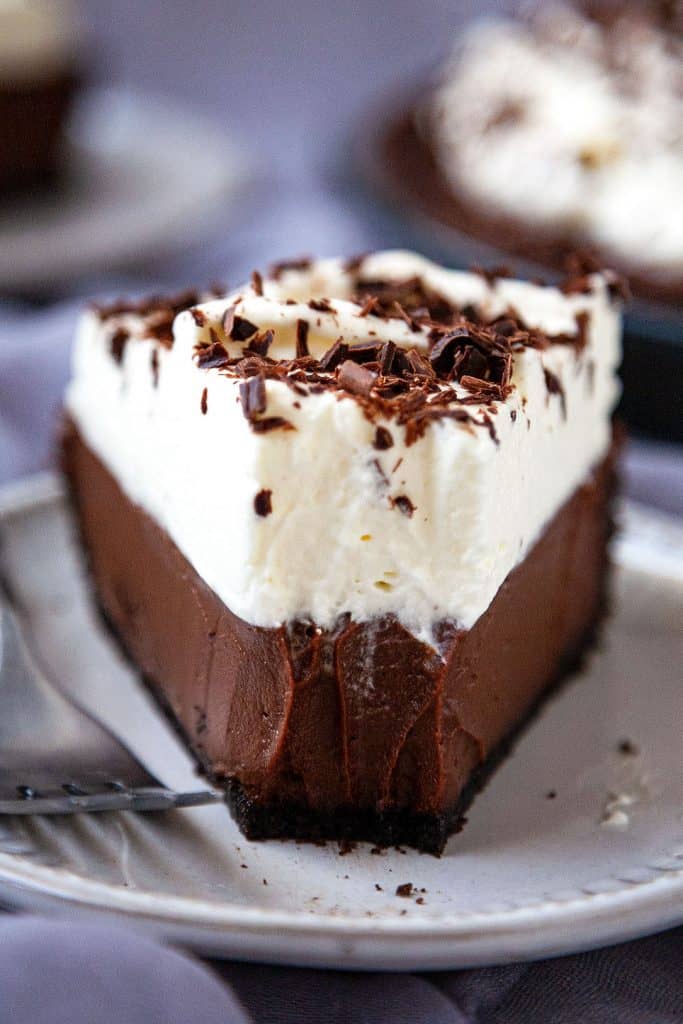
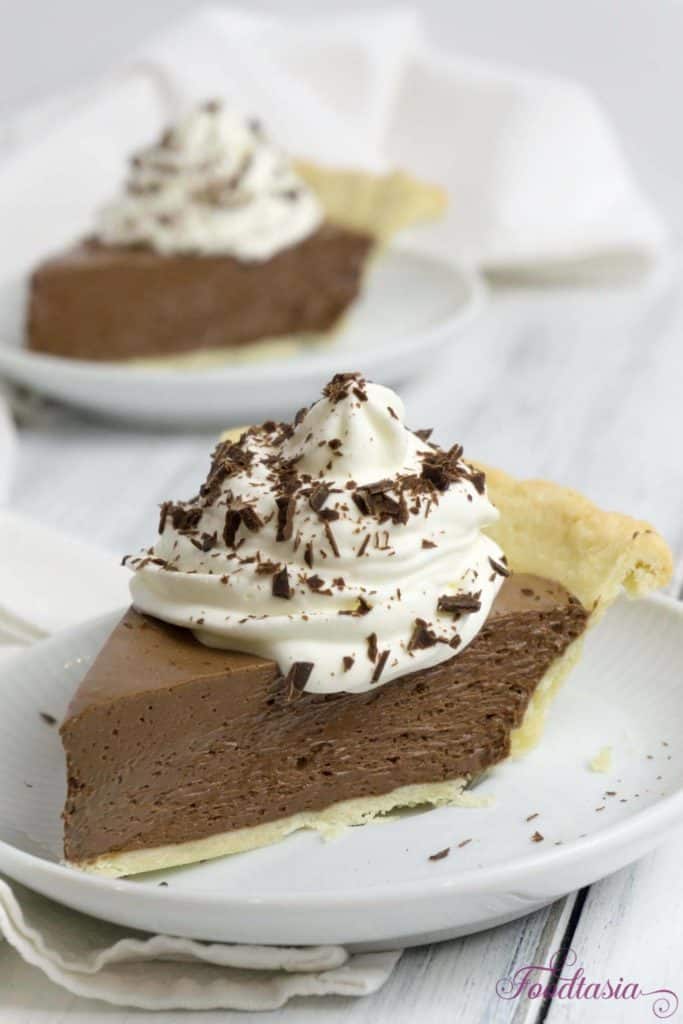
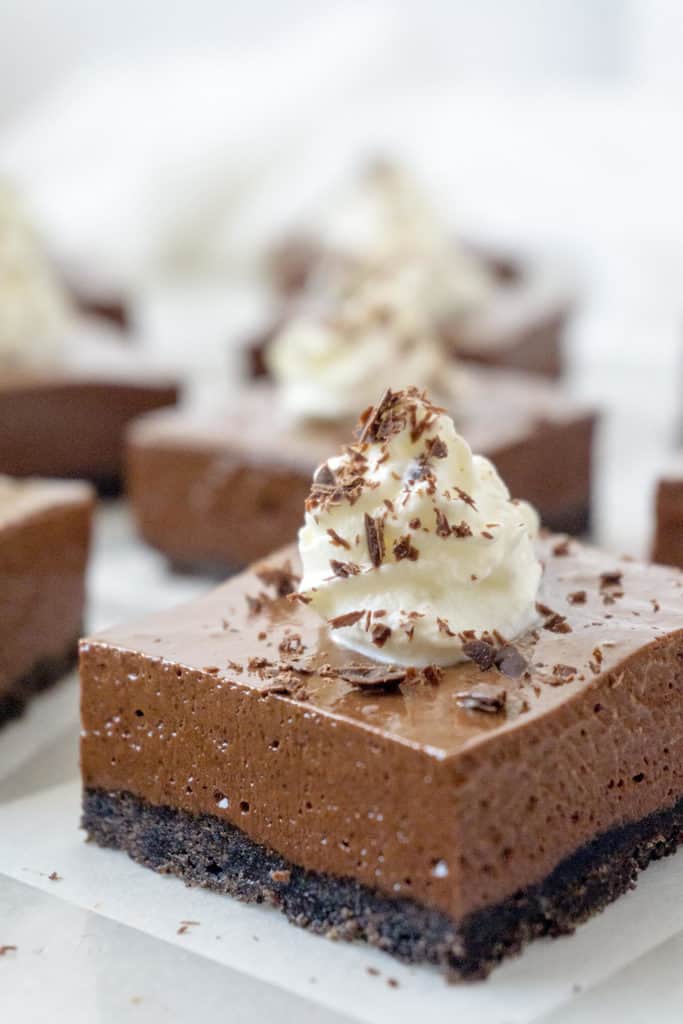
Chocolate Cream Pie is the ultimate creamy, dreamy, decadent dessert. With an Oreo cookie crust, a velvety smooth chocolate custard filling, and billows of whipped cream, this Chocolate Cream Pie will leave you swooning!

Jump to Section
The Best Chocolate Cream Pie
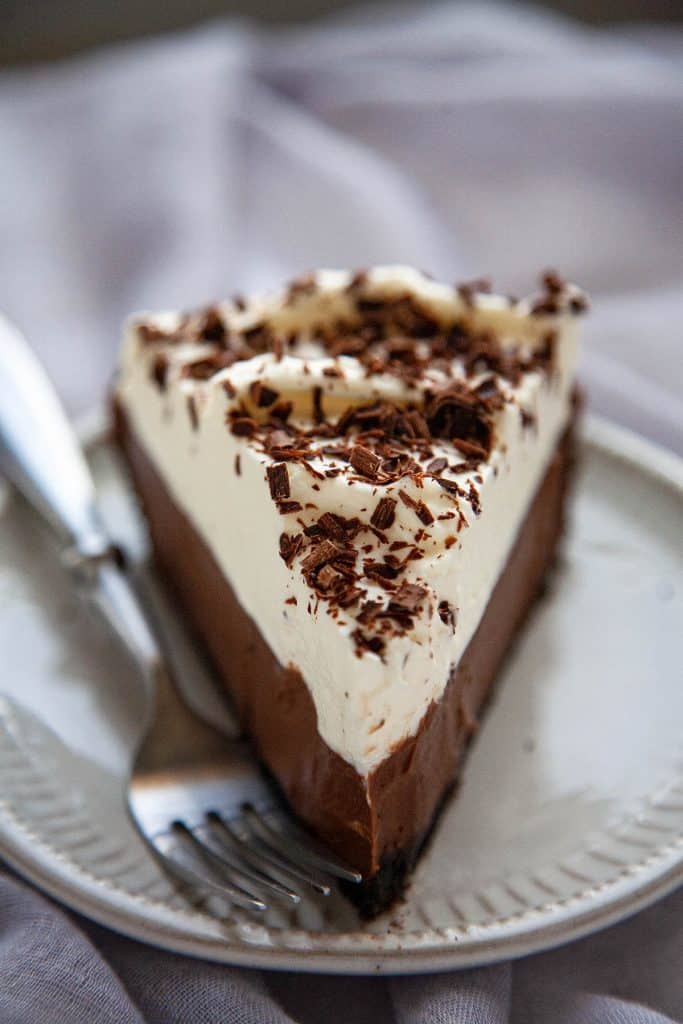
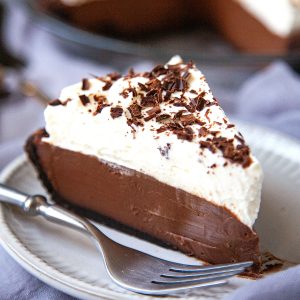
Chocolate Cream Pie is my favorite dessert ever and this recipe is truly the best I’ve ever had. The chocolate custard filling is perfection. It’s velvety smooth, so creamy, and somehow light, yet rich at the same time.
But not overly rich. It’s not a heavy, cloyingly rich ganache. It’s not overly sweetened or too heavy.
The filling is a pastry cream – a crème patisserie thickened with a little cornstarch, egg yolks, and a good dose of chocolate.
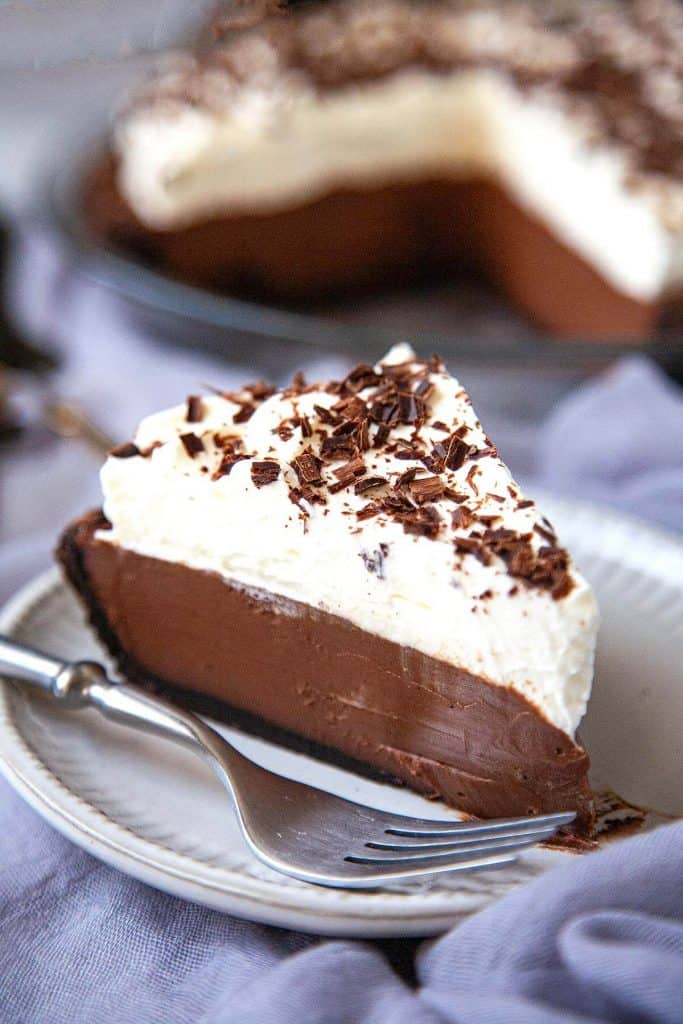
Chocolate Cream Pie with an Oreo cookie crust
An Oreo cookie crust is the perfect base for this Chocolate Cream Pie. The crumbly, crunchy texture is a wonderful contrast to the smooth, creamy filling.
And the Oreos add the perfect salty, sweet, chocolate flavor.
No-Bake
The custard in this pie is made on the stovetop, and the finished pie isn’t baked.
I prefer to bake the unfilled crust for 10 minutes to help set the crust for easier, neater slicing and a crunchier crust, but you could skip the baking and just freeze the crust for about 15 minutes to firm it up before putting in the filling.
Be prepared though, for the crust to not slice as cleanly and serve as neatly as if it is baked.
How to make Chocolate Cream Pie
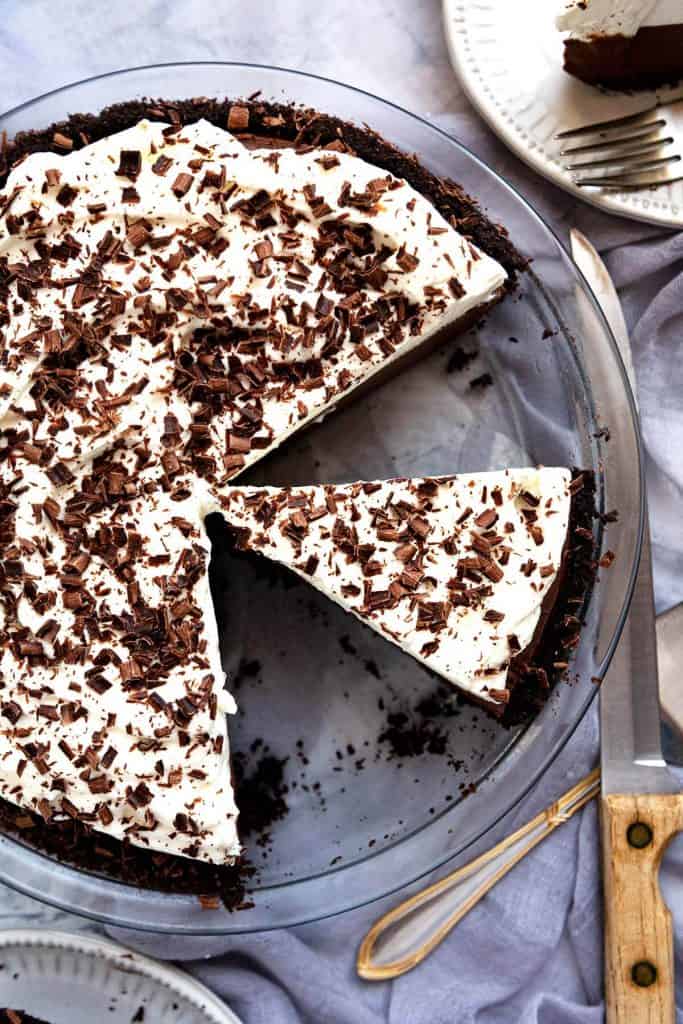
This Chocolate Cream Pie consists of an Oreo cookie crust, a smooth and velvety chocolate custard, and a whipped cream topping.
How to make an Oreo cookie crust
Grind the Oreo cookies - with their cream fillings - in a food processor until they are finely ground. If you don't have a food processor, put the cookies in a plastic bag and mash them with a rolling pin. Mixed the cookie crumbs with melted butter then press into the bottom and up the sides of a 9-inch pie dish. This is my favorite pie dish – which also comes recommended by Cook’s Illustrated.
I use my hands to press the crumbs into the sides of the pie dish, and the bottom of a measuring cup to compact the crumbs into a tight, smooth crust.
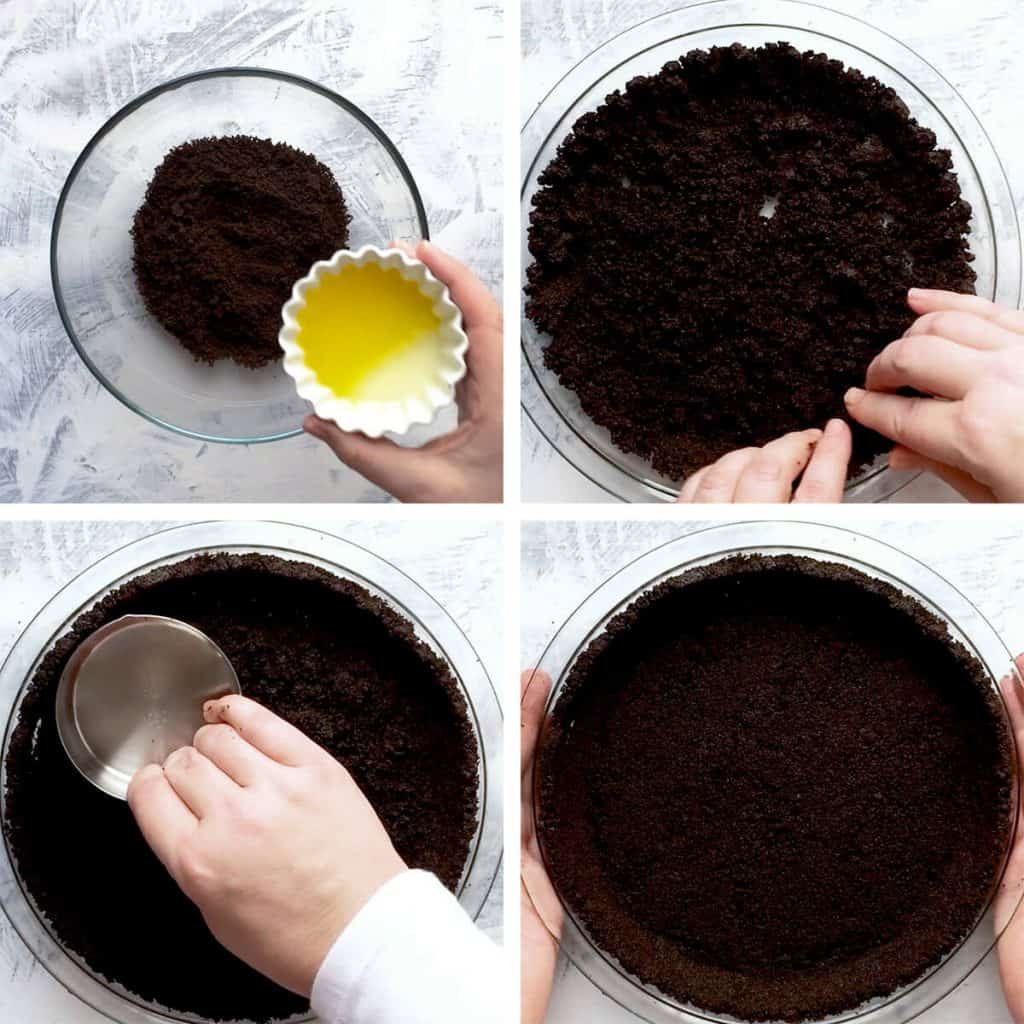
Another trick I use is to press the crumbs into the bottom of the pie dish, then carefully push towards the edges and up the sides of the dish. This way, the crumbs are already somewhat compacted before pressing them into the sides.
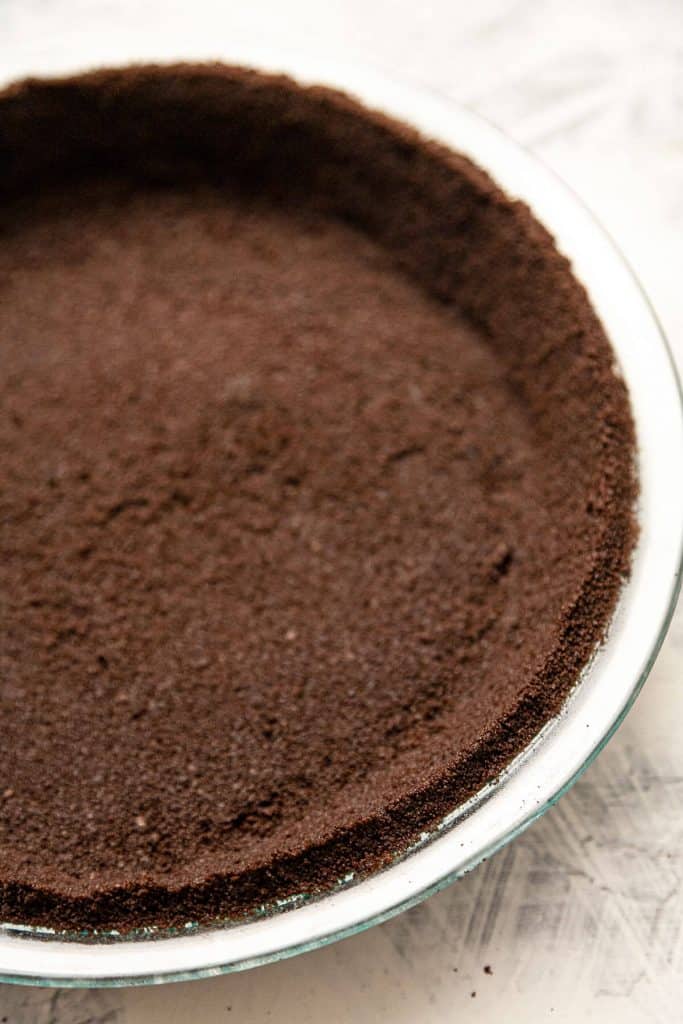
The crust is chilled in the refrigerator for 20 minutes, baked for 10 minutes in the oven, then left to cool.
If you choose not to bake the crust, stick it in the freezer while making the chocolate custard to let it firm up.
How to make the filling
The filling for Chocolate Cream Pie is a crème patisserie - or pastry cream – that has a good dose of chocolate mixed in.
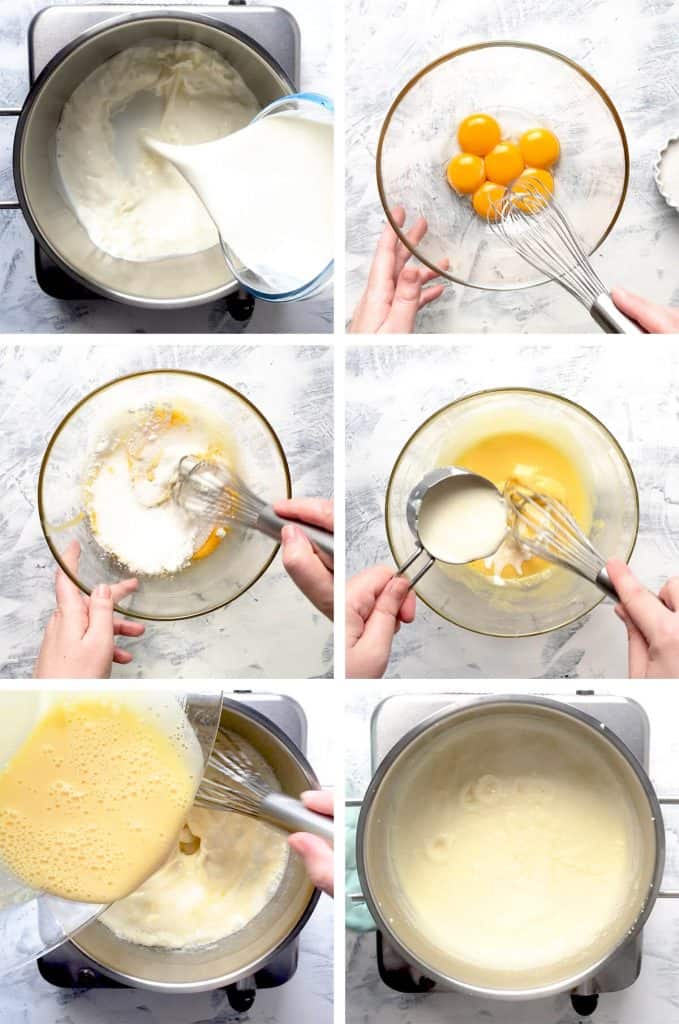
Start the chocolate pastry cream by bringing half-and-half (or equal parts milk and heavy cream) to a simmer.
In a stand mixer fitted with a paddle attachment, or in a medium bowl by hand, whisk the egg yolks until they are lightened up, about 30 seconds.
Add the cornstarch and sugar, and continue whisking until the mixture is glossy and slightly thickened, and the sugar has begun to dissolve, about 1 minute.
Slowly drizzle ½ cup of the hot half-and-half over the egg yolks while whisking continuously. Then whisk the egg yolk mixture back into the rest of the hot half-and-half. It should thicken in about 30 seconds. Return to simmer, whisking constantly, until 3 or 4 bubbles burst on the surface and mixture is thickened and glossy, about 15 seconds longer.
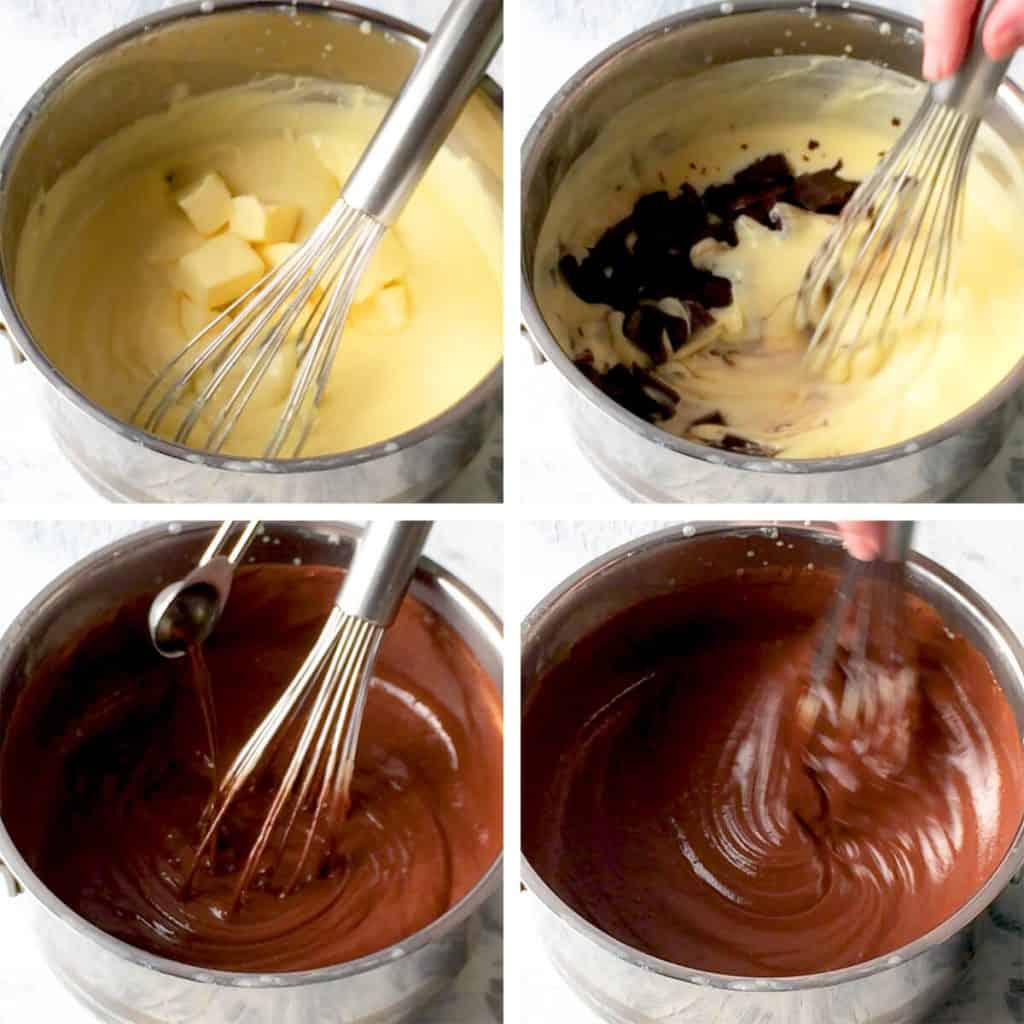
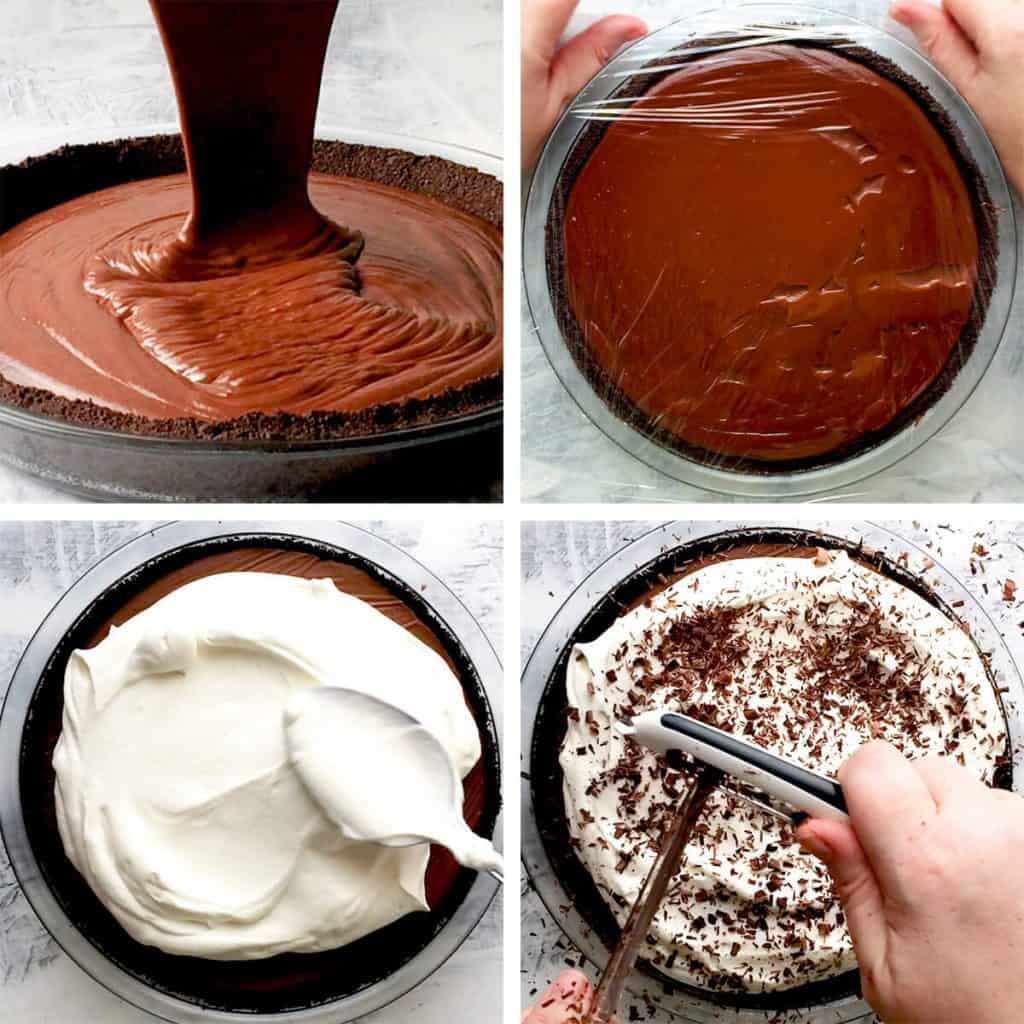
Take off the heat, and whisk in butter until fully incorporated and smooth. Whisk in the semisweet and unsweetened chocolates until fully incorporated and smooth, using a rubber spatula to scrape the bottom and sides of the pan. Whisk in the vanilla, then immediately pour through a strainer, then into the cooled crust.
Cover with plastic wrap, gently pressing the plastic onto the filling, and chill until the filling is firm, about 4 hours.
How to make the whipped cream topping and optional stabilized whipped cream topping
I always make stabilized whipped cream. It’s just an easy extra step, but the cream stays fresh for days. Regular whipped cream will start weeping in a matter of hours, and will look quite wet and deflated the next day.
If making the optional stabilized whipped cream, stir 1 teaspoon of powdered, plain gelatin into 1 tablespoon of water. Let it rest for 5 minutes so the water is fully absorbed. Heat the gelatin mixture in the microwave for 5-7 seconds so that it melts and smooths. Let it cool slightly and stir in 1 teaspoon of whipping cream.
With a cold bowl and cold beaters, whip the cream and sugar until it thickens and forms soft peaks (when you lift the beaters out of the bowl the whipped cream folds over).
If making the optional stabilized whipped cream, with the mixer on low, slowly pour the cooled gelatin mixture in as your mixing the whipped cream.
Continue mixing the whipped cream on medium high until you have stiff peaks (when you lift the beaters out of the bowl, the whipped cream stands straight up and doesn’t fold over), but don’t over beat it or it will not have a smooth texture.
How to top the pie
Top the chilled Chocolate Cream Pie with the whipped cream. Then using a vegetable peeler, run the peeler down the thin edge of a chocolate bar to make chocolate shavings. I do this right over the pie. If you touch the shavings or if your room is warm, they will melt easily.
Top the pie with the whipped cream shortly before serving. This is especially important if not using stabilized whipped cream.
Recipe
Chocolate Cream Pie
Ingredients
For the Oreo cookie crust:
- 20 Oreo cookies (190g)
- 3 tablespoons unsalted butter, (melted and cooled) 43g
For the chocolate filling:
- 2 ½ cups half-and-half ((OR 1 ¼ cups milk and 1 ¼ cups heavy cream)) 568g
- pinch of table salt
- ⅓ - ½ cup granulated sugar ((SEE NOTE 1)) 66g-99g
- 2 tablespoons cornstarch 14g
- 6 large egg yolks at room temperature
- 6 tablespoons unsalted butter (cold, cut into 6 pieces) 85g
- 6 ounces semisweet chocolate or bittersweet chocolate (finely chopped (SEE NOTE 2)) 170g
- 1 ounce unsweetened chocolate (finely chopped) 28g
- 1 teaspoon vanilla
For the whipped cream topping:
- 1 ½ cups heavy cream, (cold) 341g
- 2 tablespoons granulated sugar 25g
- ½ teaspoon vanilla
For the optional Stabilized Whipped Cream (SEE NOTE 3):
- 1 teaspoon plain unflavored gelatin
- 1 tablespoon water
- 1 teaspoon whipping cream
For the chocolate shavings:
- Bar of bittersweet or semisweet chocolate.
Instructions
For the Oreo cookie crust:
- Finely grind the Oreo cookies in a food processor, then mix with melted butter. You can do this right in the processor.
- Press the buttered crumbs into the bottom and up the sides of a 9-inch pie dish, pressing with the bottom of a measuring cup to compact the crumbs into a tight, smooth crust.
- Chill the crust in the refrigerator for 20 minutes to firm the crumbs, then bake for about 10 minutes until the crumbs are fragrant and set. Remove the crust from oven and let cool on a rack while preparing filling. (SEE NOTE 4)
For the filling:
- Bring half-and-half (or equal parts milk and heavy cream) to a simmer over medium-high heat, stirring occasionally with wooden spoon to prevent scorching on the bottom of the pan.
- In a stand mixer fitted with a paddle attachment, or in a medium bowl by hand, whisk the egg yolks until they are lightened up, about 30 seconds.
- Add the cornstarch, sugar, and salt, and continue whisking until the mixture is glossy and slightly thickened, and the sugar has begun to dissolve, about 1 minute.
- Slowly drizzle ½ cup of the hot half-and-half over the egg yolks while whisking continuously. Then whisk the egg yolk mixture back into the rest of the hot half-and-half. It should thicken in about 30 seconds. Return to simmer, whisking constantly, until 3 or 4 bubbles burst on the surface and mixture is thickened and glossy, about 15 seconds longer.
- Take off the heat, and whisk in butter until fully incorporated and smooth. Whisk in the semisweet and unsweetened chocolates, until fully incorporated and smooth, using a rubber spatula to scrape the bottom and sides of the pan. Whisk in the vanilla, then immediately pour through a strainer to remove and small bits of egg, then into the cooled crust.
- Cover with plastic wrap, gently pressing the plastic onto the filling, and chill until the filling is firm, about 4 hours.
For the whipped cream topping (and optional stabilized whipped cream topping):
- If making the optional stabilized whipped cream, stir 1 teaspoon of powdered, plain gelatin into 1 tablespoon of water. Let it rest for 5 minutes so the water is fully absorbed. Heat the gelatin mixture in the microwave for 5-7 seconds so that it melts and smooths. Let it cool slightly and stir in 1 teaspoon of whipping cream.
- With a cold bowl and cold beaters, whip the cream and sugar until it thickens and forms soft peaks (when you lift the beaters out of the bowl the whipped cream folds over).
- If making the optional stabilized whipped cream, with the mixer on low, slowly pour the cooled gelatin mixture in as your mixing the whipped cream.
- Continue mixing the whipped cream on medium high until you have stiff peaks (when you lift the beaters out of the bowl, the whipped cream stands straight up and doesn’t fold over), but don’t over beat it or it will not have a smooth texture.
- Top the chilled Chocolate Cream Pie with the whipped cream. Then using a vegetable peeler, run the peeler down the thin edge of a chocolate bar to make chocolate shavings. I do this right over the pie. If you touch the shavings or if your room is warm, they will melt easily.
- Top the pie with the whipped cream shortly before serving. This is especially important if not using stabilized whipped cream.
Notes
- NOTE 1: I use ⅓ cup sugar when using semisweet chocolate, and ½ cup sugar when using bittersweet chocolate.
- NOTE 2: You can use semisweet or bittersweet chocolate for this pie. I use bittersweet because it’s easier to find a good quality bittersweet chocolate bar.
- NOTE 3: I always make stabilized whipped cream. It’s just an easy extra step, but the cream stays fresh for days. Regular whipped cream will start weeping in a matter of hours, and will look quite wet and deflated the next day.
- NOTE 4: You could get away with not baking the crust, however, it would be more crumbly and break more easily when slicing. If you choose not to bake the crust, stick it in the freezer while making the chocolate custard to let the crumbs firm up.
- Recipe is adapted from Baking Illustrated.
Nutrition
Enjoy, friends!
Follow me on INSTAGRAM and PINTEREST for all the latest content and recipes!
Subscribe to FOODTASIA’S NEWSLETTER to receive fresh recipes straight to your inbox.
You might also like:


Brenda says
I made this pie and it was delicious! The whole family loved it and said it was a “keeper” recipe. It’s the perfect mix of decadent meets dreamy goodness. I topped it with the stabilized whipped cream and sliced strawberries! Heaven❤️❤️❤️
Kelly says
So happy you liked it, Brenda!