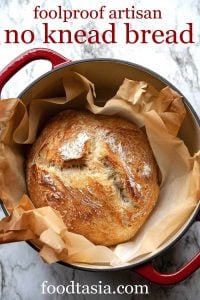
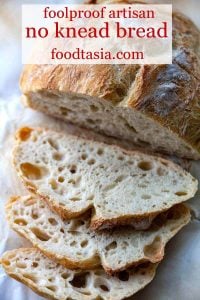
The WORLD’S EASIEST Crusty Artisan No Knead Bread with a crispy, rustic crust and a soft chewy interior filled with irresistible air pockets. The perfect, foolproof recipe perfect for beginners and experienced bakers alike. There’s nothing like the smell of freshly baked bread coming from your kitchen.

Jump to Section
The MOST INCREDIBLE No Knead Bread Recipe
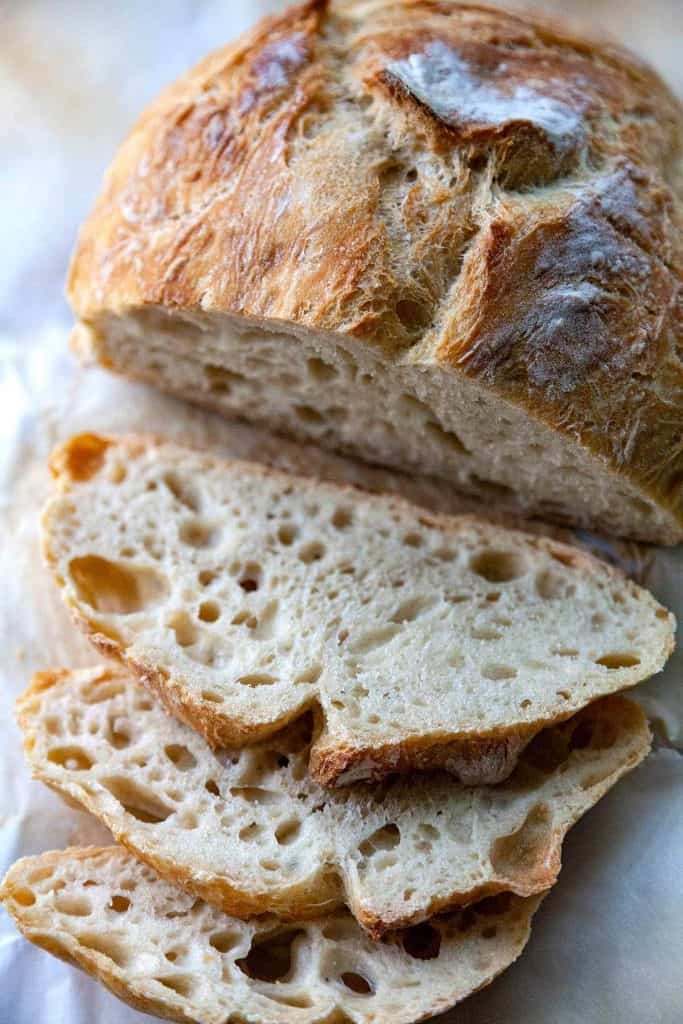
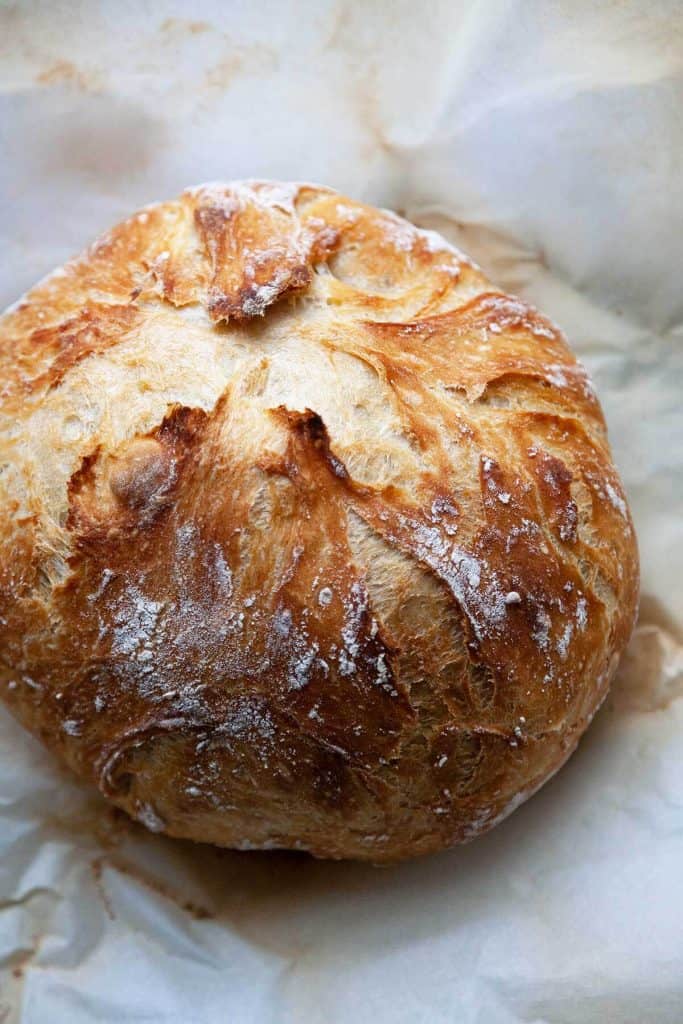
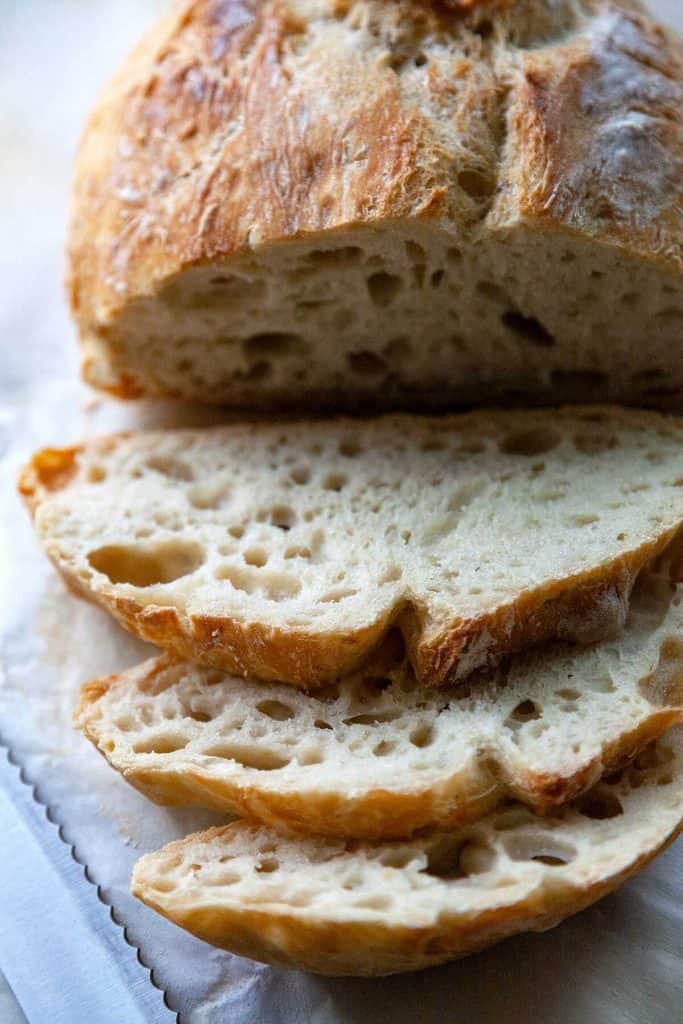
I am blown away by the quality of this artisan no knead loaf. I’m leery of many no knead bread recipes, but this one is a keeper.
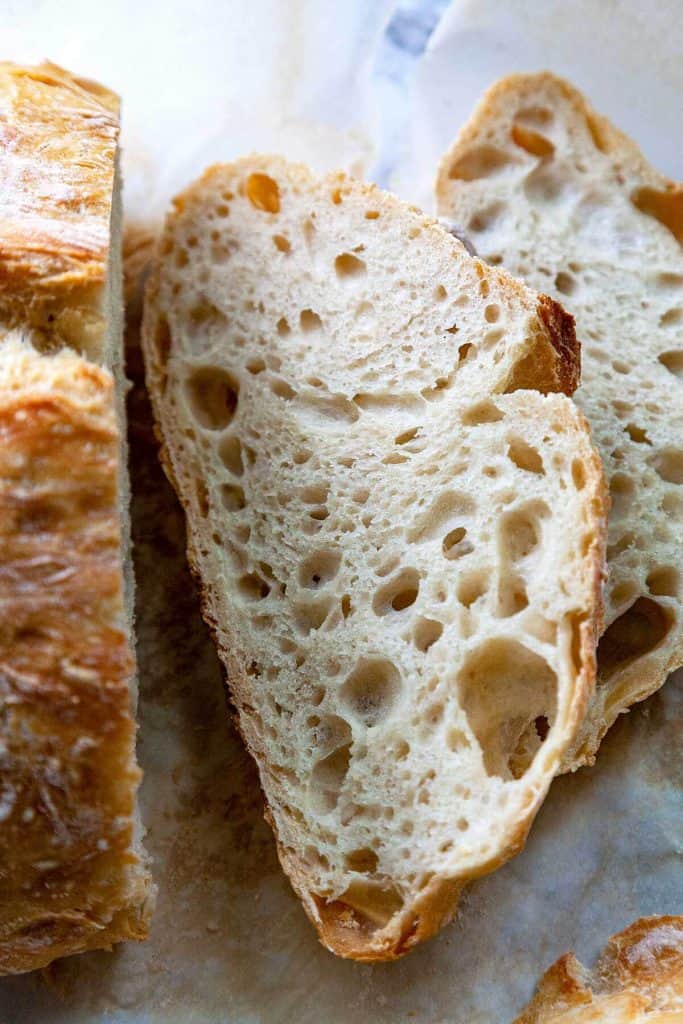
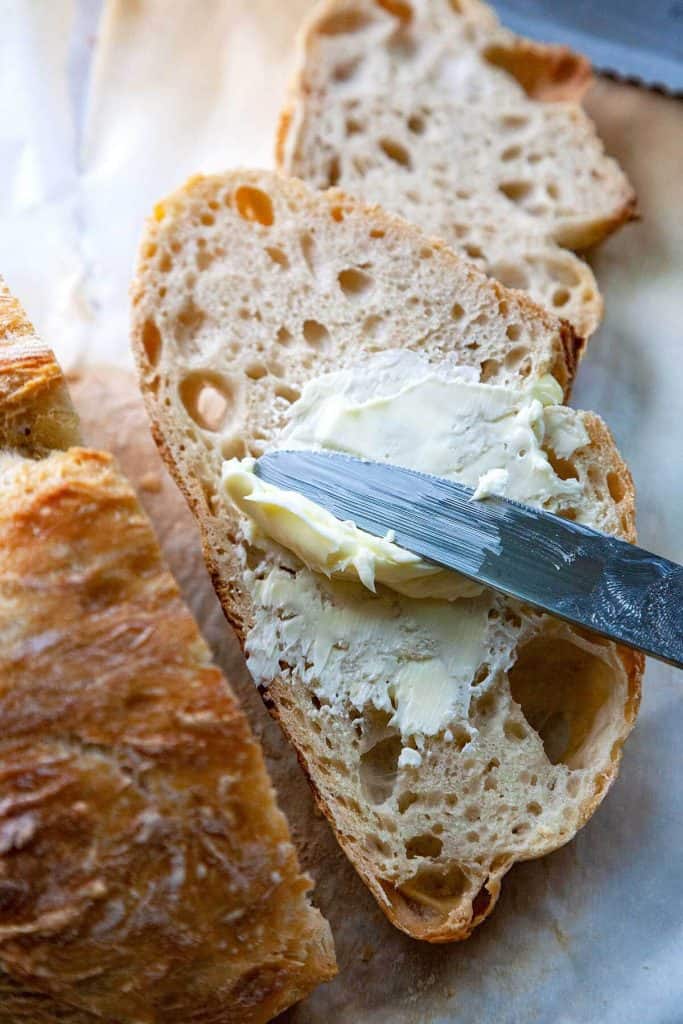
With its irresistibly crusty exterior and its soft, chewy interior so light and full of air pockets – this is truly everything I ever dreamed of in a loaf.
Perfect for beginners or more experienced bread bakers. I’ve baked my own bread for years, and I still keep coming back to this loaf over and over again. It’s practically foolproof. Even a beginner will have success with this loaf.
The EASIEST 5 Minute No Knead Bread recipe EVER
This No Knead Bread Recipe is ridiculously easy to make.
- Just 5 minutes of hands on time
- No knead, no mixer – just give it a couple of stirs with a spoon
- No shaping it into a loaf – just pour it out and give it a tuck and a push here and there. It will look messy at this point, but this is what will give it that gorgeous, cracked, rugged crust.
- Flexible rising times - from as quick as 2 hours, to 12-18 hours on the counter, to up to 5 days in the fridge
Why this recipe works
- Slow rise – the slow rise of this dough allows you to use less yeast while the complex flavors of the dough develop.
- Wet dough – a wet dough allows the gluten to develop without kneading and creates bigger air pockets in the loaf.
- Baking technique – baking the bread in a dutch oven gives a crisp, crackly crust found in artisan loaves. The dutch oven creates a steamy environment which gives a boost to the rise of the bread.
While it gives the best results, a dutch oven is not needed to make this No Knead Bread! I've given some alternatives down below.
How do you make homemade No Knead Bread?
No Knead bread is simple to make in these easy steps:
- Stir the ingredients together in a large mixing bowl
- Cover the bowl with plastic and let rest 12-18 hours
- Pour the dough onto floured parchment paper and roughly shape into a ball
- Preheat the oven and dutch oven to 450° F for 30 minutes
- Put the parchment and dough ball into the pan, cover, and bake for about 45 minutes.
Then pat yourself on the back for making the easiest, most incredible loaf of no knead bread EVER!
Ingredients
Flour – bread flour or all-purpose flour. Bread flour is the best for homemade breads, but all-purpose can also be used if that’s what you have on hand.
Bread flour has more protein than all-purpose flour which creates higher amounts of gluten. Because of the higher protein level, bread flour is able to absorb more liquid, allowing it to hold its shape and rise upward instead of outward.
The high amount of gluten in bread flour also creates a more elastic dough, which produces a lighter and chewier loaf, as opposed to a bread that is more dense and crumbly. It also creates bigger air pockets.
Yeast – Instant yeast can be mixed right in with the flour as shown here.
If you are using active dry yeast, dissolve the yeast in water first according to the package directions. When it gets bubbly and foamy, mix with the rest of the ingredients.
Make sure your active dry yeast is fresh. If using active dry yeast, be sure to proof it in water or according to the directions on the package before mixing it with the rest of the ingredients. Active dry yeast is unstable and can be dead, even before the expiry date. It also has a larger grain size and needs direct contact with water to dissolve.
How to make Step by Step
In a large mixing bowl, mix together the flour, yeast, salt, and water until a shaggy, rather wet, dough ball forms. (If you're using active dry yeast, dissolve it in the water first. When it becomes foamy, mix with the rest of the ingredients.)
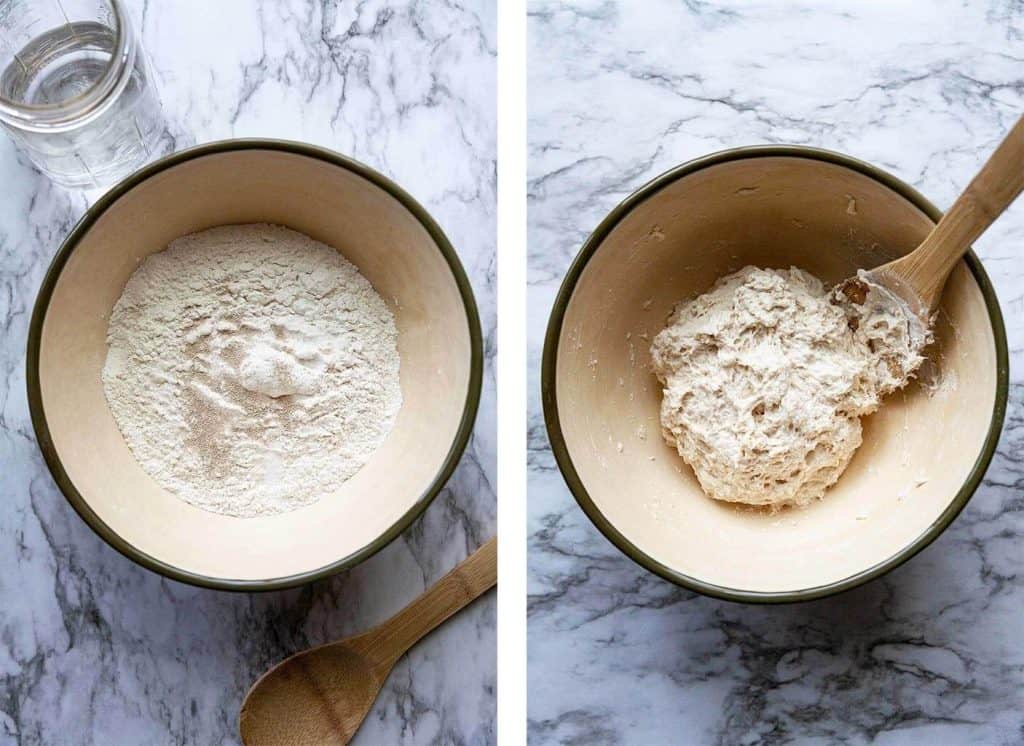
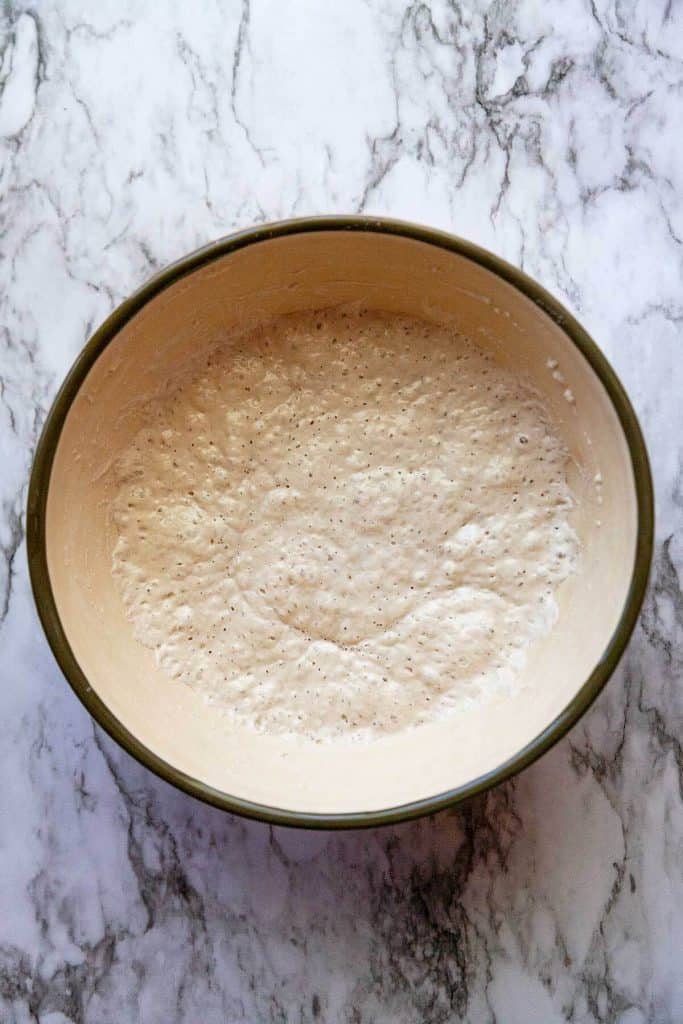
Cover with plastic and let sit on the counter at room temperature for 12-18 hours. When it’s done, the dough will be a little loose and the surface should be covered with tiny bubbles.
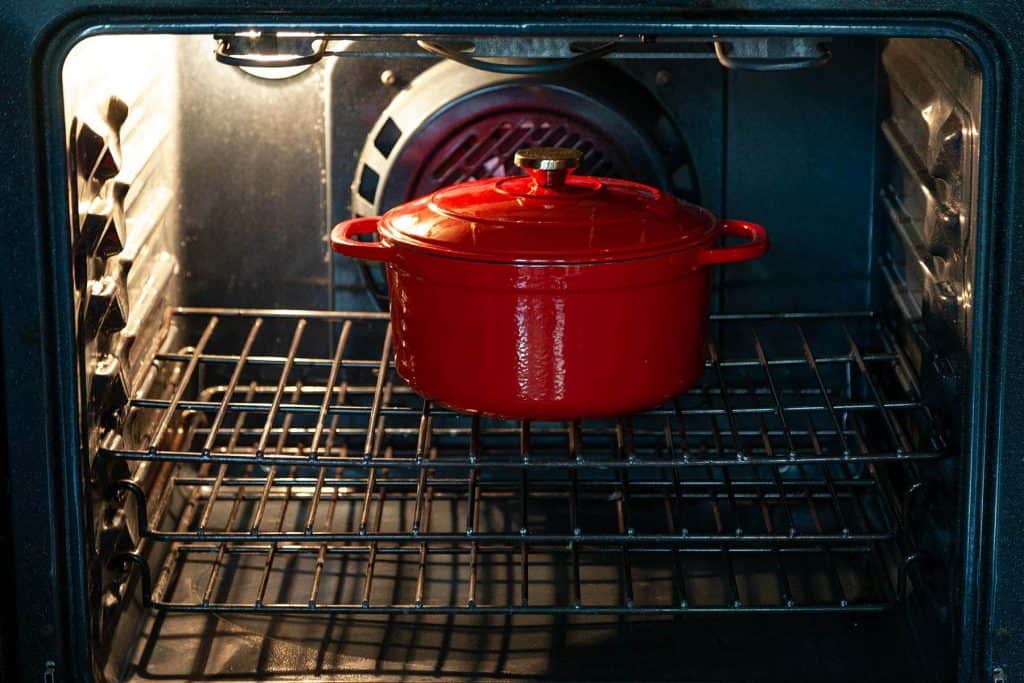
When you’re ready to bake, preheat the oven to 450° F. Put a large, 5.5 - 6 quart Dutch oven with a lid into the oven to preheat for 30 minutes.
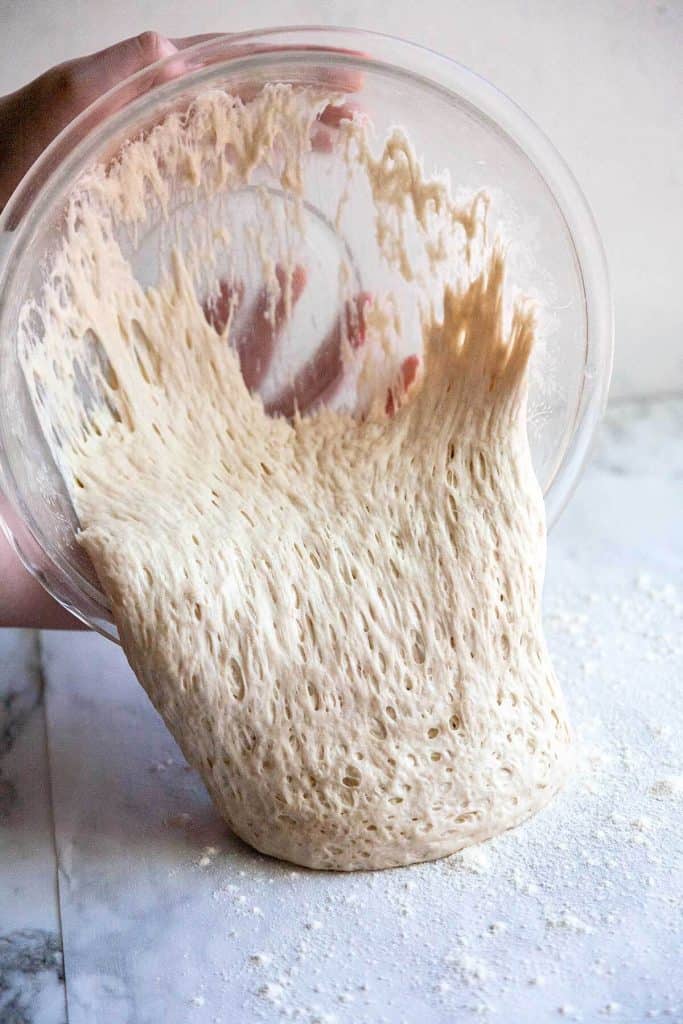
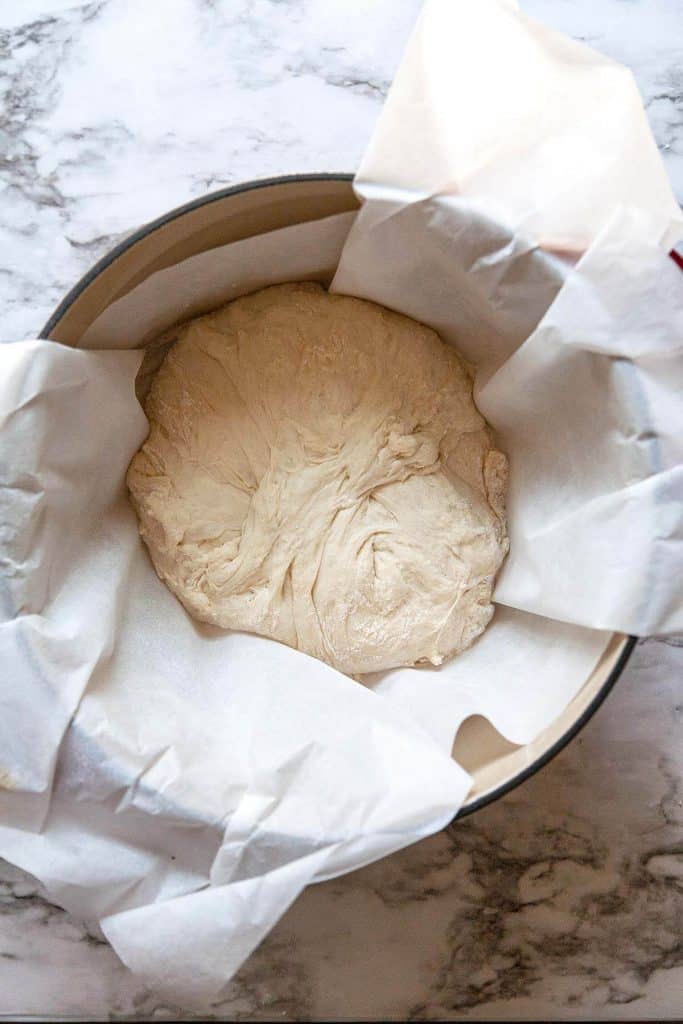
Sprinkle flour on a piece of parchment paper and pour/scrape the dough out onto the paper. The dough should be somewhat stringy (from the gluten) and full of air bubbles.
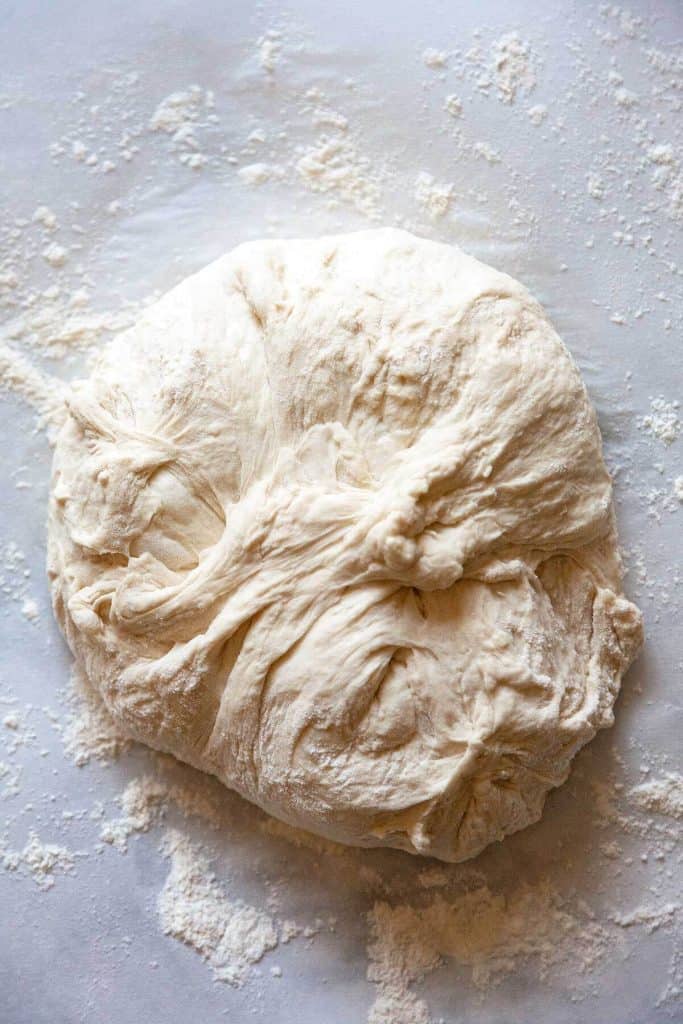
Sprinkle a little flour on top of the dough - just enough so that the dough doesn’t stick to your fingers. Gently form the dough into a ball shape by lifting up the edges onto the top of the ball and pushing on the sides with cupped hands.
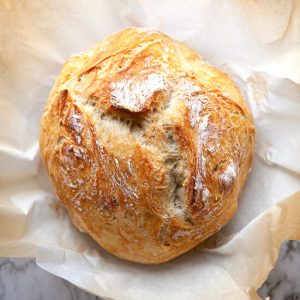
The shape will be a little messy – this is what gives the final loaf it beautiful, rustic appearance. The openings on top is where the cracks will form.
Cover the dough with plastic or a kitchen towel until pan has heated.
Remove the pan from the oven and take off the lid. Lift the dough and parchment paper together and lower them into the pan. Be very careful – the pan is super hot.
I use a wooden spoon to press the parchment paper towards the sides of the pan if I see it pushing into the dough and giving it a funny shape.
Put the lid on the pan and put it in the middle of the preheated oven. Bake for 30 minutes.
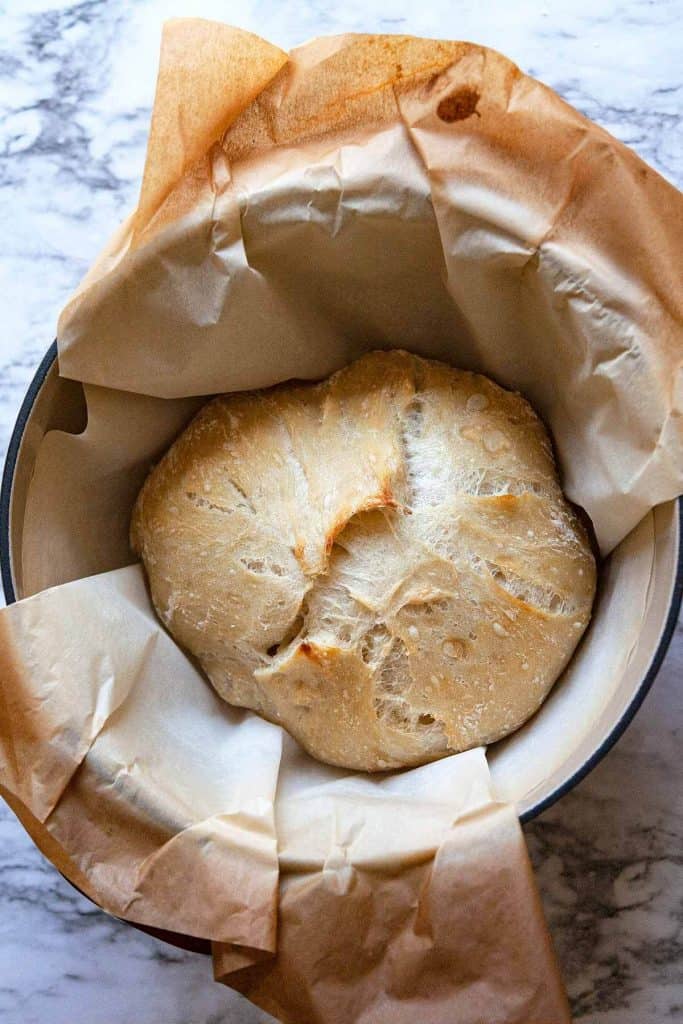
Remove the pan from the oven, remove the lid, and put the pan back into the oven to bake for about 10-15 minutes, until the crust is a beautiful golden brown.
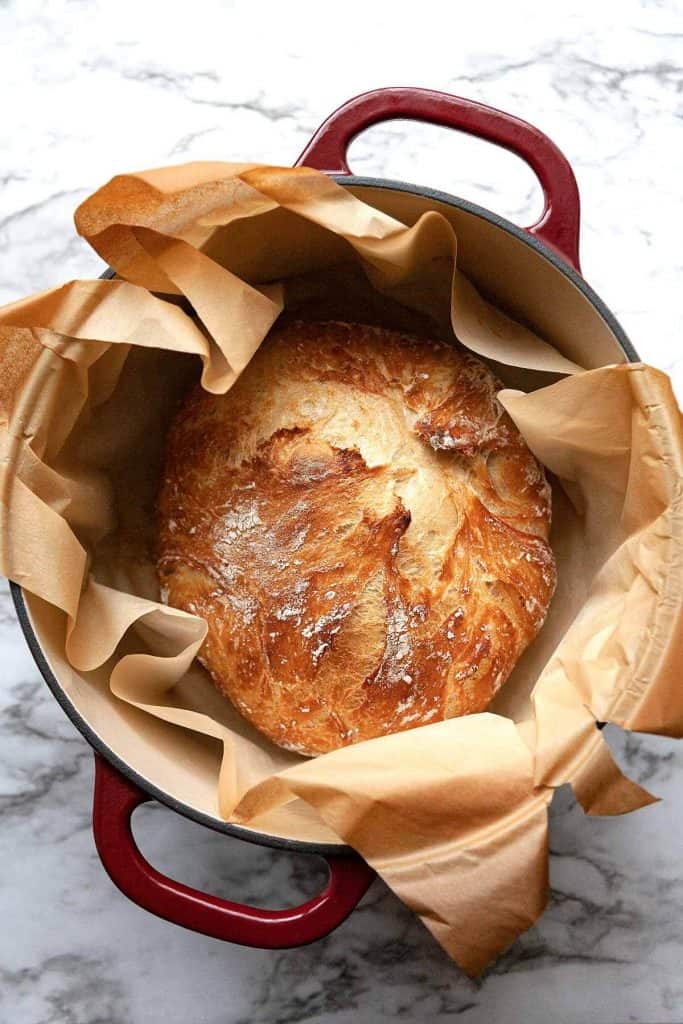
Remove the pan from the oven and lift the loaf out of the pan holding the four corners of the parchment.
Let the loaf rest for at least 10 minutes before cutting (or tearing) into it.
For a quicker no knead loaf and flexible rising times
- If you’re really in a hurry you can make a quicker no knead loaf by increasing the amount of yeast and using warmer water (about 110° F. Water above 130°F will kill the yeast). Use 2 teaspoons of yeast and let rise for 2 hours before proceeding with the recipe. This will sacrifice some flavor that comes from the long, slow rising.
- The recipe as written allows a 12-18 hour slow rise at room temperature.
- For even more flavor development, refrigerate the risen dough for up to 5 days. Allow to sit at room temperature for an hour or so before proceeding with the recipe.

Substitutions for a dutch oven
A dutch oven is a worthwhile investment for the easy and quality loaves that you will want to bake again and again. I use a 5.5 quart Lodge dutch oven that I picked up at Walmart for about $40. You can also find the 6 quart Lodge here and a less expensive one here.
No dutch oven? While using a dutch oven is ideal and gives the best results, here are some ways you can bake this no knead bread without a dutch oven:
- Any oven safe pot or pan with a tight fitting lid that can be heated up to 450° F.
- A covered metal pot
- If your lid has a plastic handle, cover the top with aluminum foil.
- An oven safe covered casserole dish
- In a baking pan with a pan of water on the bottom rack to create steam.
Recipe
Fullproof Artisan No Knead Bread
Equipment
Ingredients
- 3 cups flour, bread or all-purpose 425g
- ½ teaspoon instant or active dry yeast*
- 2 teaspoons salt
- 1 ½ cups room temperature water 340g
Instructions
- In a large mixing bowl, mix together the flour, yeast, salt, and water until a shaggy, rather wet dough ball forms.
- Cover with plastic and let sit on the counter at room temperature for 12-18 hours. When it’s done, the dough will be a little loose and the surface should be covered with tiny bubbles.
- When you’re ready to bake, preheat the oven to 450° F. Put a large, 5.5 - 6 quart Dutch oven with a lid into the oven to preheat for 30 minutes.
- Sprinkle flour on a piece of parchment paper and pour/scrape the dough out onto the paper. The dough should be somewhat stringy (from the gluten) and full of air bubbles.
- Sprinkle a little flour on top of the dough - just enough so that the dough doesn’t stick to your fingers. Gently form the dough into a ball shape by lifting up the edges onto the top of the ball and pushing on the sides with cupped hands.
- The shape will be a little messy – this is what gives the final loaf it beautiful, rustic appearance. The openings on top is where the cracks will form.
- Cover the dough with plastic or a kitchen towel until pan has heated.
- Remove the pan from the oven and take off the lid. Lift the dough and parchment paper together and lower them into the pan. Be very careful – the pan is super hot.
- I use a wooden spoon to press the parchment paper towards the sides of the pan if I see it pushing into the dough and giving it a funny shape.
- Put the lid on the pan and put it in the middle of the preheated oven. Bake for 30 minutes.
- Remove the pan from the oven, remove the lid, and put the pan back into the oven to bake for about 10-15 minutes, until the crust is a beautiful golden brown.
- Remove the pan from the oven and lift the loaf out of the pan holding the four corners of the parchment.
- Let the loaf rest for at least 10 minutes before cutting (or tearing) into it.
Notes
- Bread flour creates a chewier loaf with larger air pockets that rise upwards instead of outwards.
- Instant yeast can be mixed right in with the flour as shown here.
- If you are using active dry yeast, dissolve the yeast in water first according to the package directions. When it gets bubbly and foamy, mix with the rest of the ingredients.
- Dough can be refrigerated after rising for up to 5 days to develop more flavor. Let sit at room temperature for an hour before proceeding with recipe.
- Bread stays fresh for about 2 days. After that, I slice it and keep it in a ziplock bag in the freezer for up to 3 months.
Nutrition
Enjoy, friends!
Follow me on INSTAGRAM and PINTEREST for all the latest content and recipes!
Subscribe to FOODTASIA’S NEWSLETTER to receive fresh recipes straight to your inbox.
You might also like:


Kaelyn Denney
So yummy!! It's just as easy as it looks. 🙂
Kelly
Thanks so much, Kaelyn! So happy you liked it!
Julia lee
Hi, I would like to double the recipe. As I don’t have a bigger Dutch oven, can I put the two dough in separate pots (one small Dutch oven and one normal pot) and cook in oven same time as I have a big oven ? Thanks. Julia
Kelly
Hi Julia! Yes that should work!
Theresa
Hi, when do I put my dough into the fridge if I will bake it the next day? (Put after 12 - 18 hours for the first proofing) ? How much water do I need to dissolve my active dry yeast in your recipe? Thank you in advance for your advice.
Kelly
Hi Theresa! I put it in after the first proofing. I also just use the full amount of water to dissolve the active dry yeast.
Andrea
Dear Kelly, I absolutely have to try this recipe as soon as possible. Your No-Knead-Bread looks incredible. Love the easy recipe, the wonderful step-by-step pictures, your explanations and your alternatives...I have a lovely Dutch oven and your trick about lowering the unbaked loaf into the pre-heated pot is priceless. I cannot wait to give your recipe a try!
Stay safe and well, my friend!
Andrea
Kelly
It's so good and so easy! Thanks so much, Andrea!
Bonita Read
Made this no knead bread and WOW.. what a winner.. easy and delicious!! thank you. I am thinking of adding cut of pitted olives cut in half to the dough next time for and olive bread variation and a bit more flavour 🙂
Bonita
I meant to type 'cut up pitted black olives..."
Kelly
Thanks so much, Bonita! I'm so happy you liked it! The black olive addition sounds wonderful!
Emily
I am fresh out of parchment paper, is it absolutely necessary??
Kelly
Hi Emily, It helps get the loaf in and out of the pan, but it's not absolutely necessary.
Raymund
For a no knead bread, that looks fantastic. Keeping this recipe
Kelly
I'm leary of most no knead breads as I've had a number of them that were unedible and went straight to bread crumbs. This one is excellent! Thanks so much, Raymund!
Gracie
I have a 2.8 qt Dutch oven. Is this too small to make this bread?
Kelly
I haven't tried it in a smaller pan. It might depend on how wide the pan is on the bottom. I'm guessing it would rise more upwards instead of outwards if it was narrower on the bottom than the 6 quart pan. Do let me know how it turns out if you try it.
marcie
I've been making no knead bread too and absolutely love how easy it is! Your bread is absolute perfection Kelly!
Kelly
It's wonderful! Thanks so much, Marcie!
Mary Ann | The Beach House Kitchen
Great post Kelly! Thanks so much for sharing all the important info! I want to reach into my screen and grab a slice!
Kelly
Thanks so much, Mary Ann!
Cheyanne @ No Spoon Necessary
Eeeee!! This loaf looks absolutely PERFECT!!! There really is nothing better than the smell of freshly baked bread... and don't even get me started on the taste! I'm literally drooling over this loaf! I love that crust and that fluffy, airy interior! I can't wait to make this! Pinned!
Kelly
It's wonderful! Thanks so much, Chey!
Liz
I made this bread first 10 years ago and have made it twice so far this year! So darn easy, isn't it??? Yours looks cookbook worthy and I bet it tasted terrific, too! Stay well, my friend!
Kelly
We can't stop making it, it's so good! Thanks so much, Liz!
Ron
Well done Kelly! I love cooking bread in our dutch oven as it produces such good results. Thanks for sharing.
Kelly
The dutch oven is definitely a worthwhile investment for the quality breads it makes. Thanks so much, Ron!
Kathy @ Beyond the Chicken Coop
I love everything about this bread! The crust, the texture, the holes, and how easy it is to make! This is a perfely delicious loaf of bread!
Kelly
We love it! Thanks so much, Kathy!
All That I'm Eating
What a brilliant bread recipe! Perfect for busy lives too as you can mix it one day and bake it the next.
Kelly
It's so easy and so good! Thanks so much, Caroline!