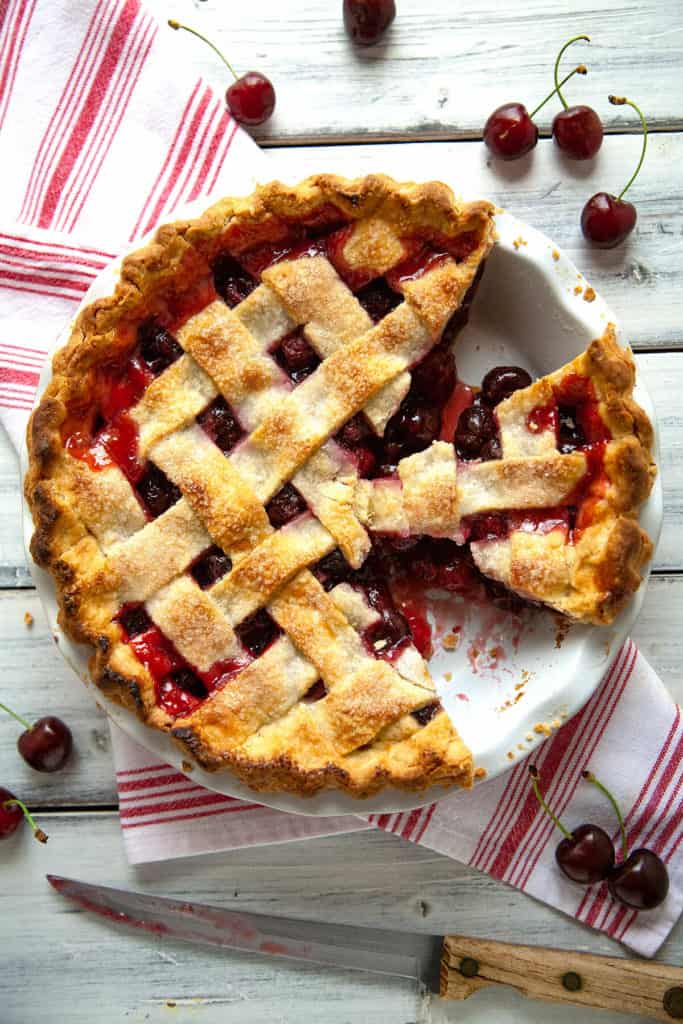
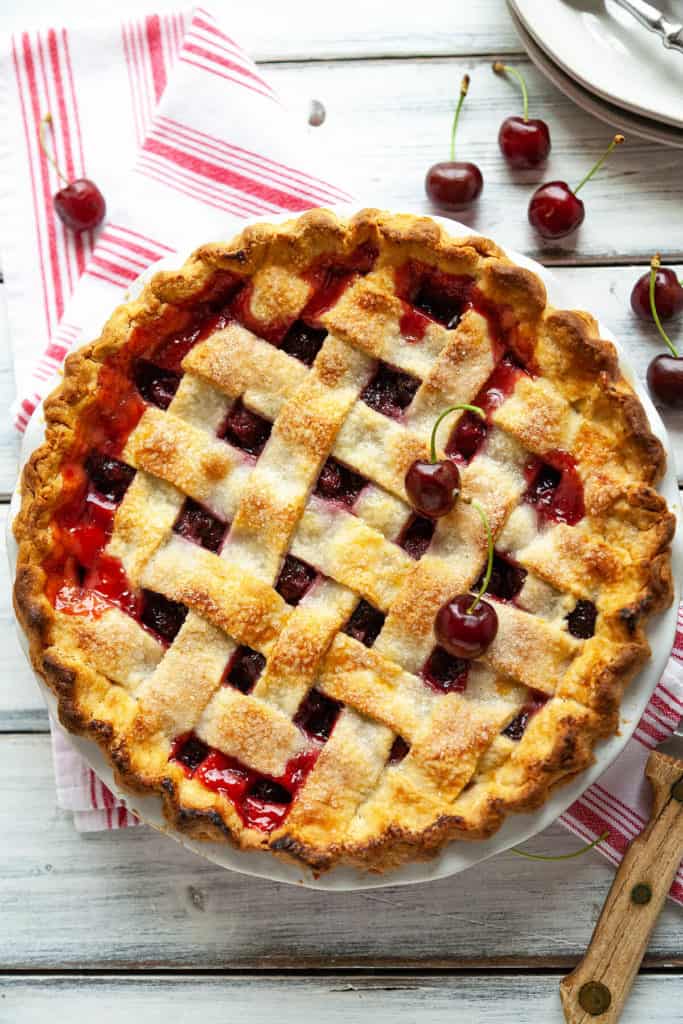
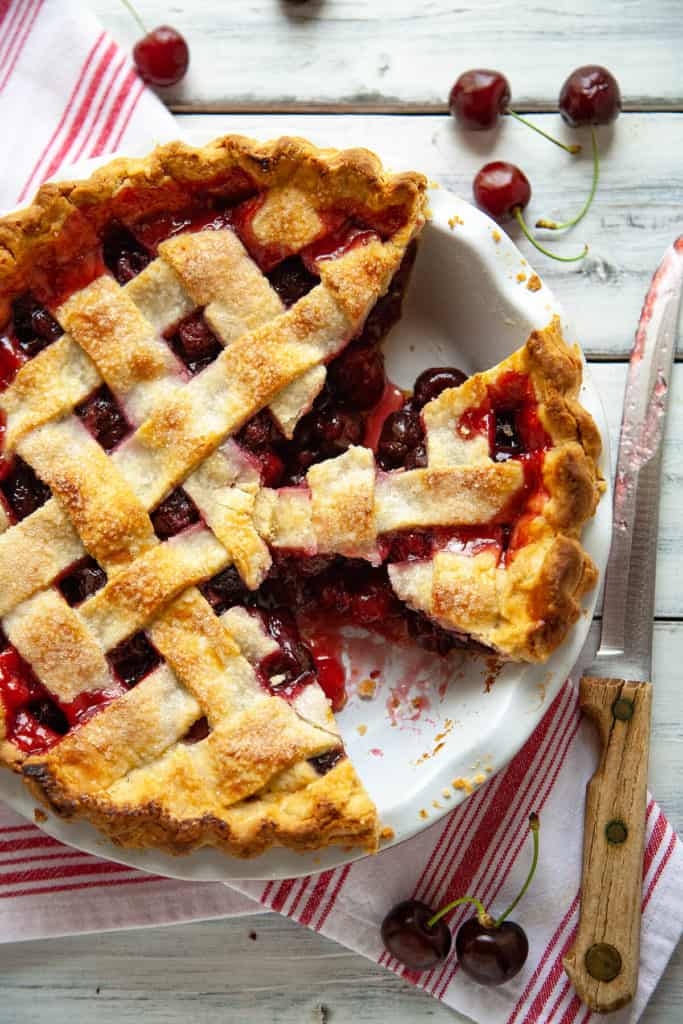
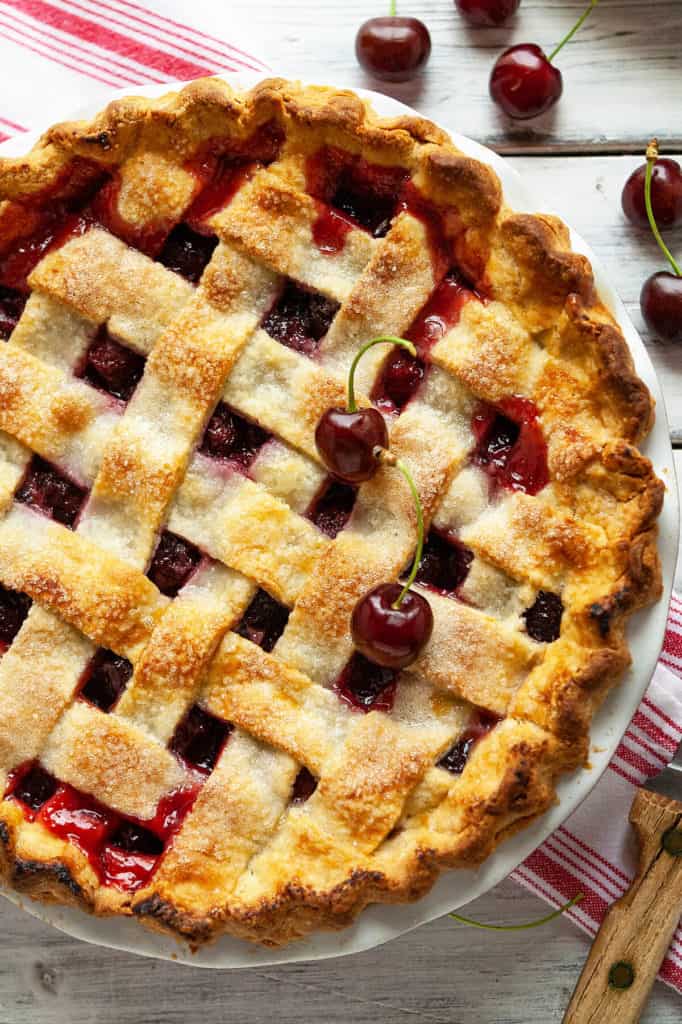
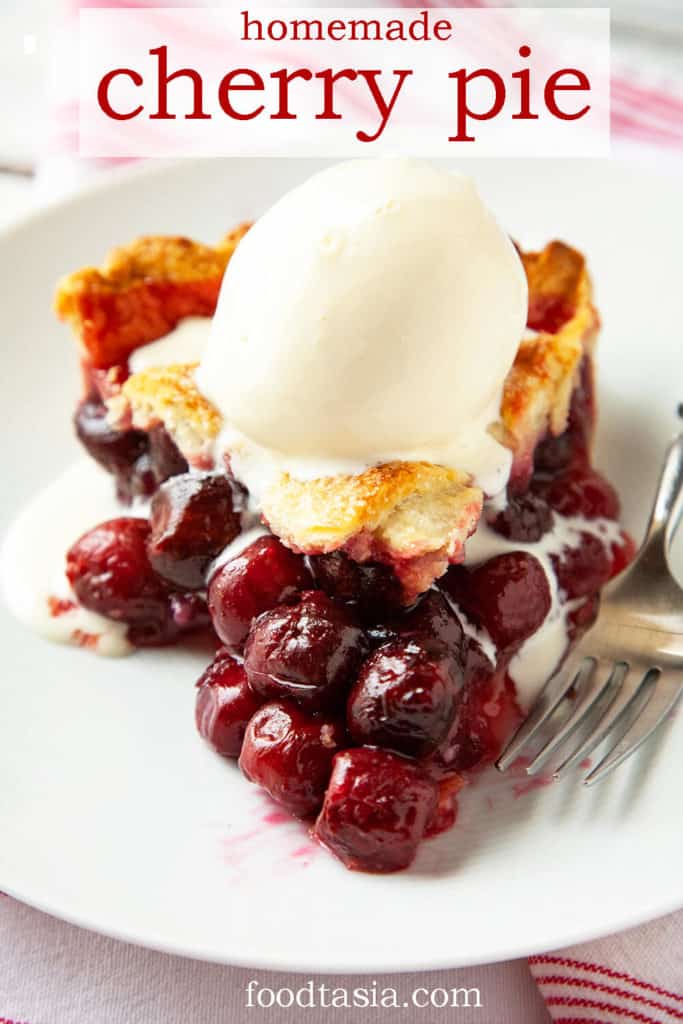
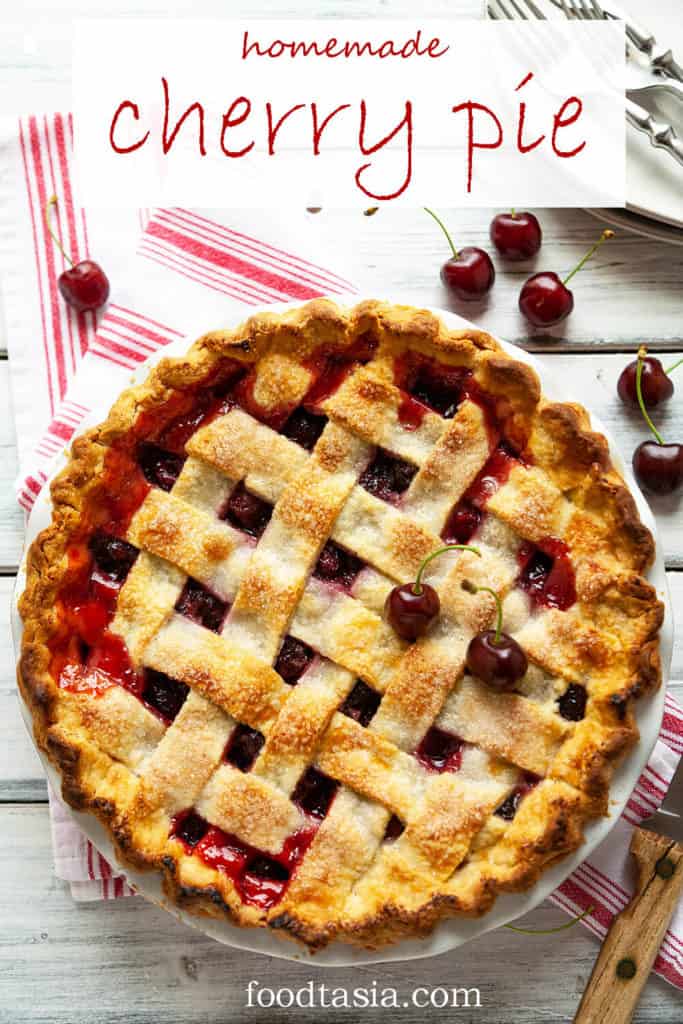
Homemade Cherry Pie is a summertime classic with its buttery, flaky crust and a beautiful, juicy cherry filling. It's sure to be a family favorite!

Jump to Section
Why I love this recipe
Cherry is my absolutely favorite pie and this recipe is the best I’ve ever tasted. It has a pure, bright cherry flavor, heightened and made more complex by the perfect balance of sugar, lemon juice, and salt. Salt is all too often left out of or under used in sweets, but it’s essential to bring out the natural, complex flavors. This Cherry Pie is perfectly thickened with tapioca or corn starch, it's never runny or goopy.
Which Cherries to Use
The cherry filling can be made with your favorite cherry variety. I made this recipe with dark sweet cherries because they’re the most widely available variety. You can use rainier or a mix of rainier and dark sweet. If you’re lucky enough to find sour cherries, reduce the amount of lemon juice and use a little extra sugar if needed.
How to pit cherries
Cherries are a snap to pit with a cherry pitter. It’s a great investment if you plan to pit a lot of cherries. I use a hand pitter that’s pretty cheap. If you pit lots and lots of cherries, there’s a model that can pit 25 pounds of cherries an hour. How awesome is that?!
Can I use frozen cherries?
You can definitely use frozen cherries or even jarred sour cherries for Cherry Pie. I use fresh cherries when they're in season in the summer. And a Cherry Pie using frozen cherries always shows up on the Thanksgiving table. If using frozen pitted cherries, you can let them thaw to soften first, however that's not absolutely necessary. If using jarred sour cherries, be sure to drain them well.
Which thickener to use
I use quick cooking tapioca because it keeps the filling clear and shiny without getting gloopy. If you don’t have tapioca on hand, cornstarch is the next best option. I’ve given measurements for both below.
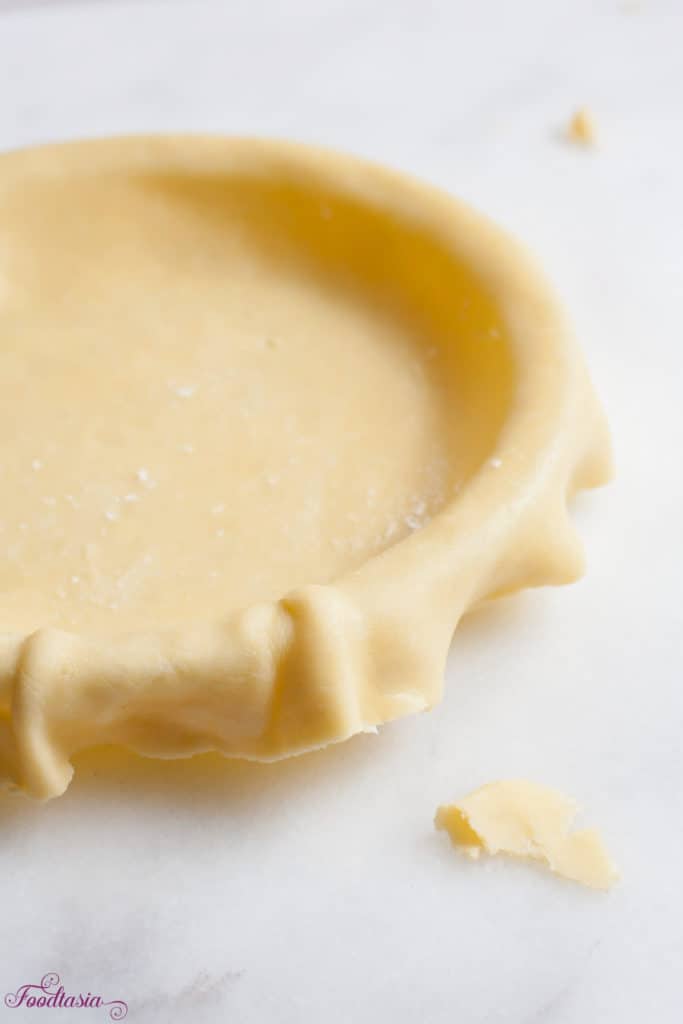
Use a good quality pie crust
Because the crust is such an important part of a pie, it’s important for it to be mouthwateringly good. I use my no-fuss, all-butter Flaky Pie Crust. It’s light, tender, and full of melt-in-your-mouth butter flavor. Best of all, it’s dependable and easy to work with. Check out my step by step tutorial here.
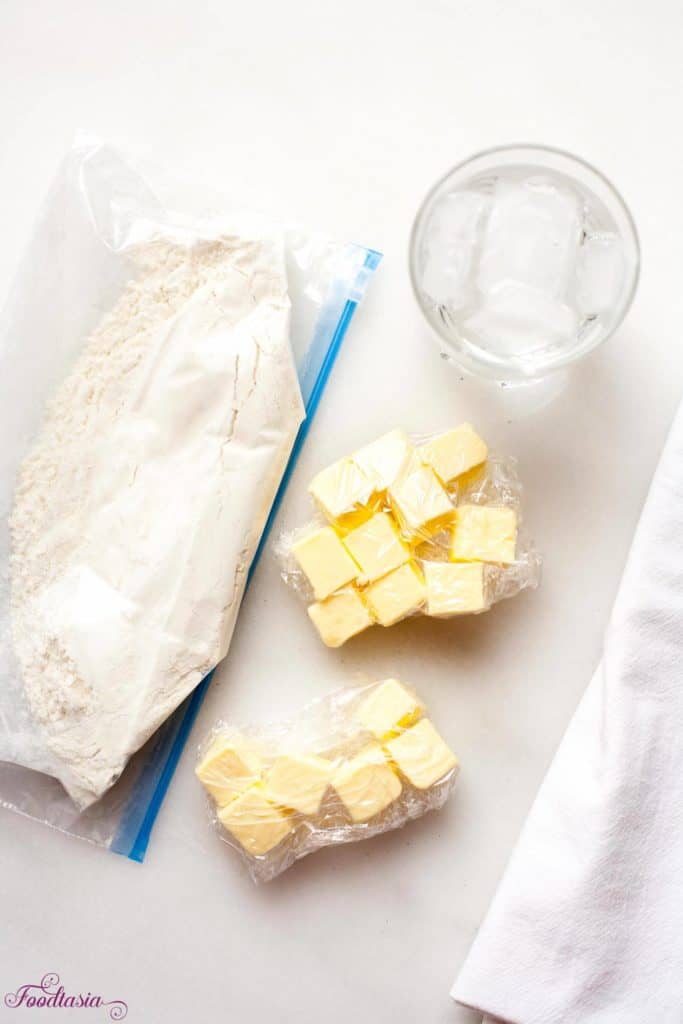
Keep the pastry ingredients cold
It’s important to keep the ingredients for the pie crust cold. The pastry will be tender and flaky. Cold pie dough is so much easier to work with and keeps its shape better. This is especially helpful when transferring the rolled crust to the pie dish and creating the lattice on top. Freezing the pie for 30 minutes before putting it into the oven helps keep the shape of the crimped edges when baking.
Putting the chilled pie into a 425 F degree oven also helps keep the shape of the crimped edges. A not cold enough pie and a not hot enough oven lead to the pretty crimped edges melting into a not-so-pretty blob.
How to make Homemade Cherry Pie
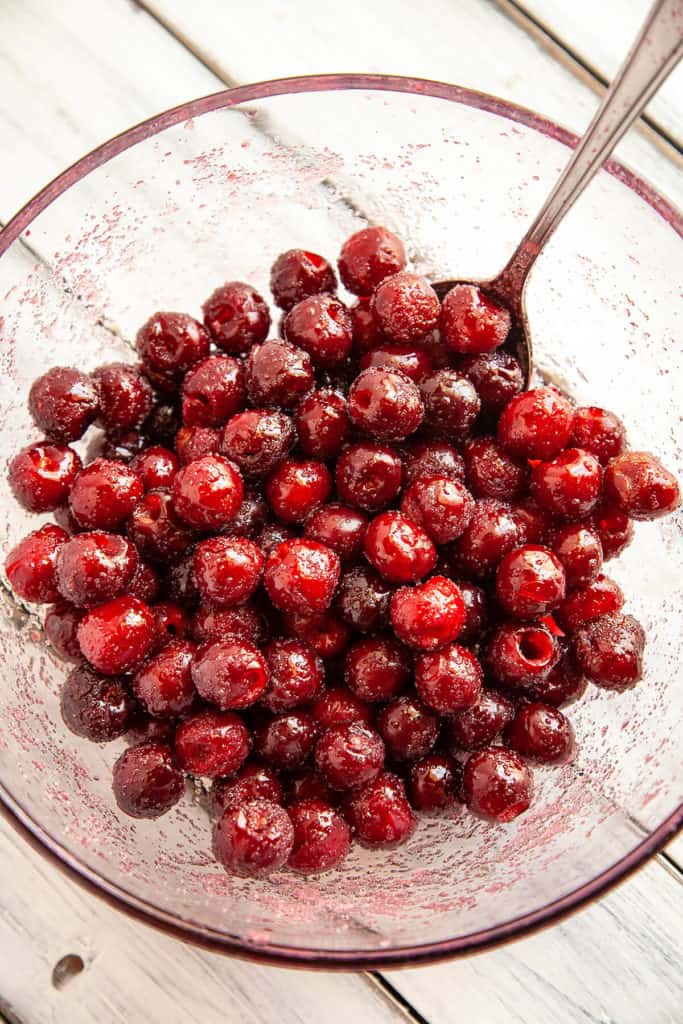
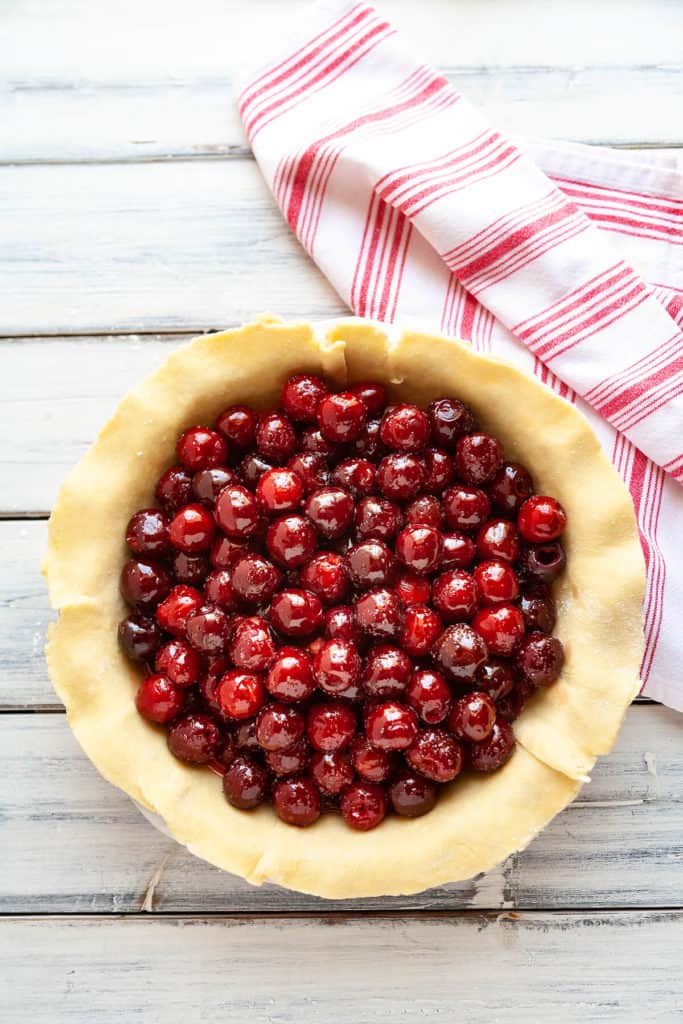
Making Homemade Cherry Pie is pretty easy. I like to pit the cherries over a mixing bowl that has the sugar and lemon juice already in it. This catches any of the juices, and stirring the cherries into the lemon and sugar every so often prevents the cherries from browning.
Mix in the tapioca and salt. It will look like wet sand on the cherries.
If you are using cornstarch instead of tapioca, pour off some of the juices that collect on the bottom of the mixing bowl into a smaller bowl. Dissolve the cornstarch into this juice, then pour it all back on the cherries. Add the salt.
Roll out the chilled pie crust to a 13-inch circle, working quickly and keeping everything as cold as possible. Check out my step by step instructions here. Lift the pie crust and fit onto a 9-inch deep dish pie dish. Trim the overhang to about a half an inch all around. Pour the cherry filling into the prepared crust and gently press down to even out the cherries. Dot the top of the pie with cubes of butter.
How to make a lattice crust
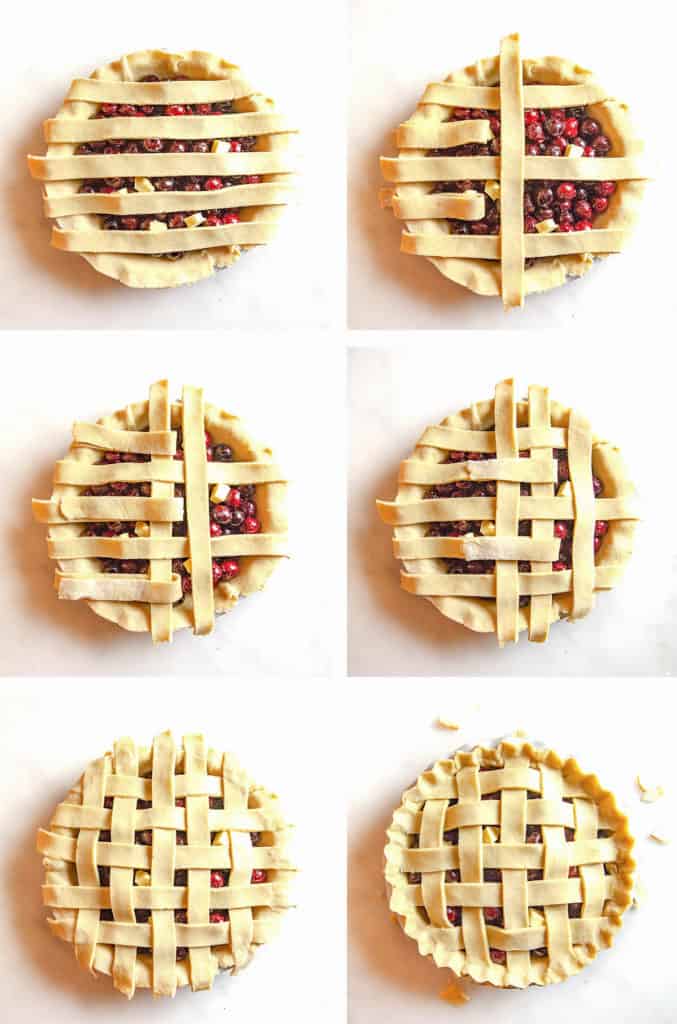
Roll out the second chilled pie crust to a 13-inch circle. Cut the circle into 1-inch wide strips.
Place 5 strips of dough horizontally over the pie filling, with the longer strips in the center and shorter strips towards edges. Don’t forget to save some of the longer strips for the vertical rows.
Fold the 2nd and 4th strips halfway back and place a long vertical strip of dough in the center of the pie. Fold the 2nd and 4th strips back over the vertical strip.
Next, fold back the 1st, 3rd, and 5th strips and place a vertical strip next to the first one. Fold the 1st, 3rd, and 5th strips back over the second vertical strip.
Next, fold the 2nd and 4th strips back and place a short vertical strip of dough on the outer edge of the pie. Fold the 2nd and 4th strips back over the third vertical strip.
Complete the same steps for the other half of the pie.
Fold the edges of the lattice under the excess of the bottom crust. Press into an even rim of dough and flute or crimp as desired.
How to bake
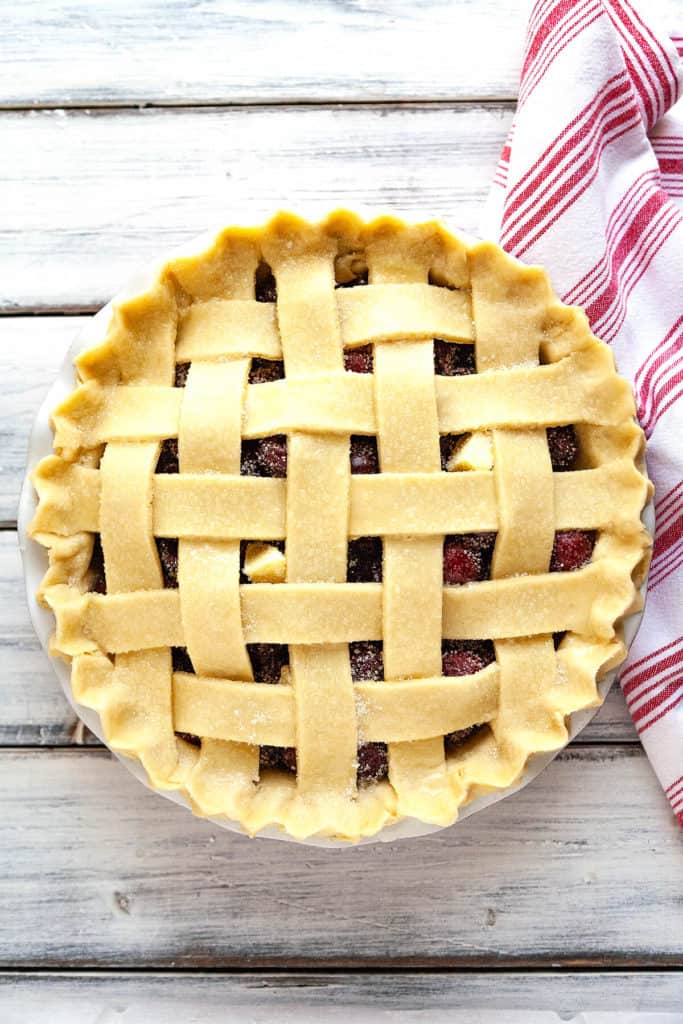
Freeze the pie for about 30 minutes before baking. This helps the top crust and crimped edge to keep its shape while baking.
Brush the top crust of the pie with egg wash. I use an egg white mixed with 1 tablespoon water. For an even more golden color, you can use the whole egg. You can also mix the egg with milk or cream. Sprinkle regular granulated sugar or coarse raw sugar over the top crust.
Bake the pie on a non-insulated, metal baking sheet on the bottom third of a 425 F oven for 20 minutes. Lower the heat to 375 F and continue baking until the crust is golden brown and the cherry filling is bubbling steadily, even in the center of the pie. If the crust starts to over-brown, cover the top with a tented piece of aluminum foil.
The baking time can vary considerably depending on the thickness and type of pie plate, the amount of top crust, how long the pie was in the freezer, and variations in oven temperatures. A rough time is about an hour, but judge the doneness of the pie based on how the pie looks, not the time.
How to prevent a soggy bottom
Here are a few tips that have helped me over the years to avoid the dreaded soggy bottom on a pie crust:
The amount of thickener in the pie should be suitable for the juiciness of the fruit you are using. Cherries are pretty juicy and need the perfect balance of thickener so the filling is juicy but not watery.
Brushing egg wash on the bottom crust before putting in the filling can help waterproof the crust. I use the same egg-white wash that I use on the top of the pie.
Baking the pie on a metal baking sheet helps the bottom crust cook more quickly so it’s less likely to become soggy. It also catches any spills. Be sure not to use an insulated baking sheet.
Freezing the pie before baking for about 30 minutes, or longer if desired.
A glass pie dish conducts heat more quickly and evenly to the dough, producing a crispier crust than heavy ceramic or stoneware.
Let the pie cool before cutting
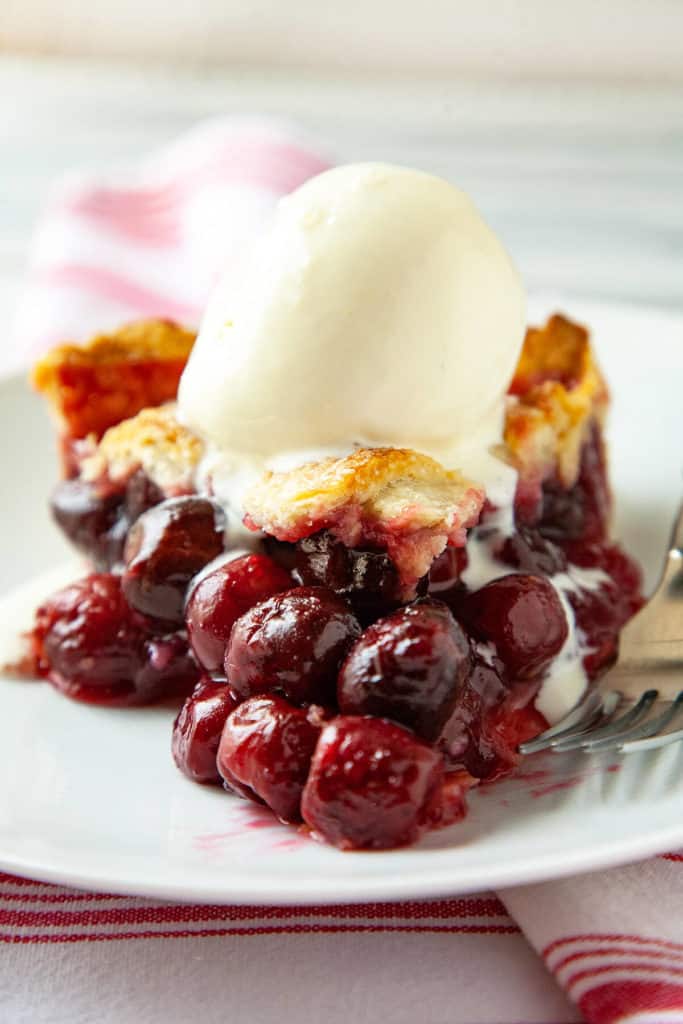
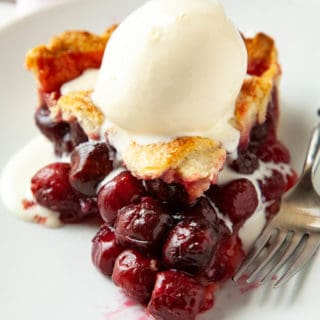
This is easily the hardest part of making Cherry Pie! The pie needs to cool for several hours until it’s almost room temperature, no higher than 85 degrees F. This allows the thickener to set. If you cut into the pie too early, it will be runny and thin. More like cherry soup than cherry pie.
How to freeze
Cherry Pie can be frozen whole before baking, or after baking, either whole or in slices. Put the pie in the freezer. When it’s firm enough, wrap it well with several layers of plastic wrap. It will keep frozen for several months.
To freeze slices of baked Cherry Pie, let the pie cool completely. Slice the pie into slices. I like to remove at least one piece for now so that I can spread the pieces out in the pie dish so they don’t stick when frozen. Put the pie still in the pie dish into the freezer and freeze the pie. When it is firm, remove the individual slices and wrap individually in plenty of plastic wrap.
How to bake a frozen pie
If the pie was frozen unbaked, just bake the frozen pie straight from the freezer following the same directions given. It may take a little longer to finish.
If the pie was baked before freezing, you can either put it in the oven straight from the freezer or let it sit on the counter for a while to thaw before heating in the oven. Heat at 350 F until the pie is warmed through. Put a piece of tented foil on top of the pie if it begins to brown too much.
Individual pieces of frozen pie can be heated in the microwave until warm.
Recipe
Homemade Cherry Pie
Ingredients
Cherry Pie Ingredients:
- 6 cups cherries pitted [from 2.25 lbs (1021g fresh, unpitted cherries])
- 2 tablespoons lemon juice 28g
- 1 cup sugar 198g
- 3 ½ tablespoons quick-cooking tapioca 42g (OR 5 tablespoons (35g) corn starch)
- ½ teaspoon salt 3g
- 1 tablespoon butter diced (to dot the top) 14g
- 1 Recipe for Flaky Double Pie Crust
Egg Wash:
- 1 egg white (or 1 whole egg)
- 1 tablespoon water (or milk or cream if using whole egg)
- 1 tablespoon regular or coarse sugar
Instructions
- Put the sugar and lemon juice into a large mixing bowl. Pit the cherries over the bowl, stirring the cherries into the lemon and sugar every to prevent the cherries from browning.
- Mix in the tapioca and salt. It will look like wet sand on the cherries.
- OR
- If you are using cornstarch instead of tapioca, pour off some of the juices that collect on the bottom of the mixing bowl into a smaller bowl. Dissolve the cornstarch into this juice, then pour it all back on the cherries. Add the salt.
- Roll out the chilled pie crust to a 13-inch circle, working quickly and keeping everything as cold as possible. See notes for the link to my step-by-step tutorial on how to make a Flaky Pie Crust.
- Lift the pie crust and fit onto a 9-inch deep dish pie dish. Trim the overhang to about a half an inch all around.
- Pour the cherry mixture into the prepared crust and press down gently to even out the cherries. Dot the top of the pie with cubes of butter.
To make the lattice crust:
- Roll out the second chilled pie crust to a 13-inch circle. Cut the circle into 1-inch wide strips.
- Place 5 strips of dough horizontally over the pie filling, with the longer strips in the center and shorter strips towards edges. Don’t forget to save some of the longer strips for the vertical rows.
- Fold the 2nd and 4th strips halfway back and place a long vertical strip of dough in the center of the pie. Fold the 2nd and 4th strips back over the vertical strip.
- Next, fold back the 1st, 3rd, and 5th strips and place a vertical strip next to the first one. Fold the 1st, 3rd, and 5th strips back over the second vertical strip.
- Next, fold the 2nd and 4th strips back and place a short vertical strip of dough on the outer edge of the pie. Fold the 2nd and 4th strips back over the third vertical strip.
- Complete the same steps for the other half of the pie.
- Fold the edges of the lattice under the excess of the bottom crust. Press into an even rim of dough and flute or crimp as desired.
To bake the pie:
- Freeze the pie for about 30 minutes before baking. This helps the top crust and crimped edge to keep its shape while baking.
- Brush the top crust of the pie with egg wash. I use an egg white mixed with 1 tablespoon water. For an even more golden color, you can use the whole egg. You can also mix the egg with milk or cream. Sprinkle regular granulated sugar or coarse raw sugar over the top crust.
- Bake the pie on a non-insulated, metal baking sheet on the bottom third of a 425 F oven for 20 minutes. Lower the heat to 375 F and continue baking until the crust is golden brown and the cherry filling is bubbling steadily, even in the center of the pie. If the crust starts to over-brown, cover the top with a tented piece of aluminum foil.
- The baking time can vary considerably depending on the thickness and type of pie plate, the amount of top crust, how long the pie was in the freezer, and variations in oven temperatures. A rough time is about an hour, but judge the doneness of the pie based on how the pie looks, not the time.
- Let the pie cool completely to room temperature, no more than 85 degrees before slicing.
- The pie will keep for 3 days at room temperature or in the refrigerator.
Notes
- See my Flaky Pie Crust post for recipe and a step by step tutorial on making pie crust.
- About 2 pounds (900g) of frozen cherries can be used. Let thaw until softened.
Nutrition
Enjoy, friends!
Follow me on INSTAGRAM and PINTEREST for all the latest content and recipes!
Subscribe to FOODTASIA’S NEWSLETTER to receive fresh recipes straight to your inbox.
You might also like:


Susan says
Gorgeous cherry pie! If I'm not just popping them in my mouth, my second choice is having them in a pie 🙂
Kelly says
Cherry is my fave! Thanks so much, Susan!
David @ Spiced says
You make an excellent point about salt in sweet recipes, Kelly! I know it seems counter intuitive, but you said it best. The salt helps bring out the other flavors, and (assuming you don't use too much salt) you can't actually taste it. Funny how that works, right? So this cherry pie is hands down one of the prettiest pies I've ever seen! You nailed it. I kinda want to just curl up on the couch with that pie dish. Would that be allowed??
Kelly says
That would definitely be allowed, David! My first hint that salt brought out the sweet flavor was when I would see my dad salting his cantaloupe. And times when I've forgotten to put the salt in a chocolate chip cookie or a banana bread, they've turned out very flat tasting. Samin Nosrat sums it all up so well in her Salt, Fat, Acid, Heat.
Monika Dabrowski says
Your pie looks absolutely perfect. I adore cherry desserts and your are right, the hardest thing about making a pie is waiting for it to cool before cutting:)
Kelly says
Sometimes I can't wait and I end up with cherry soup! Thanks so much, Monika!
nancyc says
Yum! This cherry pie looks so good!
Kelly says
Thanks so much, Nancy!
Cheyanne @ No Spoon Necessary says
I absolutely LOVE cherries! I just wish their season was longer. This pie looks like the absolutely perfect way to enjoy them! That buttery crust and that juicy, fresh filling! I'll take the whole pie please - with a few scoops of vanilla ice cream on top! Drooling!!!! Pinning to try!
Kelly says
We've eaten four cherry pies in as many days! Can't seem to get enough of them! Thanks so much, Chey!
mjskitchen says
Your pie crust is gorgeous, your cherries are mouthwatering and the pie - well, I'm speechless. This pie would last 2 days in this house.
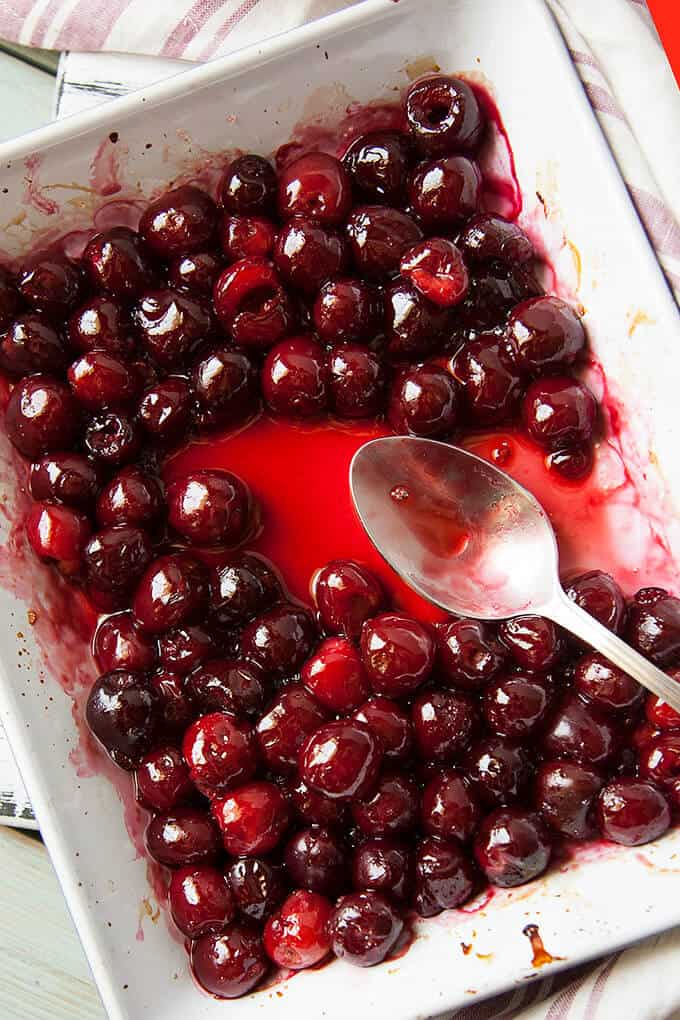
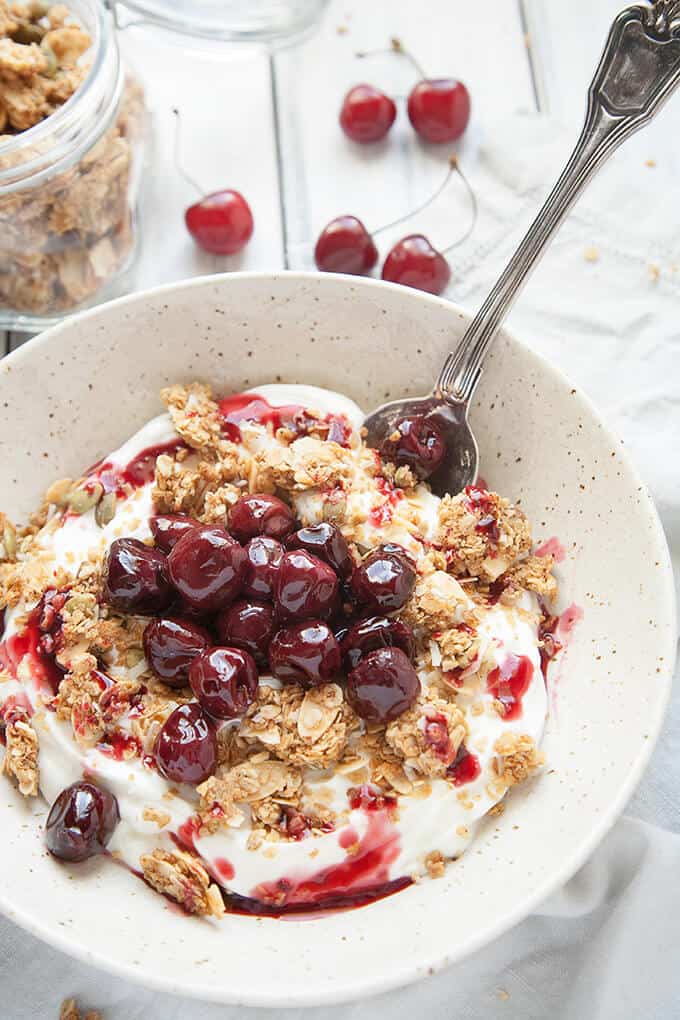
Thanks for the links to your other cherry recipes. We love a breakfast of hot fruit over cold yogurt with granola. So tomorrow, I'll be roasting up some cherries.
Kelly says
Aw, thanks so much, MJ! The roasted cherries are magical!
Haylie / Our Balanced Bowl says
Kelly, I absolutely love everything about this recipe!! The cherries look so juicy and bursting with flavor! The vanilla ice cream on top is a must and I LOVE that you gave step by step photos on how to do a lattice crust because Lord knows I certainly can't do that on my own! LOL! Awesome, awesome recipe and photos as always!!
Kelly says
Aw, thanks so much, Haylie! The lattice is pretty easy, but if I'm not paying close enough attention I get myself mixed up and make a mistake in my counting, lol (as seen in some of the pictures!)
Laura says
That is a gorgeous Cherry Pie! Totally my favorite, too! I love the hint of freezing before baking- going to give that a try!
Kelly says
I find that freezing the pie keeps the crimped edge looking nice instead of melting out of shape. Thanks so much, Laura!
annie@ciaochowbambina says
Is there anything more homey than homemade cherry pie? I adore how absolutely stunning and information-filled your posts are! Not to mention delicious!!
Kelly says
Cherry Pie is my fave! Thanks so much, Annie! So glad the info is helpful!
marcie says
Cherry pie has always been a favorite of mine, and this is such a beautiful tutorial! I've never made a lattice crust and I'm sure I could do it following your easy instructions. 🙂 The cherries look so plump and juicy and I'd love a big slice!
Kelly says
Cherry Pie is definitely a summer essential! The lattice is surprisingly easy. You just have to be able to count to five. Which I sometimes can't do! Thanks so much, Marcie!
Mary Ann | The Beach House Kitchen says
OMG! Those cherries look amazing Kelly! And your pie crimping skills are seriously top shelf! I NEED lessons!
Kelly says
The secret to crimping is freezing the pie before baking. That way it holds its shape instead of melting into a blob! Thanks so much, Mary Ann!
Dawn - Girl Heart Food says
25 pounds of cherries in an hour? That's pretty awesome! Such a handy tool to have for sure! This pie is absolutely BEAUTIFUL, Kelly! Nothing like homemade and this one looks sooooo good! Love the lattice work too 🙂
Kelly says
You sure can get a lot more cherries done with that pitter! Thanks so much, Dawn!
angiesrecipes says
o my...this looks out of this world delicious with all sweet juicy berries and that melt-in-mouth pie crust! I am seriously drooling over here.
Kelly says
Cherry Pie is pretty wonderful! Thanks so much, Angie!
Leanne says
I'm all about the fresh cherries this time of year, and this is one gorgeous cherry pie Kelly! The cherry filling looks so juicy, and the crust looks perfectly flaky! And as usual, you've included some helpful tips and steps, which is always appreciated! Happy Monday Kelly!
Kelly says
We're so loving the fresh cherries! And Cherry Pie is pretty wonderful! Thanks so much, Leanne!
2pots2cook says
Dear Kelly, if you will ever decide to have cooking class, wherever, I'd be happy to join ! Marvelous !
Kelly says
Thanks so much, Davorka! That's actually one of my dreams!