Foodtasia

  • Recipes
  • Subscribe
  • About
menu icon
go to homepage
  • Recipes
  • Subscribe
  • About
    • Facebook
    • Instagram
    • Pinterest
  • search icon
    Homepage link
    • Recipes
    • Subscribe
    • About
    • Facebook
    • Instagram
    • Pinterest
  • ร—
    Foodtasia

    Classic Macaroni Salad (Creamy, Easy & Perfect for BBQs)

    May 26, 2018 by Kelly 2 Comments

    Overhead view of creamy macaroni salad in a white ceramic bowl, filled with elbow pasta, diced carrots, celery, red bell pepper, and onion, with two metal spoons

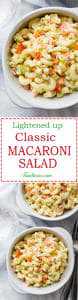
    Nothing says summer like a chilled bowl of creamy macaroni salad. Whether you're packing it for a picnic, serving it at a backyard BBQ, or prepping meals for the week, this classic recipe always delivers. Itโ€™s simple, comforting, and perfect for potlucks, family reunions, or your next backyard bash.

    Overhead view of creamy macaroni salad in a white ceramic bowl, filled with elbow pasta, diced carrots, celery, red bell pepper, and onion, with two metal spoons resting beside a small plate.

    This is the macaroni salad I make on repeat all summer long. Itโ€™s quick to throw together, full of flavor, and always the first dish to disappear. For more crowd-pleasers, try my Easy Italian Antipasto Pasta Salad, Pasta Caprese, or Greek Orzo Saladโ€”which are fresh, flavorful, and great alongside grilled meats or on their own.

    Overhead view of creamy macaroni salad in a white ceramic bowl, filled with elbow pasta, diced carrots, celery, red bell pepper, and onion, with two metal spoons resting beside a small plate.

    Jump to Section

    • My Secrets to the BEST Macaroni Salad
    • Ingredients
    • How to make Macaroni Salad Step by Step
    • COOK THE PASTA
    • MAKE THE DRESSING
    • ADD THE VEGGIES
    • COMBINE
    • Make-Ahead & Storage Tips
    • Tips for Success
    • What to Serve with Macaroni Salad
    • Recipe
    • Classic Macaroni Salad

    My Secrets to the BEST Macaroni Salad

    • Lots of fresh, crunchy veggies
    • A fresh and creamy dressing thatโ€™s never gloopy or heavy
    • The perfect balance of tangy and a touch of sweetness

    Forget the heavy, overly mayo-packed versions. My trick? I swap a portion of the mayo for plain yogurt. It lightens things up while keeping that classic creamy texture. The result is tangy, fresh, and still rich enough to satisfy.

    close up of creamy macaroni salad in a white ceramic bowl, filled with elbow pasta, diced carrots, celery, red bell pepper, and onion.

    Ingredients

    bowls of macaroni salad ingredients
    • Lots of crunchy veggies โ€“ carrot, celery, bell pepper (red or green), sweet pickle relish, and onion.
    • Sugar, vinegar, mustard โ€“ for a sweet and tangy dressing. My favorites are apple cider vinegar and Dijon mustard, but any type of vinegar and regular mustard are good too.
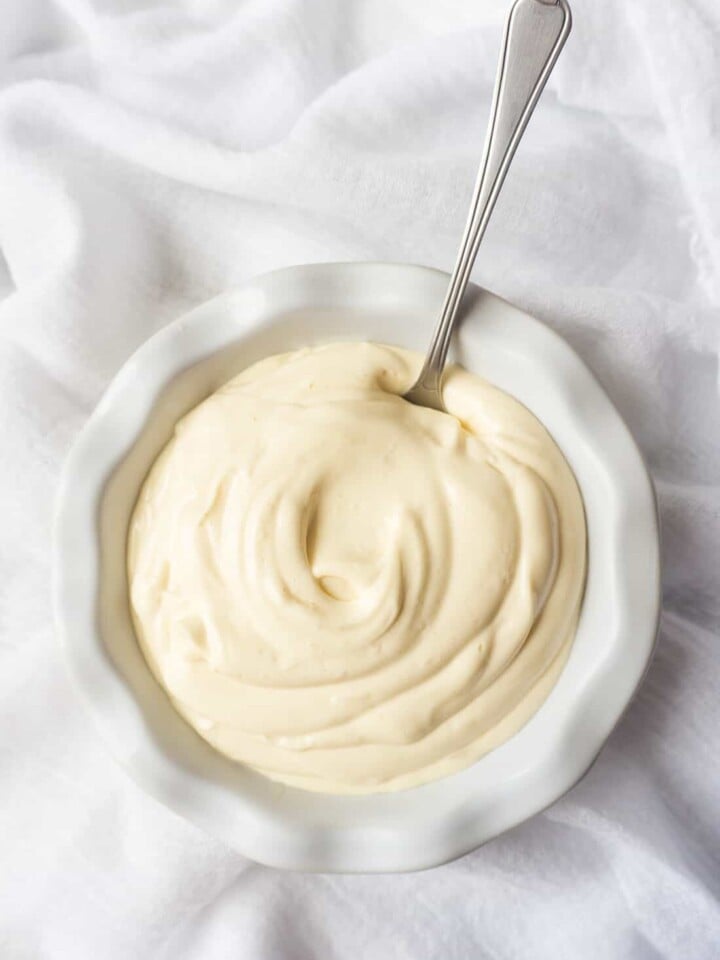
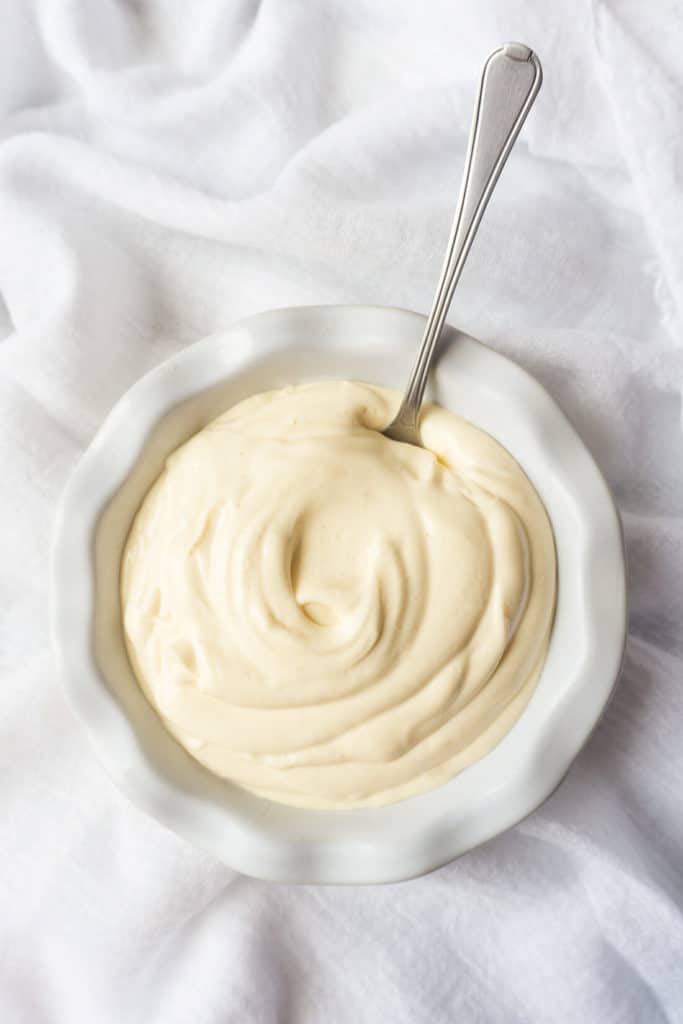
    • Mayo - For the very best flavor I use Homemade Mayonnaise. If you don't use homemade mayonnaise, use a good brand, like Hellman's.
    • Yogurt - I use full-fat, plain yogurt, not Greek yogurt. This keeps the dressing fresh, a little tangy, and not too thick. If youโ€™re craving that deli-style richness, sour cream works beautifully too.

    Want a traditional mayo-only version? Just use 2 full cups of mayo and skip the yogurt altogether.

    How to make Macaroni Salad Step by Step

    1

    COOK THE PASTA

    Boil macaroni in salted water until al dente. Drain, rinse under cold water, and toss with ยฝ tablespoon vegetable oil to keep it from sticking.

    Side-by-side images showing the process of cooking pasta for macaroni salad. The left image shows a hand holding a wooden spoon with cooked elbow macaroni over a pot of boiling water. The right image shows the drained macaroni in a metal colander, ready to cool.

    2

    MAKE THE DRESSING

    In a large bowl, whisk together mayo, yogurt, vinegar, mustard, sugar, salt, and pepper.

    Side-by-side images showing how to make dressing for macaroni salad. The left bowl contains unmixed ingredients like mayo, mustard, and seasonings. The right bowl shows the smooth, creamy dressing after mixing, with a whisk beside it.

    3

    ADD THE VEGGIES

    Stir in chopped celery, onion, carrots, bell pepper, and relish.

    Side-by-side images showing chopped vegetables being mixed into dressing for macaroni salad. The left image shows a bowl with diced carrots, celery, red bell pepper, and relish arranged on top of the creamy dressing. The right image shows the ingredients fully mixed into the dressing, creating a colorful, well-blended mixture.

    4

    COMBINE

    Fold in the cooled pasta and mix until everythingโ€™s well coated.

    Side-by-side images showing the final step of making macaroni salad. The left image shows cooked elbow macaroni added to the bowl of vegetable-filled dressing. The right image shows everything gently mixed together into a creamy, colorful macaroni salad.

    Overhead view of creamy macaroni salad in a white ceramic bowl, filled with elbow pasta, diced carrots, celery, red bell pepper, and onion, with two metal spoons

    Make-Ahead & Storage Tips

    Macaroni salad actually gets better after a little time in the fridge! Here's how to keep it fresh:

    • Make Ahead: Can be made up to 2 days in advance.
    • Store: Keep in an airtight container in the fridge for up to 5 days.
    • Do Not Freeze: The mayo-based dressing and crunchy veggies don't hold up well in the freezer.

    Tips for Success

    • Salt the pasta water with plenty of salt so the pasta doesn't taste flat. I use about 1 ยฝ teaspoons per quart of water.
    • Rinse the pasta with cold water after boiling to stop the cooking and cool it quickly.
    • Soak the diced red onion in cool water for 10 minutes to soften the flavor.
    • Toss pasta with oil to keep it from clumping and drying out.

    What to Serve with Macaroni Salad

    Overhead view of two bowls of creamy macaroni salad in a white ceramic bowls, filled with elbow pasta, diced carrots, celery, red bell pepper, and onion, with a metal spoon

    Macaroni salad pairs wonderfully with grilled meats like burgers, hot dogs, ribs, and chicken. Try it alongside easy, baked Cajun Chicken Breasts, Grilled Lemon Pepper Salmon, or these cheesy Philly Cheesesteak Slidersโ€”theyโ€™re always a hit at parties. And for a fun appetizer pairing, serve it with these crispy, baked Bacon Jalapeรฑo Poppers.

    This easy macaroni salad is a summertime essential. Pack it for a picnic, serve it at your next cookout, or keep a bowl in the fridge for easy lunches. Itโ€™s the kind of dish that never goes out of styleโ€”and always comes home empty.

    Donโ€™t forget to check out more easy pasta recipes and side dishes on the blog!

    Recipe

    Overhead view of creamy macaroni salad in a white ceramic bowl, filled with elbow pasta, diced carrots, celery, red bell pepper, and onion

    Classic Macaroni Salad

    Kelly
    Here are my secrets to the best Classic Macaroni Salad - ever! Lots of colorful, crunchy veggies, a fresh, creamy dressing, and the perfect balance of sweet and tangy. Perfect for summertime barbecues and picnics!
    Print Recipe Pin Recipe
    Prep Time 15 minutes mins
    Cook Time 20 minutes mins
    Total Time 35 minutes mins
    Course Side Dish
    Cuisine American
    Servings 10 servings
    Calories 355 kcal

    Ingredients
      

    • 1 lb macaroni
    • ยฝ tablespoon vegetable oil
    • ยฝ red onion about ยฝ cup
    • ยพ cup mayonnaise (5.8oz, 165g) click here for Homemade Mayonnaise
    • 1 ยผ cups full fat yogurt 10.9oz, 310g
    • 3 tablespoons sugar
    • 2 tablespoons apple cider vinegar
    • 1 tablespoon dijon mustard or regular
    • ยผ cup sweet pickle relish 2.5oz,70g
    • salt and pepper to taste I use about 2 teaspoons salt
    • 1 ยฝ cups carrot cut in pea-sized dice
    • 1 ยฝ cups celery cut in pea-sized dice
    • 1 ยฝ cups red bell pepper cut in pea-sized dice

    Instructions
     

    For the macaroni:

    • Cook the macaroni in salted, boiling water until al dente.
    • Drain and rinse with cold water until macaroni is cool.
    • Toss macaroni with vegetable oil.

    For the sauce:

    • Finely chop the onion, put in a small bowl, and cover with water for 10-15 minutes. Drain.
    • In a large bowl, whisk mayo, yogurt, sugar, vinegar, and mustard Add salt and pepper to taste. I use about 2 teaspoons salt.
    • Add chopped vegetables, onion, and relish to sauce and combine.
    • Add cooled macaroni to sauce and stir thoroughly to combine. Taste and adjust salt.
    • Store in a covered container in the refrigerator for up to 5 days.

    Notes

    • I use full-fat, regular yogurt, not Greek yogurt. This keeps the dressing fresh, a little tangy, and not too thick. You can adjust the ratio to your liking. A one to one ratio of mayo to yogurt would also be good.
    • If youโ€™re craving that deli-style richness, sour cream can be used instead of yogurt.
    • Want a traditional mayo-only version? Just use 2 full cups of mayo and skip the yogurt altogether.

    Nutrition

    Calories: 355kcalCarbohydrates: 45gProtein: 8gFat: 16gSaturated Fat: 3gPolyunsaturated Fat: 9gMonounsaturated Fat: 4gTrans Fat: 0.04gCholesterol: 11mgSodium: 216mgPotassium: 314mgFiber: 3gSugar: 10gVitamin A: 4092IUVitamin C: 31mgCalcium: 65mgIron: 1mg
    Keyword macroni salad, pasta
    Tried this recipe?Let us know how it was!
    Here are my secrets to the best Classic Macaroni Salad is the best - ever! You'll never know it's lightened up because it tastes even better than the original. Lots of colorful, crunchy veggies, a fresh, creamy dressing, and the perfect balance of sweet and tangy. Perfect for summertime barbecues and picnics!

    Foolproof Homemade Mayonnaise

    May 25, 2018 by Kelly Leave a Comment

    Thereโ€™s such a thrill in watching a couple of raw eggs, seasonings, and oil turn into a fluffy white cloud of mayonnaise in your blender. This quick and easy Foolproof Homemade Recipe will give you the best tasting mayonnaise in two minutes flat.

    Thereโ€™s such a thrill in watching a couple of raw eggs, seasonings, and oil turn into a fluffy white cloud of mayonnaise in your blender. This quick and easy Foolproof Homemade Mayonnaise recipe will give you the best tasting mayonnaise in two minutes flat.ย Plus you can have total control over what you put into your mayonnaise. Itโ€™s all natural - no artificial ingredients or preservatives โ€“ so you know exactly what youโ€™re eating. Thereโ€™s such a thrill in watching a couple of raw eggs, seasonings, and oil turn into a fluffy white cloud of mayonnaise in your blender. This quick and easy Foolproof Homemade Mayonnaise recipe will give you the best tasting mayonnaise in two minutes flat.Mayonnaise season is upon us, friends. Itโ€™s time for summer barbeques and picnics. Macaroni salad. Potato salad. Yummy dressings for your favorite salads. Cold cut sandwich night because itโ€™s way too hot to cook. And who is the star behind these summer favorites? Mayonnaise. Havenโ€™t given it much thought before? Me neither. Mayonnaise was just a background ingredient. Something you add to hold ingredients together or slather on your bread so your sandwich isnโ€™t dry. Then I started making my own mayonnaise and Wow! Everything tasted so much better!

    Thereโ€™s such a thrill in watching a couple of raw eggs, seasonings, and oil turn into a fluffy white cloud of mayonnaise in your blender. This quick and easy Foolproof Homemade Mayonnaise recipe will give you the best tasting mayonnaise in two minutes flat.

    I had been wanting to make my own Homemade Mayonnaise for years. But the idea of salmonella poisoning put me off. Iโ€™ve been down the food poisoning roadโ€ฆdonโ€™t want to go there again. And I definitely donโ€™t want to risk getting my kids sick. Then I discovered pasteurized eggs and YES! I could finally try all those recipes that I was avoiding. On the top of my list: French Silk Pie, (and French Silk Pie Bars!), a proper Caesar salad dressing, and mayonnaise. Mayonnaise!

    Thereโ€™s such a thrill in watching a couple of raw eggs, seasonings, and oil turn into a fluffy white cloud of mayonnaise in your blender. This quick and easy Foolproof Homemade Mayonnaise recipe will give you the best tasting mayonnaise in two minutes flat.

    One of my kids makes fun of me for my mayonnaise obsession (Was it the mayonnaise hair mask I talked you and your sister into when you were young? HeeHee 😊). The rest just Eat. It. Up. They love it! It makes everything taste better. A simple chicken sandwich becomes a gourmet treat that they ask for day after day, thanks to mayonnaise. Sauces and dressings are notched up another level. Every type of sandwich or salad you add it to will sing! (I told you I was obsessed, right?) You can even put it in your hair! 😊

    Thereโ€™s such a thrill in watching a couple of raw eggs, seasonings, and oil turn into a fluffy white cloud of mayonnaise in your blender. This quick and easy Foolproof Homemade Mayonnaise recipe will give you the best tasting mayonnaise in two minutes flat.

    Mayonnaise is an emulsion of oil and egg. Using whole eggs โ€“ and enough of them โ€“ is what makes this recipe foolproof. If the blades of the blender arenโ€™t in contact with the eggs, the mayonnaise wonโ€™t emulsify. Thatโ€™s the biggest reason for a mayonnaise fail, along with adding the oil too quickly. When you start to pour in the oil, dribble it in, almost drop by drop, in the smallest stream you can. When you have already added about a fourth of the oil, you can pour it in a small stream. The mayonnaise will thicken as more of the oil is suspended in the eggs. When the blender starts glugging and the mayonnaise stops moving inside, turn off the blender and give it a stir. Turn the machine back on and add more oil until it starts glugging again. Adding the most oil that your eggs can hold will give the thickest mayo. I start at two cups and add little by little after that until the blender stops mixing. ย 

    Homemade Mayonnaise can also be made by hand with a whisk โ€“ if you have the arm strength and patience โ€“ an immersion blender, or a food processor with the smaller bowl attachment.

    Thereโ€™s such a thrill in watching a couple of raw eggs, seasonings, and oil turn into a fluffy white cloud of mayonnaise in your blender. This quick and easy Foolproof Homemade Mayonnaise recipe will give you the best tasting mayonnaise in two minutes flat.If youโ€™ve tried different brands of mayonnaise, each has a different flavor. Those flavors are being added to whatever you spread your mayonnaise on. A sandwich tastes more like the brand of mayonnaise you put on than the other parts of the sandwich. The beauty of homemade mayonnaise is that you can adjust the flavor to how you like it. A mildly flavored mayonnaise lets the flavors of the rest of the dish dominate, while providing a subtle, delicious background flavor and maybe most importantly, a silky-smooth texture that you can only get from mayonnaise. Or if you prefer, you can give your mayonnaise a stronger flavor - unique flavors can complement the foods you are pairing them with.

    Jump to Section

    • Recipe
    • Foolproof Homemade Mayonnaise

    Recipe

    bowl of mayonnaise

    Foolproof Homemade Mayonnaise

    Kelly
    This quick and easy Foolproof Homemade Mayonnaise recipe will give you the best tasting mayonnaise in two minutes flat.
    Print Recipe Pin Recipe
    Prep Time 2 minutes mins
    Total Time 2 minutes mins
    Course Sauces
    Cuisine American
    Servings 40 tablespoons
    Calories 102 kcal

    Ingredients
      

    • 3 large pasteurized eggs at room temperature
    • 2 teaspoons lemon juice or vinegar
    • 1 tablespoon mustard
    • 2 teaspoons salt or to taste
    • 2 cups neutral flavored oil like canola or sunflower (8.5oz, 240g) approximately

    Instructions
     

    • Put eggs, lemon juice, mustard, and salt into blender and mix on medium speed.
    • With the blender still running, very slowly, stream in the oil as slow as you can.
    • Add oil until the blender makes a glugging sound because it can't mix anymore. You may need a little more than 2 cups.
    • Turn off machine and stir with a wooden spoon or rubber spatula.
    • Turn machine on again, and if the mayonnaise is moving and able to absorb more oil, you can add a little more until it stops moving again. Turn off machine and stir.
    • Store in refrigerator until expiration date on pasteurized eggs.

    Notes

    • Homemade Mayonnaise can also be made by hand with a whisk โ€“ if you have the arm strength and patience โ€“ an immersion blender, or a food processor with the smaller bowl attachment.

    Nutrition

    Calories: 102kcalCarbohydrates: 0.1gProtein: 0.5gFat: 11gSaturated Fat: 1gPolyunsaturated Fat: 0.5gMonounsaturated Fat: 9gTrans Fat: 0.002gCholesterol: 14mgSodium: 126mgPotassium: 6mgFiber: 0.02gSugar: 0.03gVitamin A: 21IUVitamin C: 0.1mgCalcium: 2mgIron: 0.1mg
    Keyword homemade, mayonnaise
    Tried this recipe?Let us know how it was!

    Thereโ€™s such a thrill in watching a couple of raw eggs, seasonings, and oil turn into a fluffy white cloud of mayonnaise in your blender. This quick and easy Foolproof Homemade Mayonnaise recipe will give you the best tasting mayonnaise in two minutes flat.

    White Chocolate Raspberry Cookies

    May 19, 2018 by Kelly 21 Comments

    This is what I wanted to taste when I bit into that Subway White Chocolate Raspberry Cookie. But I didn't. So here's my vision of what White Chocolate Raspberry Cookies should be - thick and chewy cookies with chunks of white chocolate and tangy raspberries. A perfect flavor combination! Made from scratch - no box mix.

    This is what I wanted to taste when I bit into those Subway White Chocolate Raspberry Cookies. But didn't. So here's my vision of what White Chocolate Raspberry Cookies should be - thick and chewy cookies with chunks of white chocolate, tangy raspberries, pure vanilla flavor, chewy on the inside, and crispy on the edges. A perfect flavor combination in a perfect cookie! Made from scratch - no box mix.

    This is what I wanted to taste when I bit into that Subway White Chocolate Raspberry Cookie. But I didn't. So here's my vision of what White Chocolate Raspberry Cookies should be - thick and chewy cookies with chunks of white chocolate and tangy raspberries. A perfect flavor combination! Made from scratch - no box mix. 
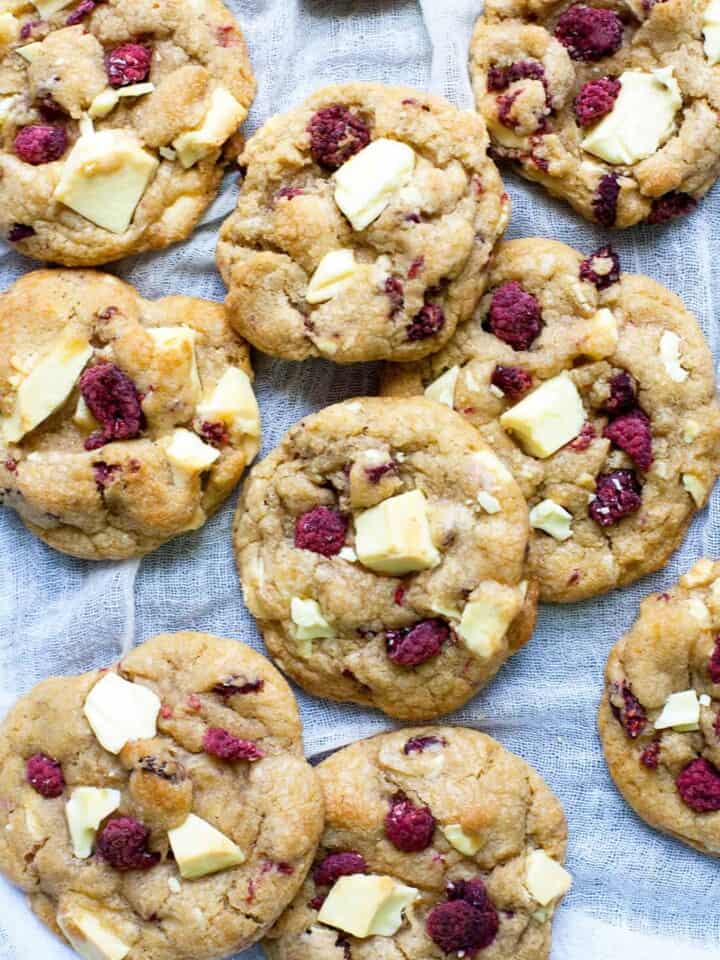
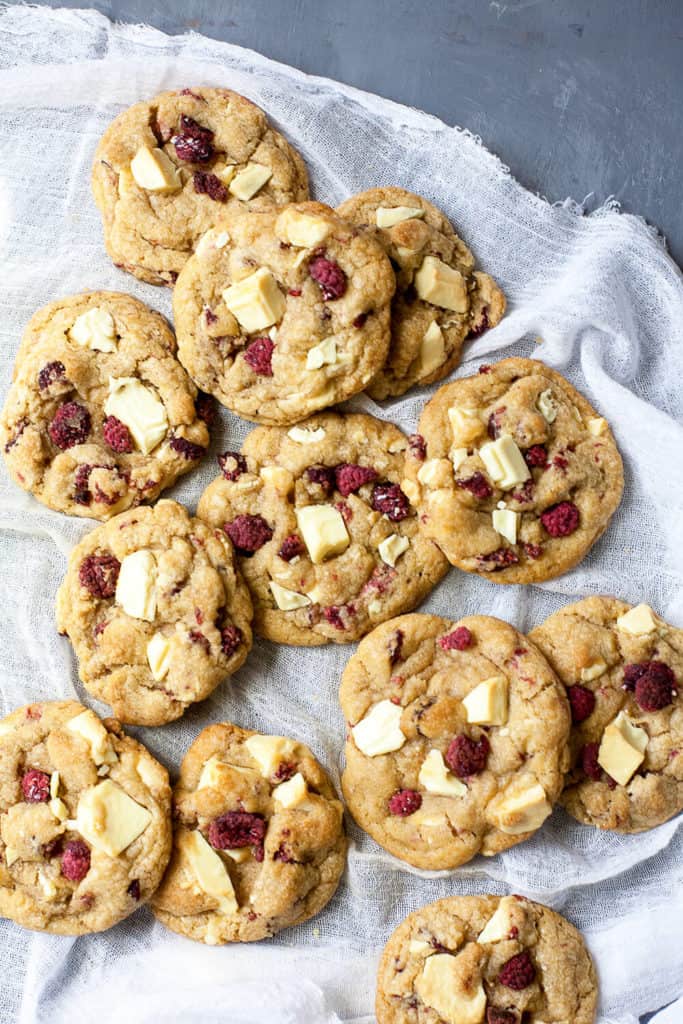
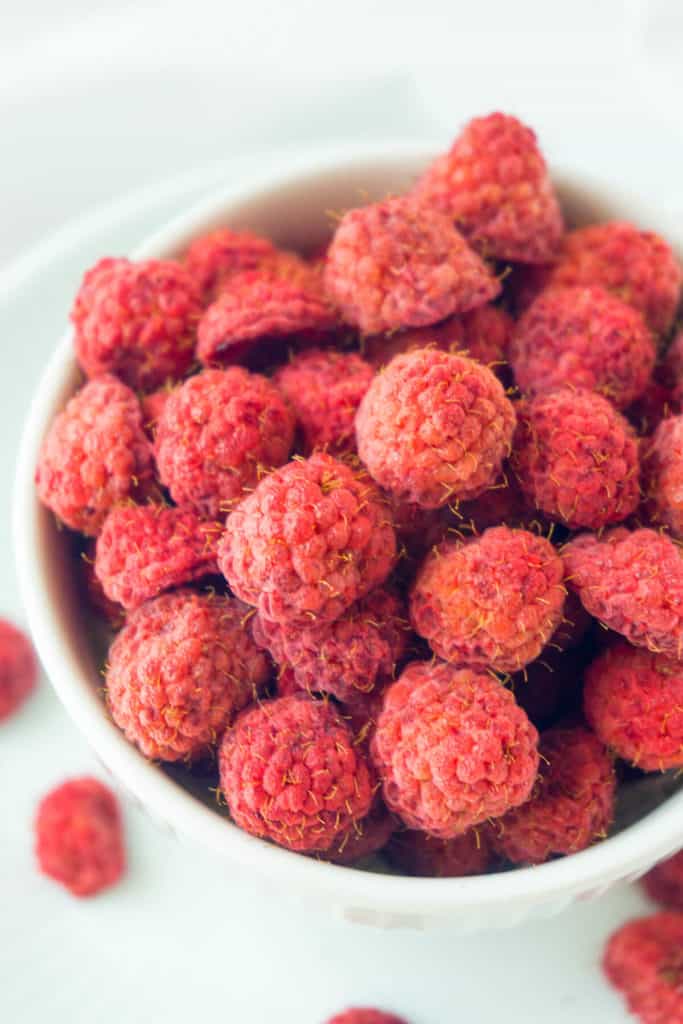
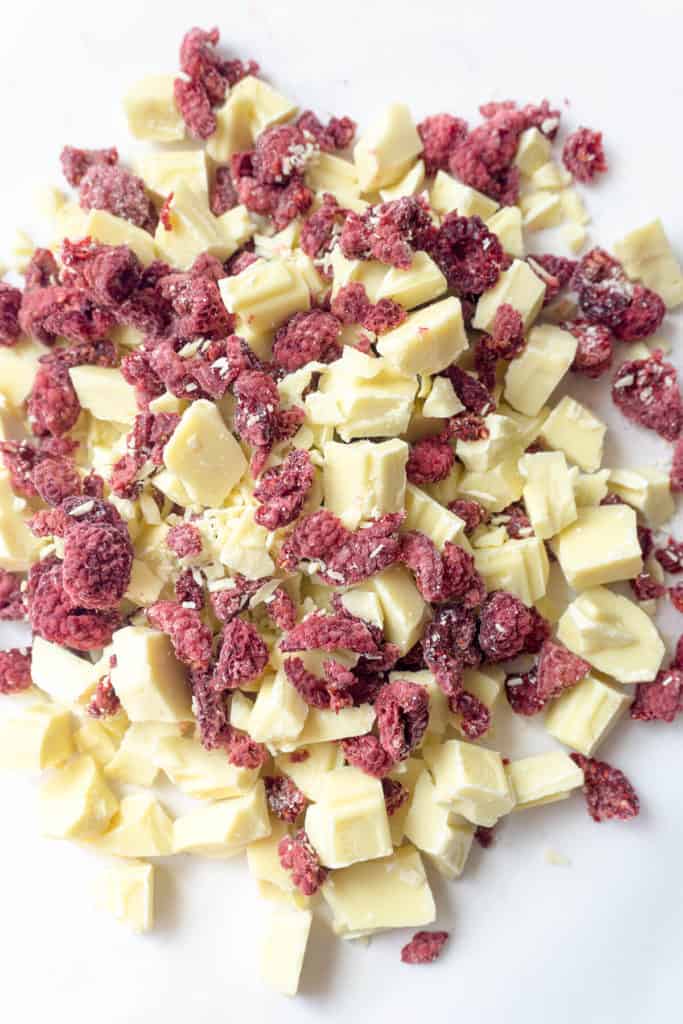
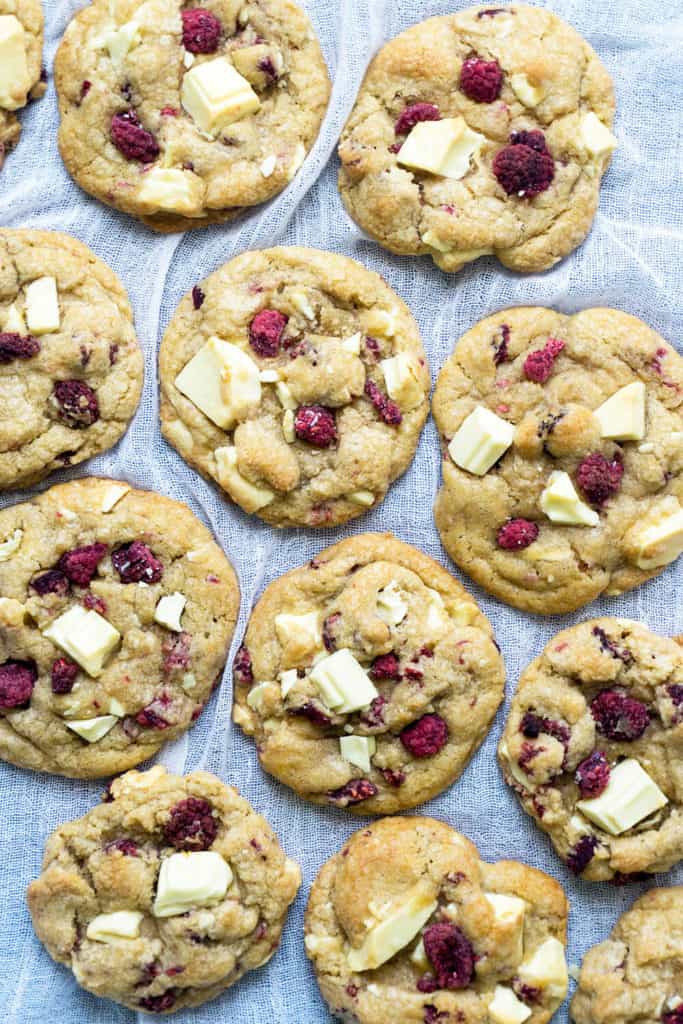
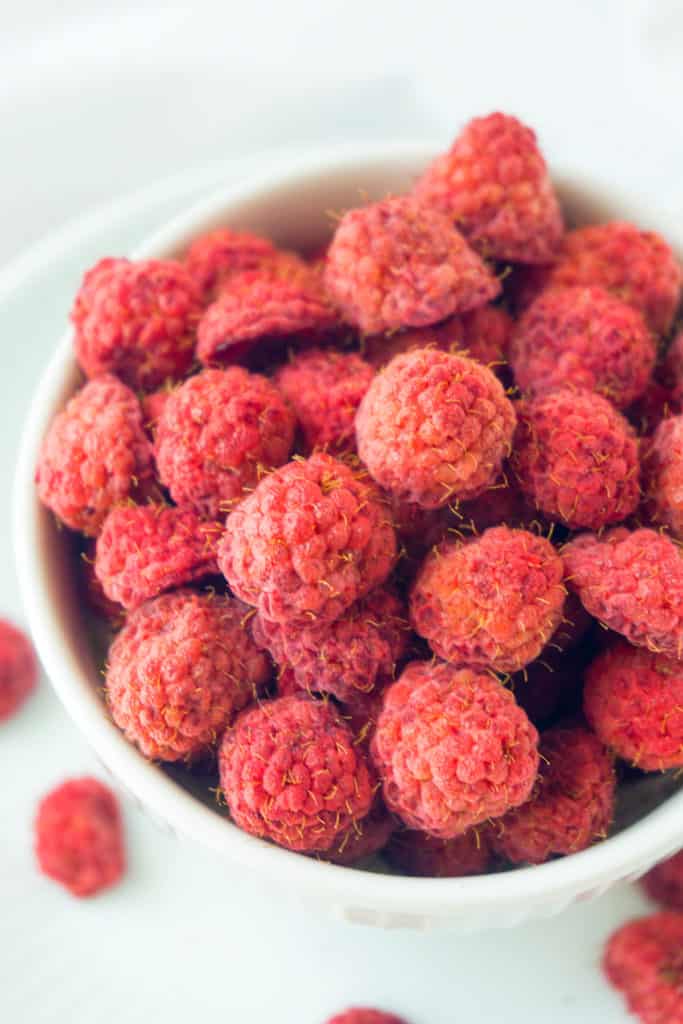
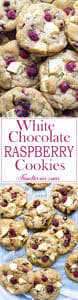
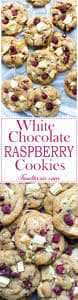
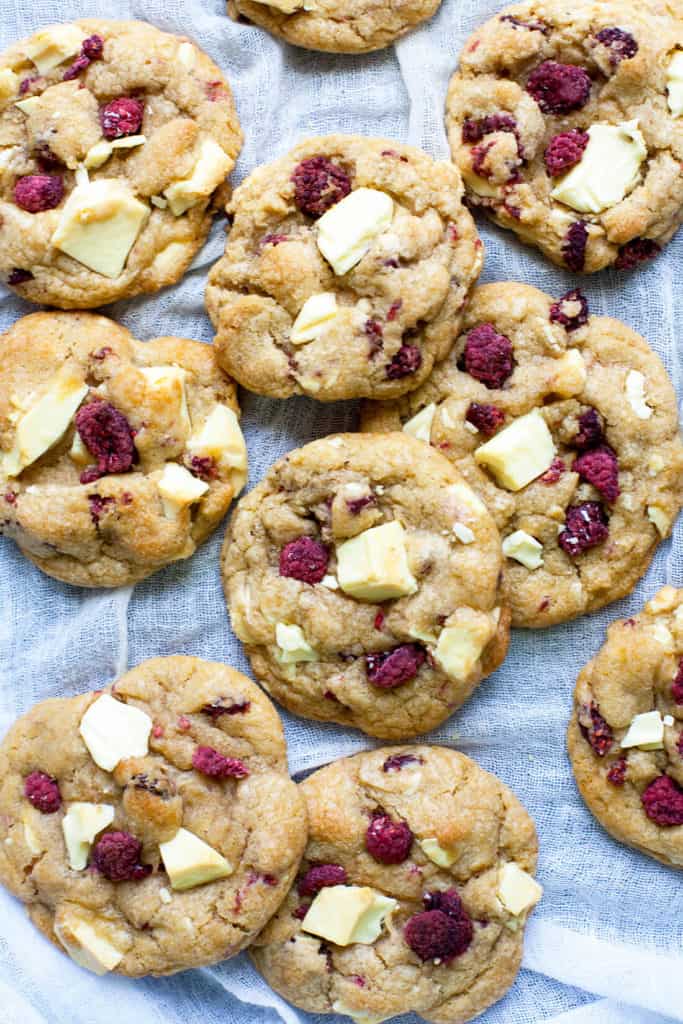
My son was telling me how good the White Chocolate Raspberry Cookies at Subway were. I hadn't tried them but I thought Yum! So I told him, the next time you're there, get one for me too. And I was excited to try it. I had visions of a thick, chewy homemade cookie with chunks of white chocolate and tangy raspberries, soft and chewy on the inside, crispy on the edges.

    This is what I wanted to taste when I bit into that Subway White Chocolate Raspberry Cookie. But I didn't. So here's my vision of what White Chocolate Raspberry Cookies should be - thick and chewy cookies with chunks of white chocolate and tangy raspberries. A perfect flavor combination! Made from scratch - no box mix.

    It was good...but it wasn't all I dreamed it to be. And that's ok. I'm a little spoiled. Subway's expertise is making fresh sandwiches, not homemade cookies. And anyway, I took it as a challenge. I don't know if it's the competitiveness in me (I'd really rather everybody wins), but when I hear my kids say I love such and such, I've GOT to make it better. I guess when I find a food I really like, I just want to make it the best it can be. The downside is, once you make it so much better, you can never go back.

    This is what I wanted to taste when I bit into that Subway White Chocolate Raspberry Cookie. But I didn't. So here's my vision of what White Chocolate Raspberry Cookies should be - thick and chewy cookies with chunks of white chocolate and tangy raspberries. A perfect flavor combination! Made from scratch - no box mix.

    I started my search for White Chocolate Raspberry Cookies on Google. The Subway copycat recipes calls for a box of muffin mix, but I was looking for something from scratch. I wanted a cookie with as close to real raspberries as possible. And I didn't want any preservatives giving the cookie a funky flavor. I definitely wanted the cookie to have the texture of my favorite chocolate chip cookie and the flavor of real vanilla. So that's where I started.

    This is what I wanted to taste when I bit into that Subway White Chocolate Raspberry Cookie. But I didn't. So here's my vision of what White Chocolate Raspberry Cookies should be - thick and chewy cookies with chunks of white chocolate and tangy raspberries. A perfect flavor combination! Made from scratch - no box mix.
    Dried Raspberries

    I started with fresh raspberries. That was a disaster. The raspberries leeched water out into the cookie and they got soggy. Bleh. So then I experimented with drying the raspberries in the oven. I didn't want a completely dried out, crumbly, freeze-dried raspberry. I wanted it to still be somewhat pliable and somewhat "real." After a few failsย  (I tried drying frozen raspberries - don't do that), I got the perfect texture I was looking for. Check out my post on DIY Oven Dried Raspberries for the details. You can substitute freeze-dried raspberries, but with drying them yourself you can control how dried out they get.

    This is what I wanted to taste when I bit into that Subway White Chocolate Raspberry Cookie. But I didn't. So here's my vision of what White Chocolate Raspberry Cookies should be - thick and chewy cookies with chunks of white chocolate and tangy raspberries. A perfect flavor combination! Made from scratch - no box mix.

    I roughly chopped the raspberries here because I wanted them to still look like raspberries. But they would also be great chopped finer so they would be more spread out in the cookie. Biting into a whole dried raspberry can be pretty tangy.

    This is what I wanted to taste when I bit into that Subway White Chocolate Raspberry Cookie. But I didn't. So here's my vision of what White Chocolate Raspberry Cookies should be - thick and chewy cookies with chunks of white chocolate and tangy raspberries. A perfect flavor combination! Made from scratch - no box mix. 
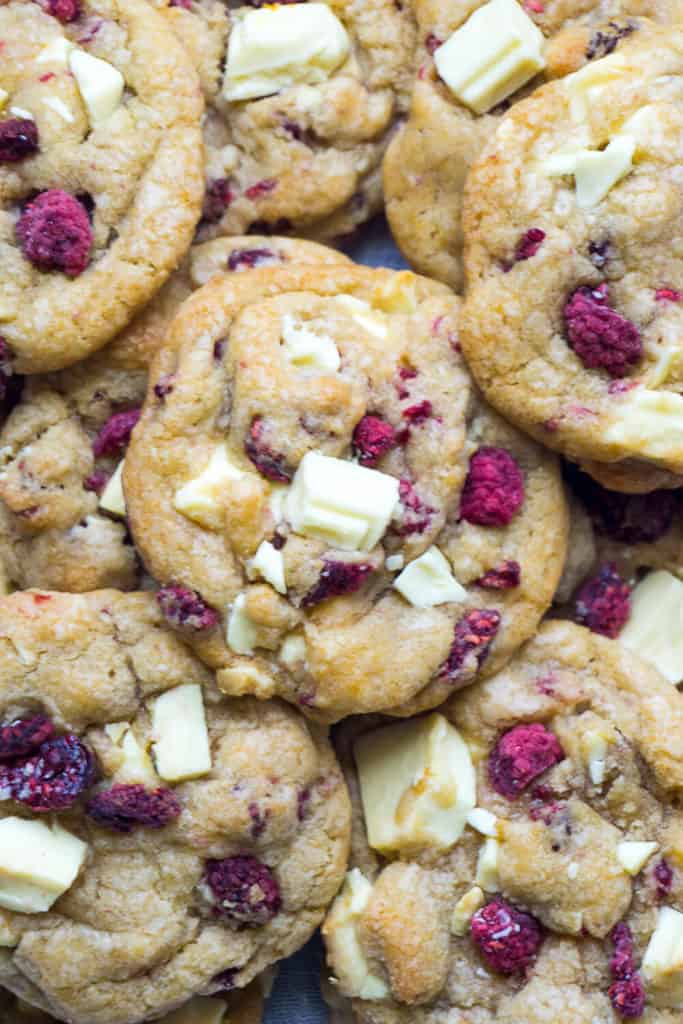
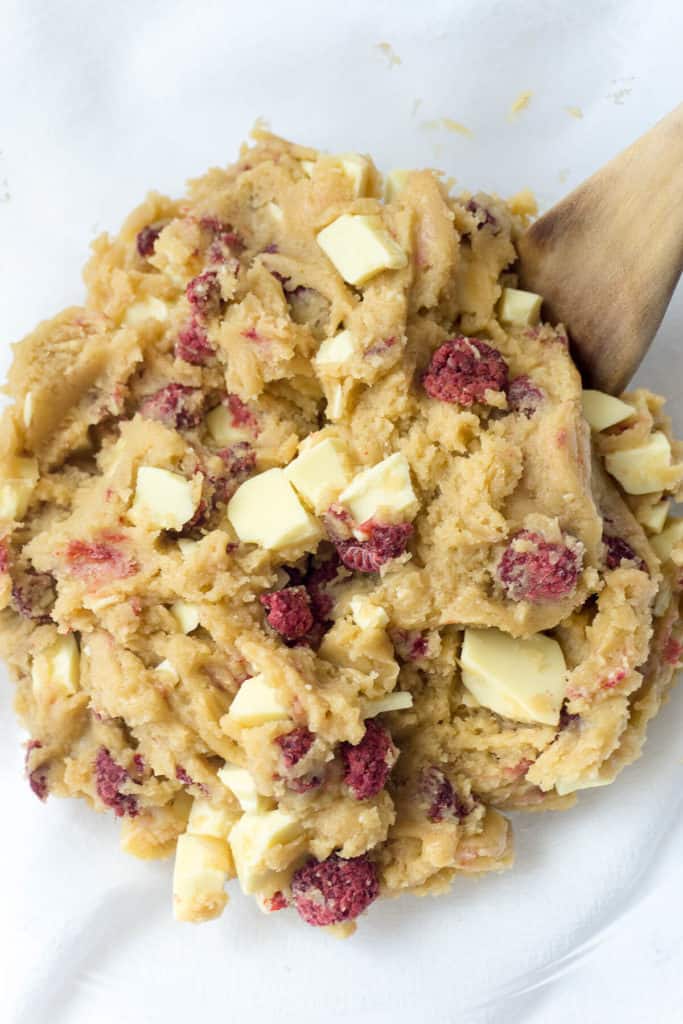
This recipe uses melted butter for the chewiest cookie. Added bonus - it's also easy to mix by hand in bowl. Heat the butter until it is almost all melted, then stir it a bit and the warmth will melt the rest of the butter. This saves on cooling time.
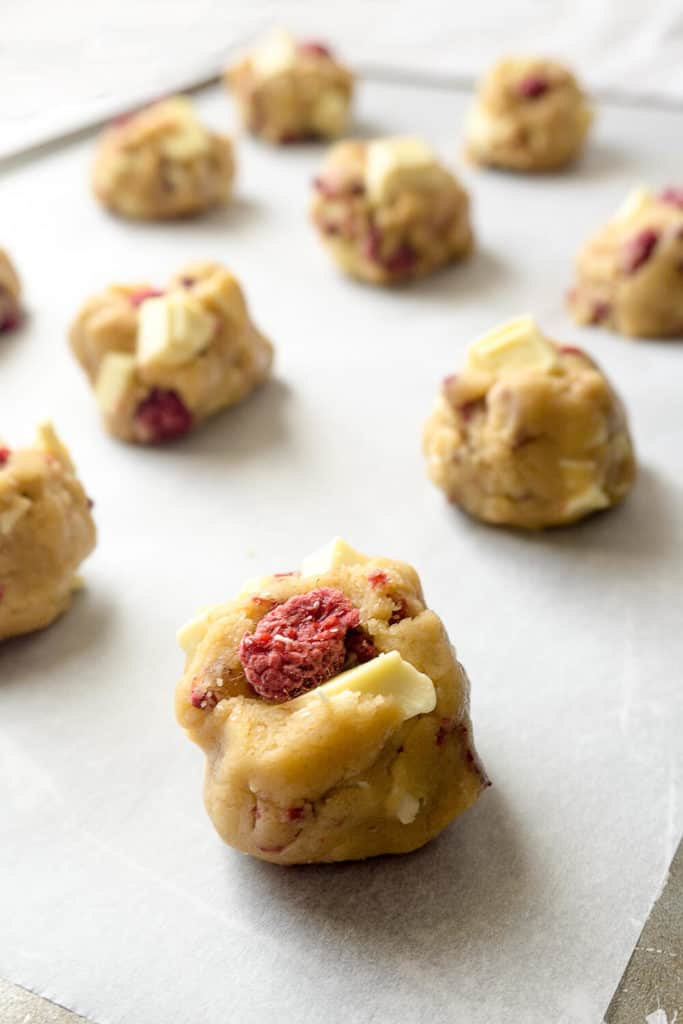
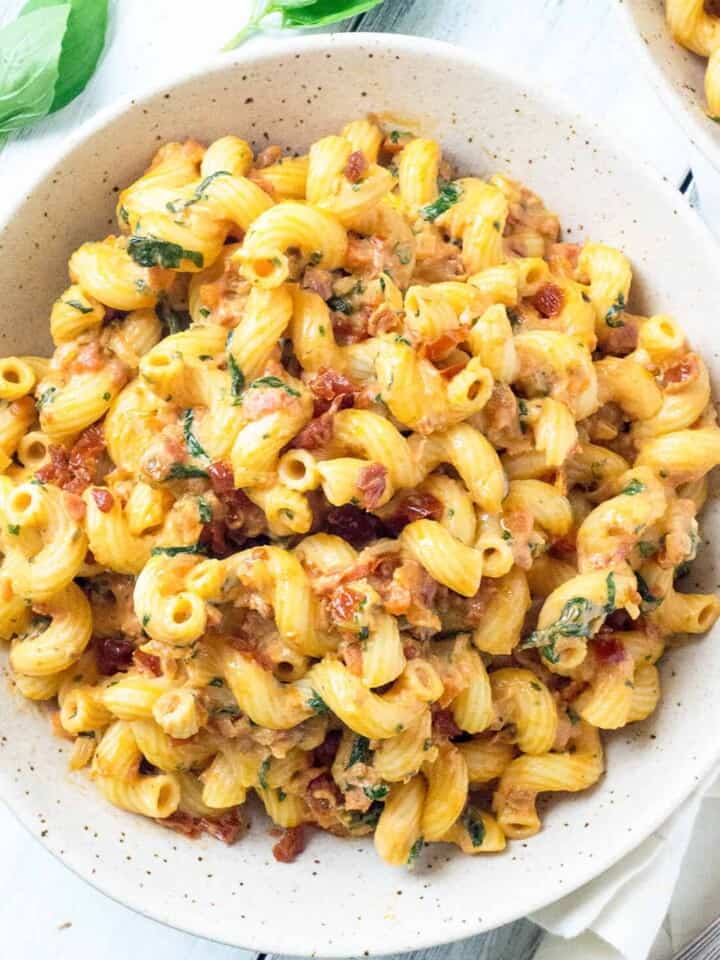
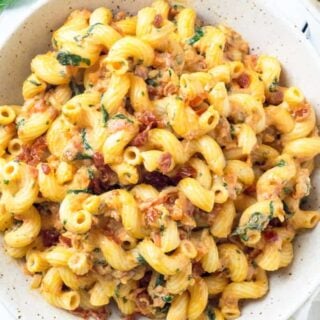
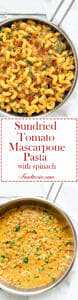
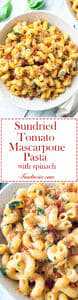
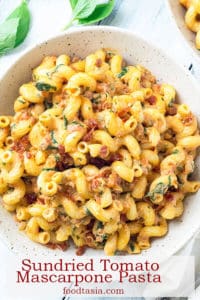
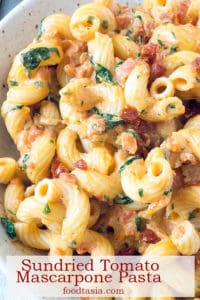
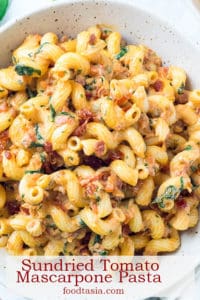
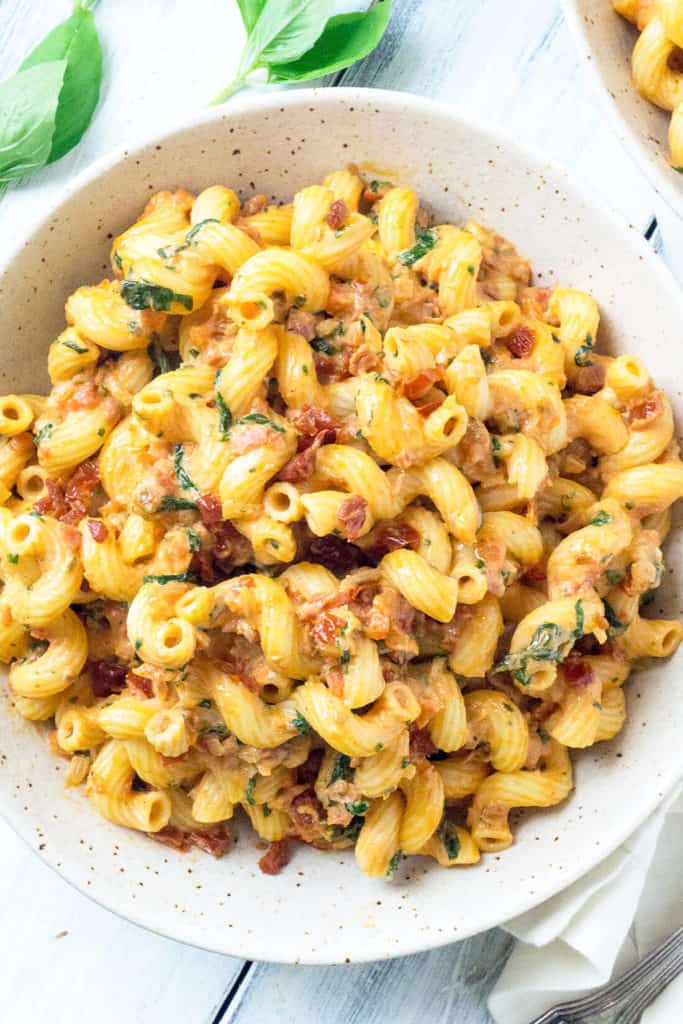
    This is what I wanted to taste when I bit into that Subway White Chocolate Raspberry Cookie. But I didn't. So here's my vision of what White Chocolate Raspberry Cookies should be - thick and chewy cookies with chunks of white chocolate and tangy raspberries. A perfect flavor combination! Made from scratch - no box mix.

    Let the dough chill for at least 30 minutes. A few hours is even better. Chilling gives the dough time to rest and gives a tighter shape.ย  I've left this dough chill overnight which allows the flavor the develop.

    This is what I wanted to taste when I bit into that Subway White Chocolate Raspberry Cookie. But I didn't. So here's my vision of what White Chocolate Raspberry Cookies should be - thick and chewy cookies with chunks of white chocolate and tangy raspberries. A perfect flavor combination! Made from scratch - no box mix.

    This is what I wanted to taste when I bit into that Subway White Chocolate Raspberry Cookie. But I didn't. So here's my vision of what White Chocolate Raspberry Cookies should be - thick and chewy cookies with chunks of white chocolate and tangy raspberries. A perfect flavor combination! Made from scratch - no box mix.

    Jump to Section

    • Recipe
    • White Chocolate Raspberry Cookies

    Recipe

    White chocolate raspberry cookies on a board

    White Chocolate Raspberry Cookies

    Kelly
    Thick and chewy cookies with chunks of white chocolate, tangy raspberries, pure vanilla flavor, chewy on the inside, and crispy on the edges.
    5 from 1 vote
    Print Recipe Pin Recipe
    Prep Time 10 minutes mins
    Cook Time 20 minutes mins
    30 minutes mins
    Total Time 1 hour hr
    Course Dessert
    Cuisine American
    Servings 35 cookies
    Calories 182 kcal

    Ingredients
      

    • 2 cups + 2 tablespoons all-purpose flour scoop and level method (10.67oz, 302g)
    • 1 ยฝ teaspoons cornstarch
    • ยฝ teaspoon salt
    • ยฝ teaspoon baking soda
    • 12 tablespoons unsalted butter 6oz, 170g, melted and cooled slightly
    • 1 cup brown sugar 7oz, 198g
    • ยฝ cup granulated sugar 3.5oz, 99g
    • 1 large egg
    • 1 large egg yolk
    • 2 teaspoons vanilla
    • 2 cups white chocolate chunks or chips 12oz, 340g
    • 1 cup dried raspberries chopped (4oz, 113g)

    Instructions
     

    • Put flour, cornstarch, salt, and baking soda in a medium bowl. Stir to combine.
    • In another mixing bowl, whisk sugars into cooled, melted butter until thoroughly combined. Mix in egg, egg yolk, and vanilla.
    • Add flour mixture and stir until just combined. Stir in white chocolate chunks and chopped, dried raspberries.
    • Roll about 3 tablespoons of dough each into balls. You can roll the dough into balls before or after chilling. I prefer before.
    • Refrigerate dough for at least 30 minutes, preferably a few hours or overnight, and up to 3-4 days.
    • When ready to bake, heat oven to 325 degrees F. Bake on a parchment lined baking sheet until just set on top and beginning to turn golden on the edges, about 10-15 minutes, depending on your oven. Cookies will appear undercooked but will firm up when cooling. Let cool on pan for 10 minutes for maximum chewiness, then transfer to a cooling rack.
    • Store in a tightly covered container. Can be kept at room temperature or, my favorite, in the refrigerator.

    Notes

    • Let the dough chill for at least 30 minutes. A few hours is even better. Chilling gives the dough time to rest and gives a tighter shape.ย  I've left this dough chill overnight which allows the flavor the develop.

    Nutrition

    Calories: 182kcalCarbohydrates: 27gProtein: 2gFat: 8gSaturated Fat: 5gPolyunsaturated Fat: 0.3gMonounsaturated Fat: 2gTrans Fat: 0.2gCholesterol: 23mgSodium: 63mgPotassium: 140mgFiber: 1gSugar: 20gVitamin A: 138IUVitamin C: 83mgCalcium: 31mgIron: 2mg
    Keyword raspberry cookies, white chocolate cookies
    Tried this recipe?Let us know how it was!

    You might also like:

    DIY Oven Dried Raspberries:

    These DIY Oven Dried Raspberries are perfect for baking, granola, trail-mixes, and cereals. Grind them up into a powder to use when you want real raspberry flavor and color but not the liquid - think raspberry frosting! But the best reason to make these DIY Oven Dried Raspberries is White Chocolate Raspberry Cookies!

    This is what I wanted to taste when I bit into that Subway White Chocolate Raspberry Cookie. But I didn't. So here's my vision of what White Chocolate Raspberry Cookies should be - thick and chewy cookies with chunks of white chocolate and tangy raspberries. A perfect flavor combination! Made from scratch - no box mix.
    This is what I wanted to taste when I bit into that Subway White Chocolate Raspberry Cookie. But I didn't. So here's my vision of what White Chocolate Raspberry Cookies should be - thick and chewy cookies with chunks of white chocolate and tangy raspberries. A perfect flavor combination! Made from scratch - no box mix.
    This is what I wanted to taste when I bit into that Subway White Chocolate Raspberry Cookie. But I didn't. So here's my vision of what White Chocolate Raspberry Cookies should be - thick and chewy cookies with chunks of white chocolate and tangy raspberries. A perfect flavor combination! Made from scratch - no box mix.
    This is what I wanted to taste when I bit into that Subway White Chocolate Raspberry Cookie. But I didn't. So here's my vision of what White Chocolate Raspberry Cookies should be - thick and chewy cookies with chunks of white chocolate and tangy raspberries. A perfect flavor combination! Made from scratch - no box mix.

    DIY Oven Dried Raspberries

    May 19, 2018 by Kelly 18 Comments

    These DIY Oven Dried Raspberries are perfect for baking, granola, trail-mixes, and cereals. Grind them up into a powder to use when you want real raspberry flavor and color but not the liquid - think raspberry frosting! But the best reason to make these DIY Oven Dried Raspberries is White Chocolate Raspberry Cookies!

    These DIY Oven Dried Raspberries are perfect for baking, granola, trail-mixes, and cereals. Grind them up into raspberry powder to use when you want real raspberry flavor and color but not the liquid - think raspberry frosting! But the best reason to make these DIY Oven Dried Raspberries is my White Chocolate Raspberry Cookies!

    These DIY Oven Dried Raspberries are perfect for baking, granola, trail-mixes, and cereals. Grind them up into a powder to use when you want real raspberry flavor and color but not the liquid - think raspberry frosting! But the best reason to make these DIY Oven Dried Raspberries is White Chocolate Raspberry Cookies!

    Making Oven Dried Raspberries is easy enough to do and a great way to use up any extra raspberries you have on hand.

    These DIY Oven Dried Raspberries are perfect for baking, granola, trail-mixes, and cereals. Grind them up into a powder to use when you want real raspberry flavor and color but not the liquid - think raspberry frosting! But the best reason to make these DIY Oven Dried Raspberries is White Chocolate Raspberry Cookies! These DIY Oven Dried Raspberries are perfect for baking, granola, trail-mixes, and cereals. Grind them up into a powder to use when you want real raspberry flavor and color but not the liquid - think raspberry frosting! But the best reason to make these DIY Oven Dried Raspberries is White Chocolate Raspberry Cookies!

    Just wash them and let them dry. Then put them on a parchment covered baking sheet and into the lowest setting your oven can go. Mine can go as low as 150 degrees F. The berries here have been dried for 6 hours.

    These DIY Oven Dried Raspberries are perfect for baking, granola, trail-mixes, and cereals. Grind them up into a powder to use when you want real raspberry flavor and color but not the liquid - think raspberry frosting! But the best reason to make these DIY Oven Dried Raspberries is White Chocolate Raspberry Cookies!

    I took them out when they were still somewhat pliable and soft for my White Chocolate Raspberry Cookies. You can leave them in longer to get more dried out, they will get a little darker.ย 

    These DIY Oven Dried Raspberries are perfect for baking, granola, trail-mixes, and cereals. Grind them up into a powder to use when you want real raspberry flavor and color but not the liquid - think raspberry frosting! But the best reason to make these DIY Oven Dried Raspberries is White Chocolate Raspberry Cookies!

    Jump to Section

    • Recipe
    • DIY Oven Dried Raspberries

    Recipe

    bowl of dried raspberries

    DIY Oven Dried Raspberries

    These DIY Oven Dried Raspberries are perfect for baking, granola, trail-mixes, and cereals. Grind them up into raspberry powder to use when you want real raspberry flavor and color but not the liquid - think raspberry frosting!ย 
    5 from 3 votes
    Print Recipe Pin Recipe
    Prep Time 2 minutes mins
    Cook Time 6 hours hrs
    Total Time 6 hours hrs 2 minutes mins
    Course Dessert
    Cuisine American
    Servings 3 servings
    Calories 82 kcal

    Ingredients
      

    • 1 pint fresh raspberries

    Instructions
     

    • Wash and dry the berries.
    • Heat oven to 150 degrees F.
    • Put the berries on a parchment lined baking sheet.
    • Bake until the desired dryness. 6 hours will be still somewhat soft and pliable. About 8 hours for very dry.
    • Keep an eye on the berries towards the end of the baking time to test for doneness.

    Notes

    • Enjoy while still pliable and soft or let them dry longer.

    Nutrition

    Serving: 0.25cupCalories: 82kcalCarbohydrates: 19gProtein: 2gFat: 1gSaturated Fat: 0.03gPolyunsaturated Fat: 1gMonounsaturated Fat: 0.1gSodium: 2mgPotassium: 238mgFiber: 10gSugar: 7gVitamin A: 52IUVitamin C: 41mgCalcium: 39mgIron: 1mg
    Keyword dehydrated, dried, raspberries
    Tried this recipe?Let us know how it was!

    You might also like:

    White Chocolate Raspberry Cookies

    This is what I wanted to taste when I bit into that Subway White Chocolate Raspberry Cookie. But I didn't. So here's my vision of what White Chocolate Raspberry Cookies should be - thick and chewy cookies with chunks of white chocolate and tangy raspberries. A perfect flavor combination! Made from scratch - no box mix.

    These DIY Oven Dried Raspberries are perfect for baking, granola, trail-mixes, and cereals. Grind them up into a powder to use when you want real raspberry flavor and color but not the liquid - think raspberry frosting! But the best reason to make these DIY Oven Dried Raspberries is White Chocolate Raspberry Cookies!

    Sundried Tomato Mascarpone Pasta with Baby Spinach and Roasted Red Pepper

    May 11, 2018 by Kelly 2 Comments

    A family favorite, this Sundried Tomato Mascarpone Pasta with Baby Spinach and Roasted Red Pepper is loaded with veggies and has perfectly balanced flavors. Added bonus - it's super fast and easy to make!

    A family favorite, this Sundried Tomato Mascarpone Pasta with Baby Spinach and Roasted Red Pepper is loaded with veggies and has perfectly balanced flavors. Added bonus - it's super fast and easy to make!

    A family favorite, this Sundried Tomato Mascarpone Pasta with Baby Spinach and Roasted Red Pepper is loaded with veggies and has perfectly balanced flavors. Added bonus - it's super fast and easy to make!My family loves thisย Sundried Tomato Mascarpone Pasta. It is so good! I make it almost every week. Super quick and easy to make, it can be put together before the pasta finishes boiling.

    A family favorite, this Sundried Tomato Mascarpone Pasta with Baby Spinach and Roasted Red Pepper is loaded with veggies and has perfectly balanced flavors. Added bonus - it's super fast and easy to make!

    Thisย Sundried Tomato Mascarpone Pasta is loaded with veggies. I use two kinds of tomato -sundried tomatoes and canned chopped Italian tomatoes. You can roast the red pepper yourself or just pick some up at the deli.

    A family favorite, this Sundried Tomato Mascarpone Pasta with Baby Spinach and Roasted Red Pepper is loaded with veggies and has perfectly balanced flavors. Added bonus - it's super fast and easy to make!

    To make the sauce, heat a little olive oil and sautรฉ a chopped onion until it is soft. Add the sundried tomato and roasted red pepper and let it cook for a minute or two. Add the garlic, give it a stir, then add the canned tomatoes and cook til they're nice and hot. Here I add my secret ingredient, a bouillon cube, for an added burst of flavor - totally optional though. Stir in the mascarpone, it will melt in about 2 minutes. When it starts to simmer, stir in the parmesan cheese. When the cheese is melted, turn off the heat and stir in the baby spinach. I give mine a rough chop but it really could go in whole.ย A family favorite, this Sundried Tomato Mascarpone Pasta with Baby Spinach and Roasted Red Pepper is loaded with veggies and has perfectly balanced flavors. Added bonus - it's super fast and easy to make!
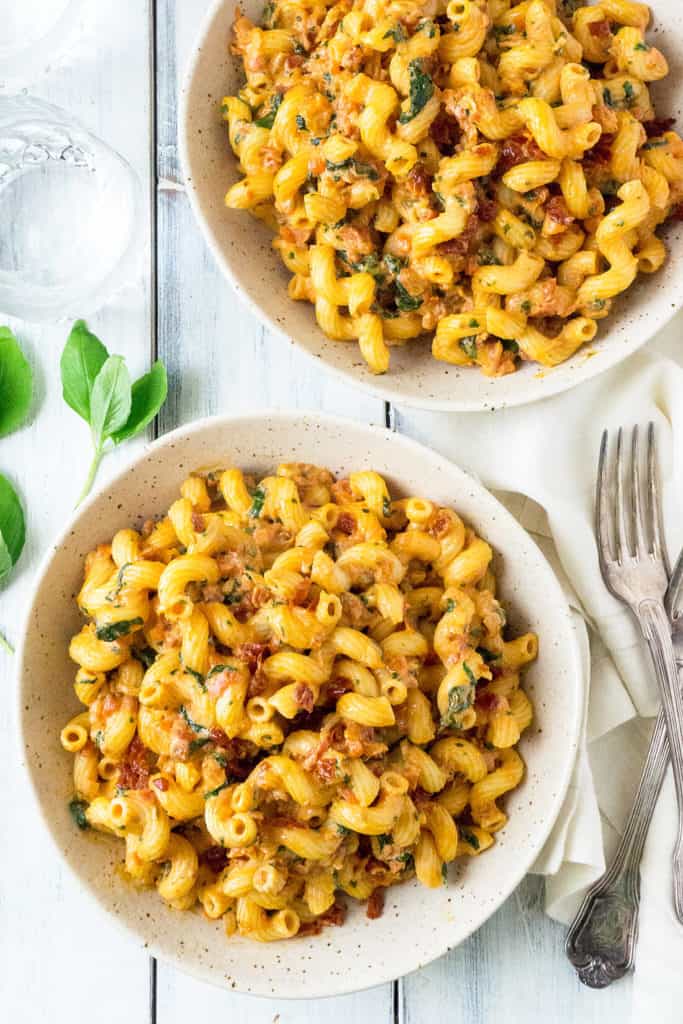
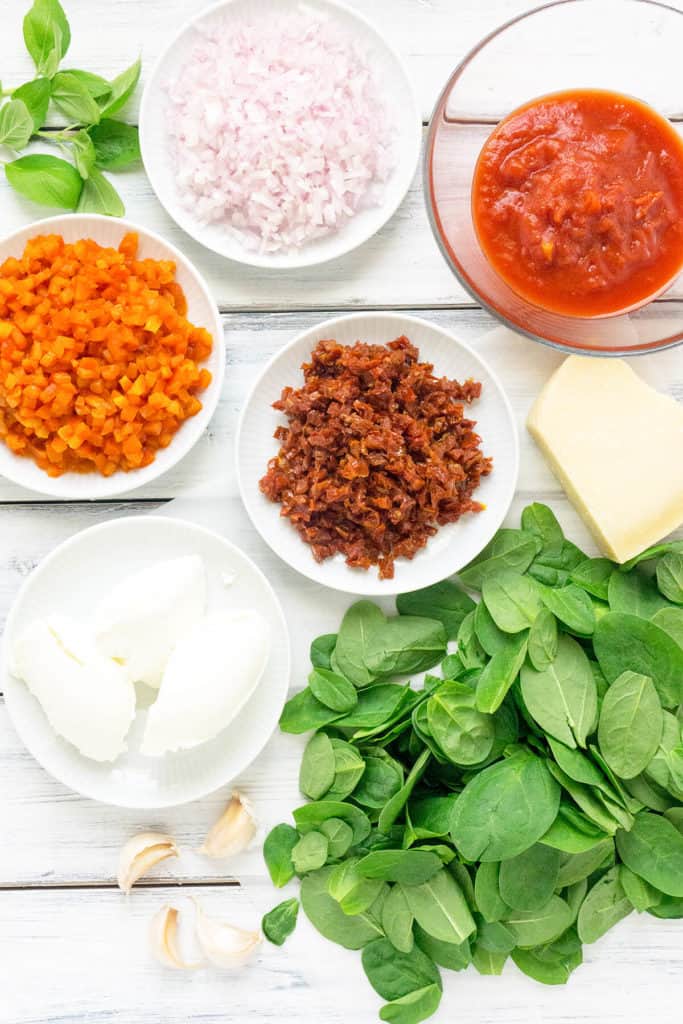
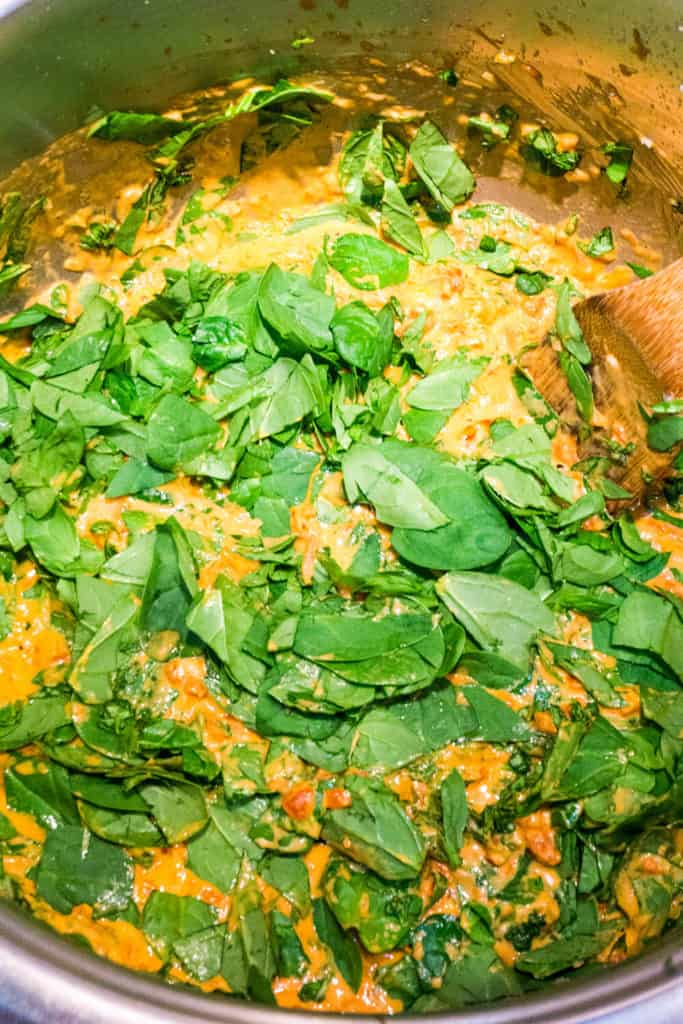
It all just blends together beautifully.ย I love making sauces with mascarpone - they're creamy and rich with the best flavor! They're also super quick - no waiting for a sauce to thicken, and if you're not paying attention and it boilsย  - no problem, it won't curdle from the heat.

    A family favorite, this Sundried Tomato Mascarpone Pasta with Baby Spinach and Roasted Red Pepper is loaded with veggies and has perfectly balanced flavors. Added bonus - it's super fast and easy to make!
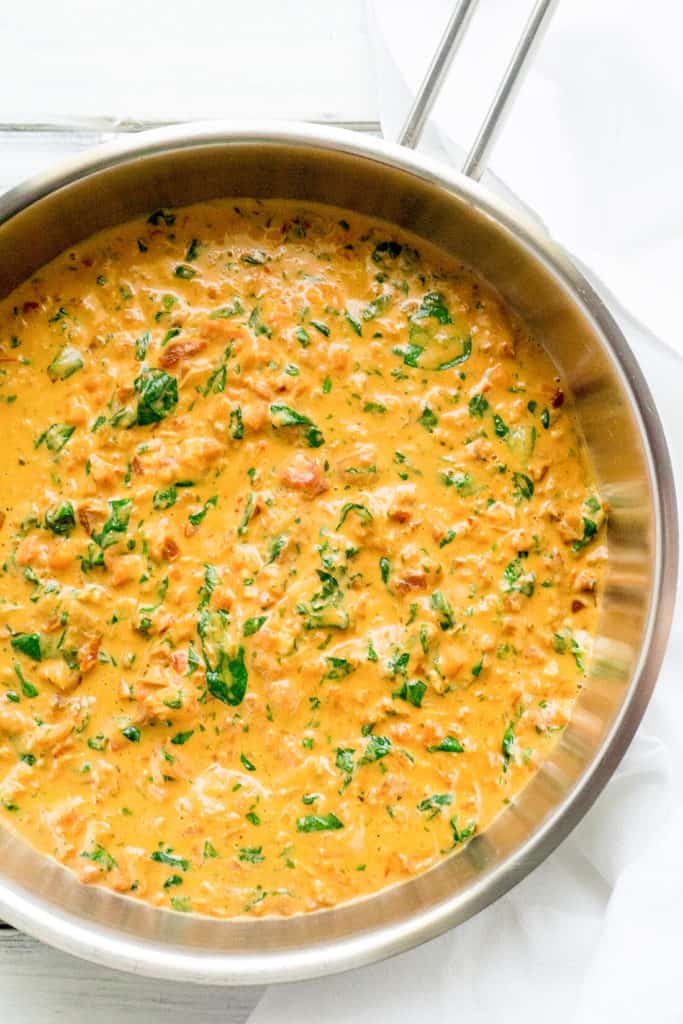
That's me sneaking all those veggies in there - the kids will never notice!

    A family favorite, this Sundried Tomato Mascarpone Pasta with Baby Spinach and Roasted Red Pepper is loaded with veggies and has perfectly balanced flavors. Added bonus - it's super fast and easy to make!

    If you prepare everything in advance, keep the pasta and sauce separate until just before serving for the maximum creaminess.

    A family favorite, this Sundried Tomato Mascarpone Pasta with Baby Spinach and Roasted Red Pepper is loaded with veggies and has perfectly balanced flavors. Added bonus - it's super fast and easy to make!

    Jump to Section

    • Recipe
    • Sundried Tomato Mascarpone Pasta with Baby Spinach and Roasted Red Pepper

    Recipe

    bowl of mascarpone pasta

    Sundried Tomato Mascarpone Pasta with Baby Spinach and Roasted Red Pepper

    Kelly
    This Sundried Tomato Mascarpone Pasta with Baby Spinach and Roasted Red Pepper is loaded with veggies and has perfectly balanced flavors.
    Print Recipe Pin Recipe
    Prep Time 10 minutes mins
    Cook Time 20 minutes mins
    Total Time 30 minutes mins
    Course Main Course
    Cuisine American
    Servings 6 servings
    Calories 578 kcal

    Ingredients
      

    • 1 lb pasta 454g, cooked and tossed with 2 tablespoons butter
    • 1 tablespoon olive oil
    • 1 medium onion
    • ยพ cup sundried tomatoes in oil drained and chopped (4oz, 112g)
    • 1 cup chopped roasted red bell peppers (from 2 red peppers yielding about 6.5oz, 184g roasted and chopped)
    • 4 cloves garlic minced
    • 1 teaspoon Italian seasoning or a mix of oregano and basil
    • 15 oz crushed tomatoes 425g
    • 1 bouillon cube - optional
    • salt and pepper to taste
    • 8 oz mascarpone cheese 227 g
    • ยฝ cup grated parmesan cheese 1.8 oz, 50g
    • 4.4 ounces baby spinach whole or roughly chopped (125g)
    • handful of fresh basil sliced

    Instructions
     

    • Heat olive oil in a large pan. Add onion and sautรฉ until soft.
    • Add roasted peppers and sundried tomatoes. Saute for a minute.
    • Add garlic and give it a stir.
    • Add Italian seasoning, crushed tomatoes, bouillon cube if using, salt, and pepper. Bring to a simmer on medium-high, 3-4 minutes.
    • Add mascarpone cheese and stir until combined.
    • When heated through, stir in parmesan cheese until melted. Turn off heat.
    • Stir in spinach and fresh basil until combined.
    • Add pasta to sauce and mix to combine.

    Notes

    To Roast Red Peppers:
    1. On a gas stove:
    2. Put the red peppers directly on the burner grates with the fire on medium-high. Rotate the peppers as each side turns black, including the top and bottom. Continue until the entire pepper is charred.
    3. Alternatively the peppers can be charred under the broiler or on the grill.
    4. Put the peppers in a bowl and cover with plastic wrap and let rest for 10 minutes. This will allow the peppers to steam and the skin to loosen. Remove the charred skin from the peppers and chop.

    Nutrition

    Calories: 578kcalCarbohydrates: 71gProtein: 18gFat: 25gSaturated Fat: 13gPolyunsaturated Fat: 1gMonounsaturated Fat: 4gCholesterol: 45mgSodium: 638mgPotassium: 796mgFiber: 6gSugar: 6gVitamin A: 3007IUVitamin C: 39mgCalcium: 216mgIron: 3mg
    Keyword sundried tomato pasta
    Tried this recipe?Let us know how it was!

    You might also like:

    Creamy, Cheesy Italian Sausage and Basil Penne:

    Creamy, Cheesy Sausage and Basil Penne

    Creamy Portobello and Mascarpone Pasta:

    Simple yet elegant, this Creamy Portobello and Mascarpone Pasta makes the perfect quick and easy weeknight dinner.

    A family favorite, this Sundried Tomato Mascarpone Pasta with Baby Spinach and Roasted Red Pepper is loaded with veggies and has perfectly balanced flavors. Added bonus - it's super fast and easy to make!
    A family favorite, this Sundried Tomato Mascarpone Pasta with Baby Spinach and Roasted Red Pepper is loaded with veggies and has perfectly balanced flavors. Added bonus - it's super fast and easy to make!
    A family favorite, this Sundried Tomato Mascarpone Pasta with Baby Spinach and Roasted Red Pepper is loaded with veggies and has perfectly balanced flavors. Added bonus - it's super fast and easy to make!
    A family favorite, this Sundried Tomato Mascarpone Pasta with Baby Spinach and Roasted Red Pepper is loaded with veggies and has perfectly balanced flavors. Added bonus - it's super fast and easy to make! #pasta #quick #quickandeasy #quickdinner #easyrecipe #recipe #easydinner #weeknightdinner #weeknightmeals
    A family favorite, this Sundried Tomato Mascarpone Pasta with Baby Spinach and Roasted Red Pepper is loaded with veggies and has perfectly balanced flavors. Added bonus - it's super fast and easy to make! #pasta #quick #quickandeasy #quickdinner #easyrecipe #recipe #easydinner #weeknightdinner #weeknightmeals
    A family favorite, this Sundried Tomato Mascarpone Pasta with Baby Spinach and Roasted Red Pepper is loaded with veggies and has perfectly balanced flavors. Added bonus - it's super fast and easy to make! #pasta #quick #quickandeasy #quickdinner #easyrecipe #recipe #easydinner #weeknightdinner #weeknightmeals

    Quick and Easy Enchilada Sauce

    May 4, 2018 by Kelly Leave a Comment

    No need to buy Enchilada Sauce from a can when it's this quick and easy to make at home.

    The perfect Enchilada Sauce! No need to buy Enchilada Sauce from a can when it's this quick and easy to make at home.

    No need to buy Enchilada Sauce from a can when it's this quick and easy to make at home. 
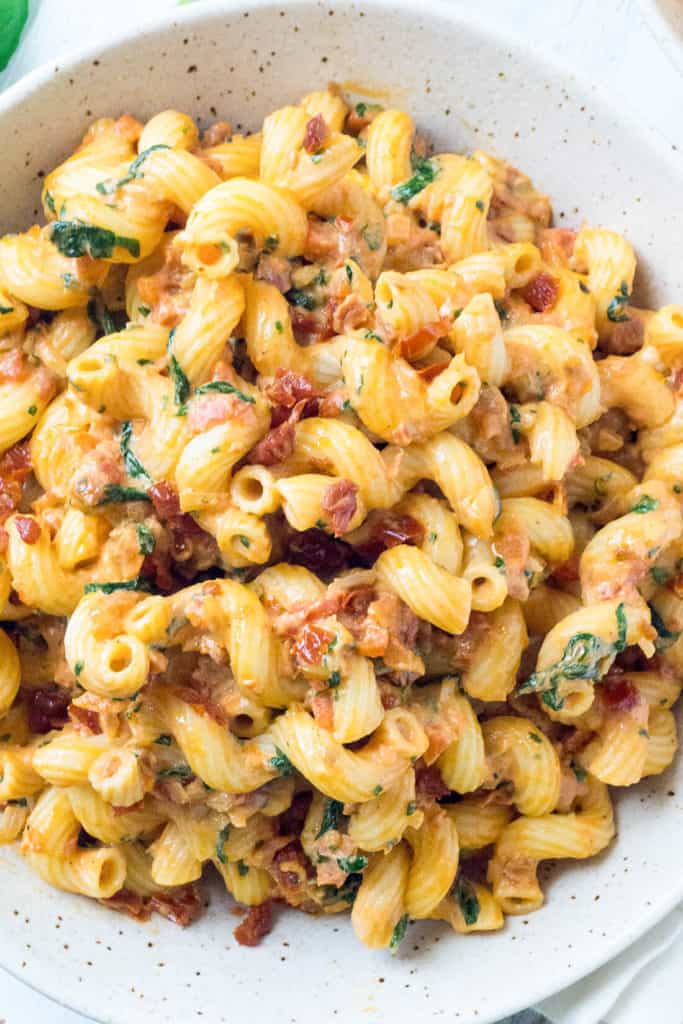
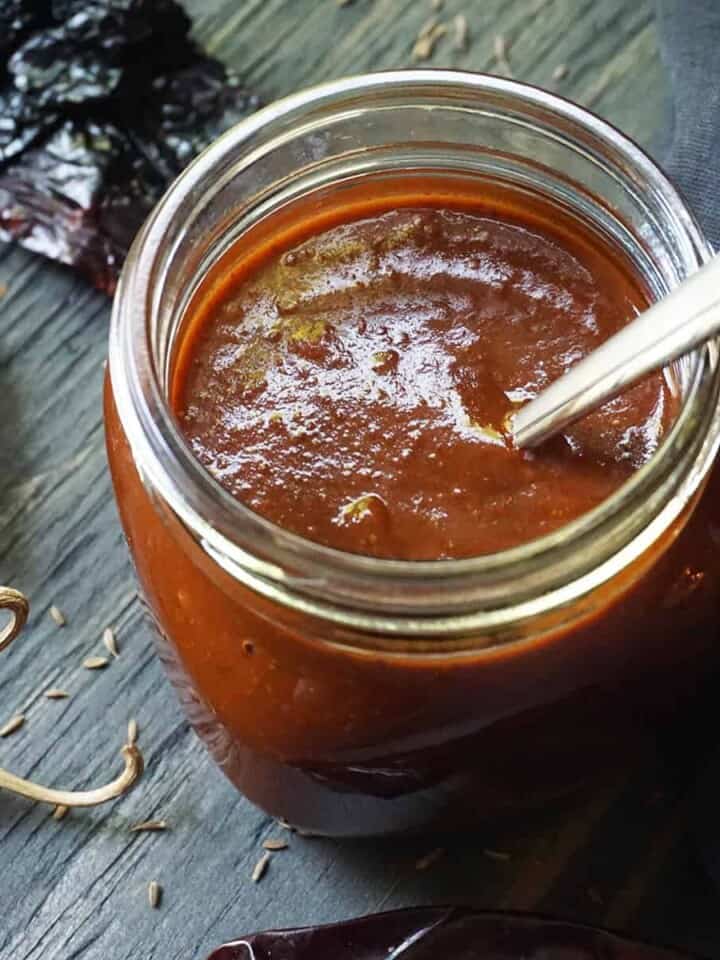
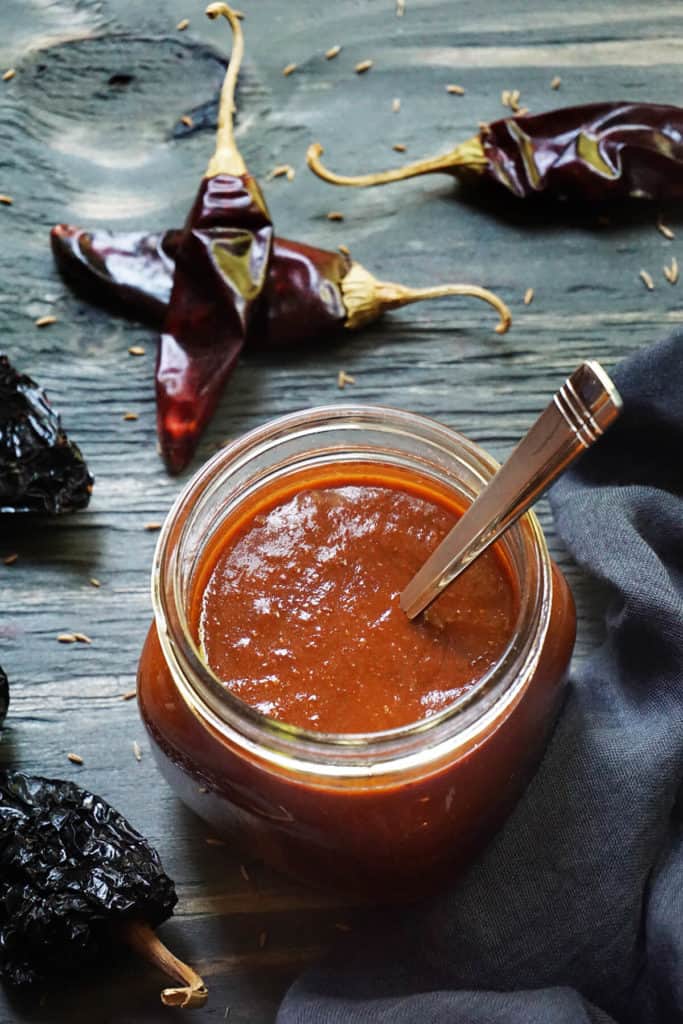
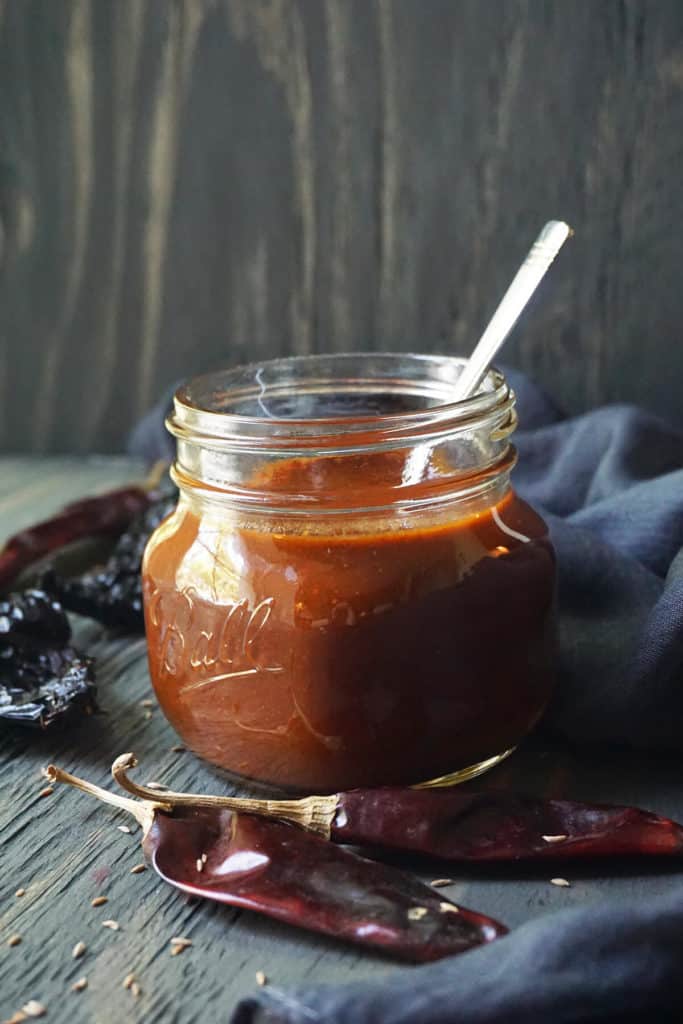
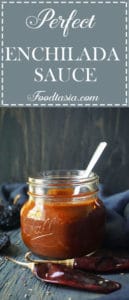
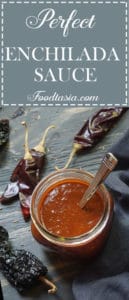
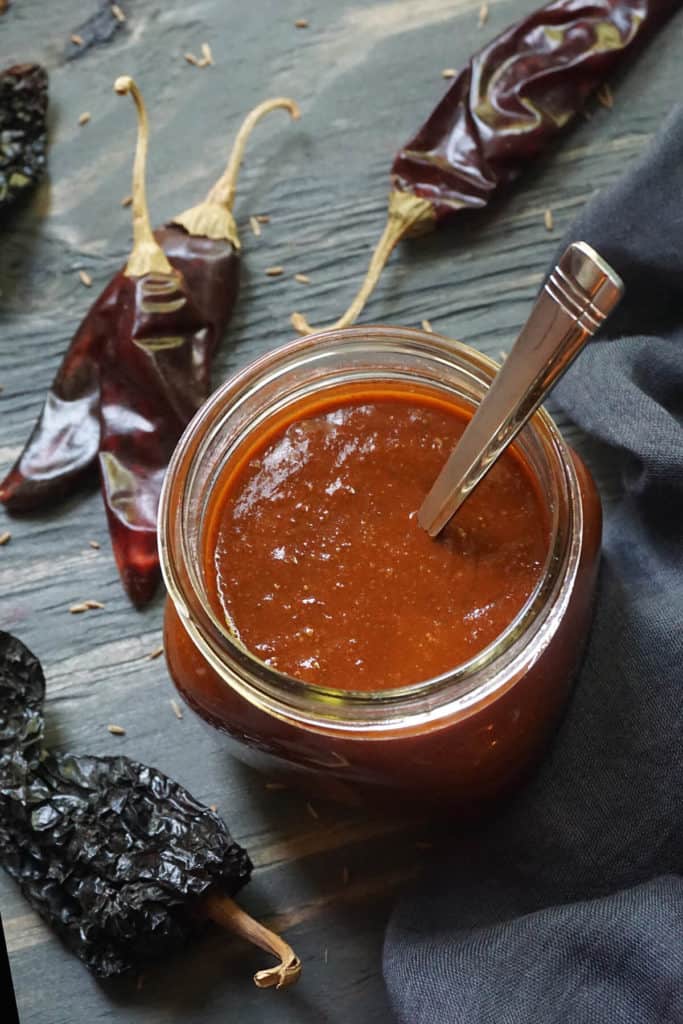
I've been tweaking this recipe for years and I've got it perfect. There are a few things I look for in an Enchilada Sauce. One is a perfect balance between tomato and chili pepper. Enchilada Sauces without tomato seem bland to me, and I find Enchilada Sauce made with pureed tomato a little pulpy, too much like spaghetti sauce. Using tomato paste gives a nice tangy tomato flavor while keeping the sauce thin and smooth.

    No need to buy Enchilada Sauce from a can when it's this quick and easy to make at home.

    You can use any kind of chili powder in this Enchilada Sauce, but it's so much more fun to experiment with different kinds of dried whole chilies. You can tweak the flavor and the heat. I've used here Guajillo and Ancho peppers. Guajillo peppers are slightly sweet with a hint of tangy cranberry. With a mild to medium heat, 2500-5000 Scoville Heat Units (SHU), they are about a third as hot as a jalapeno. Ancho peppers are mild, 1000-1500 SHU, and make the sauce a deep, rich red. They have an earthy, peppery taste with a hints of raisins and coffee. Another favorite is the New Mexico Chile pepper, 800-1400 SHU, with a crisp, clear flavor and hints of sweet dried cherry.

    No need to buy Enchilada Sauce from a can when it's this quick and easy to make at home.

    I use about one tablespoon of freshly ground chili powder for this recipe. The kids like a less powerful, less overwhelming sauce so I keep it nice and mild. Enchilada Sauce should be a perfect complement to your enchiladas, not so strong that it's the only thing you taste. I also prefer a thinner sauce so I use two tablespoons of oil and two tablespoons of flour to make a roux to thicken the sauce. If you want a thicker sauce, use three tablespoons each of oil and flour. You can use vegetable or chicken broth in this recipe. I always have chicken bouillon cubes on hand so I just throw one of those in. I also like the kick they give the sauce.

    The perfect Enchilada Sauce! No need to buy Enchilada Sauce from a can when it's this quick and easy to make at home.

    Jump to Section

    • Recipe
    • Quick and Easy Enchilada Sauce

    Recipe

    jar of enchilada sauce

    Quick and Easy Enchilada Sauce

    Kelly
    The perfect Enchilada Sauce! No need to buy Enchilada Sauce from a can when it's this quick and easy to make at home.
    Print Recipe Pin Recipe
    Prep Time 5 minutes mins
    Cook Time 10 minutes mins
    Total Time 15 minutes mins
    Course Sauces
    Cuisine Mexican
    Servings 6 servings
    Calories 66 kcal

    Ingredients
      

    • 2 tablespoons vegetable oil
    • 2 tablespoons all-purpose flour
    • 3 tablespoons tomato paste
    • 1 tablespoon chili powder
    • 1 teaspoon ground cumin
    • ยฝ teaspoon garlic powder
    • ยฝ teaspoon dried oregano
    • 2 cups broth chicken or vegetable
    • 1 tablespoon vinegar
    • salt and pepper to taste

    Instructions
     

    • Heat vegetable oil over medium heat. Add flour and whisk. Let cook for a minute or two until it is bubbly but not brown.
    • Add tomato paste, chili powder, cumin, garlic powder, and oregano. Stir to combine and cook for a minute but don't let chili burn or it will turn bitter.
    • Slowly whisk in broth and whisk until smooth.
    • Increase heat to medium-high, whisking often. Let simmer until thickened, about 5 minutes.
    • Add vinegar. Add salt and pepper to taste.

    Notes

    • also prefer a thinner sauce so I use two tablespoons of oil and two tablespoons of flour to make a roux to thicken the sauce. If you want a thicker sauce, use three tablespoons each of oil and flour.

    Nutrition

    Calories: 66kcalCarbohydrates: 6gProtein: 1gFat: 5gSaturated Fat: 1gPolyunsaturated Fat: 3gMonounsaturated Fat: 1gTrans Fat: 0.03gSodium: 399mgPotassium: 121mgFiber: 1gSugar: 2gVitamin A: 691IUVitamin C: 2mgCalcium: 14mgIron: 1mg
    Keyword enchilada sauce
    Tried this recipe?Let us know how it was!

    The Perfect Enchilada Sauce! No need to buy Enchilada Sauce from a can when it's this quick and easy to make at home.
    The Perfect Enchilada Sauce! No need to buy Enchilada Sauce from a can when it's this quick and easy to make at home.
    The Perfect Enchilada Sauce! No need to buy Enchilada Sauce from a can when it's this quick and easy to make at home.

    Lemon Blueberry Cheesecake Bars

    April 13, 2018 by Kelly 1 Comment

    Lemon Blueberry Cheesecake Bars - rich, creamy cheesecake with flecks of lemon zest and studded with juicy blueberries on a shortbread crust. All the deliciousness of cheesecake in a quick and easy bar.

    Lemon Blueberry Cheesecake Bars -ย  rich, creamy cheesecake with flecks of lemon zest and studded with juicy blueberries on a shortbread crust. All the deliciousness of cheesecake in a quick and easy bar, with bright, sunny flavors. Perfect for spring!

    Lemon Blueberry Cheesecake Bars - rich, creamy cheesecake with flecks of lemon zest and studded with juicy blueberries on a shortbread crust. All the deliciousness of cheesecake in a quick and easy bar. Lemon Blueberry Cheesecake Bars - rich, creamy cheesecake with flecks of lemon zest and studded with juicy blueberries on a shortbread crust. All the deliciousness of cheesecake in a quick and easy bar.

    I love these little bars! They're light and refreshing with the perfect balance of sweetness and sunny lemon, just popping with juicy blueberries.

    Lemon Blueberry Cheesecake Bars - rich, creamy cheesecake with flecks of lemon zest and studded with juicy blueberries on a shortbread crust. All the deliciousness of cheesecake in a quick and easy bar. 
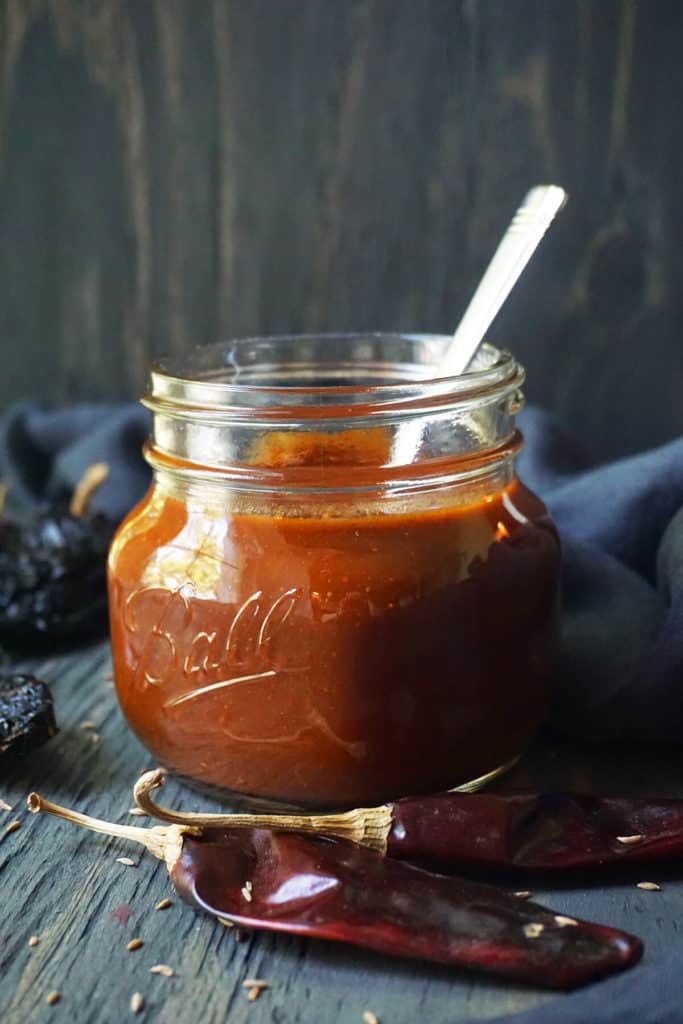
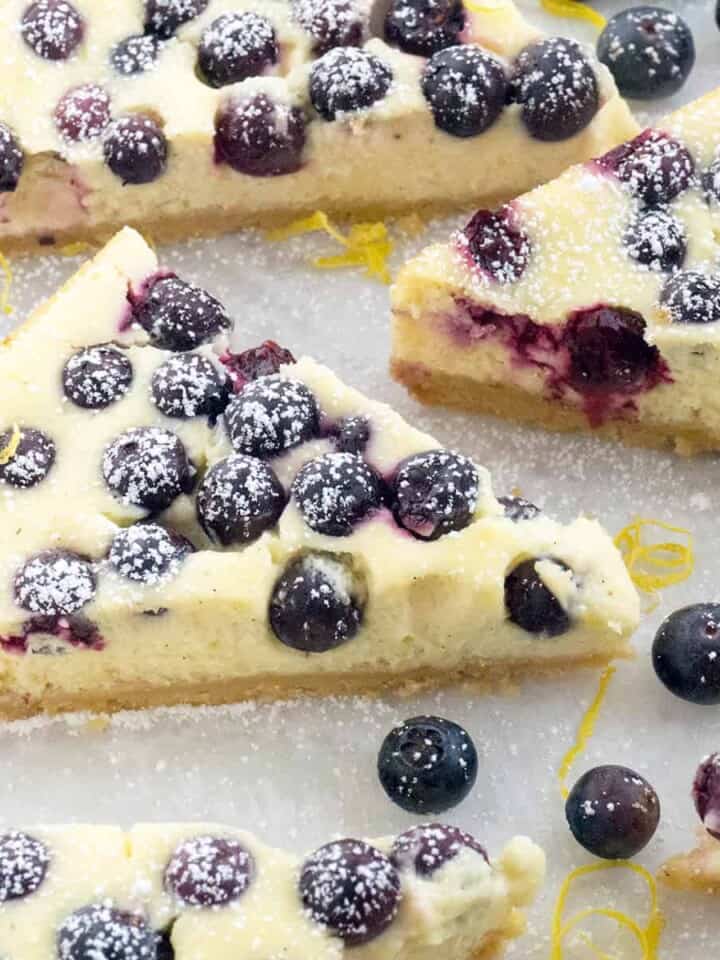
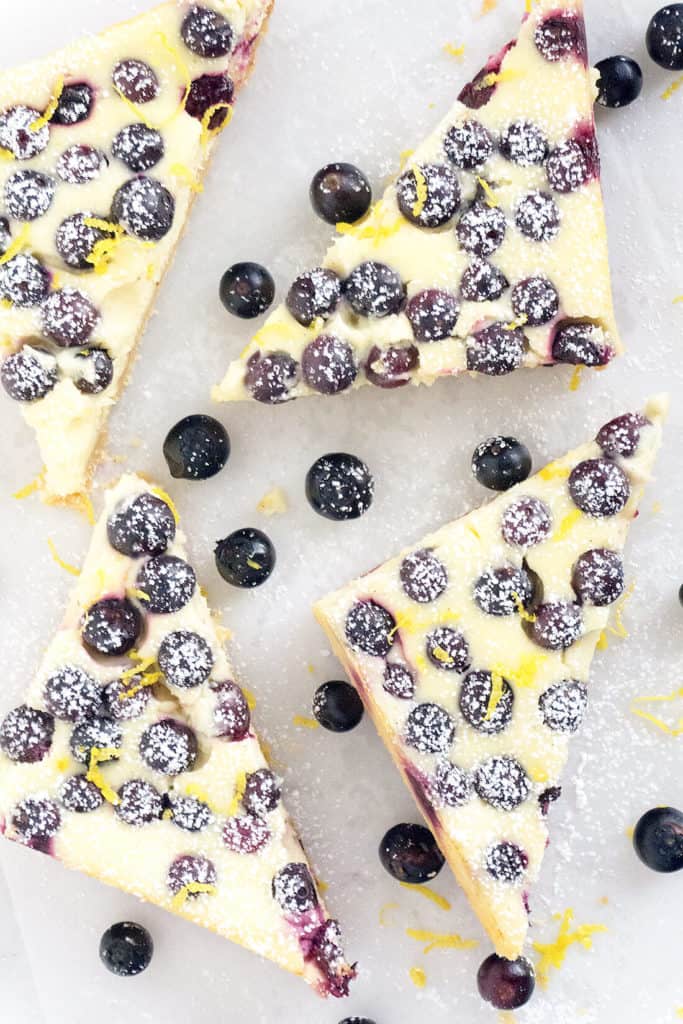
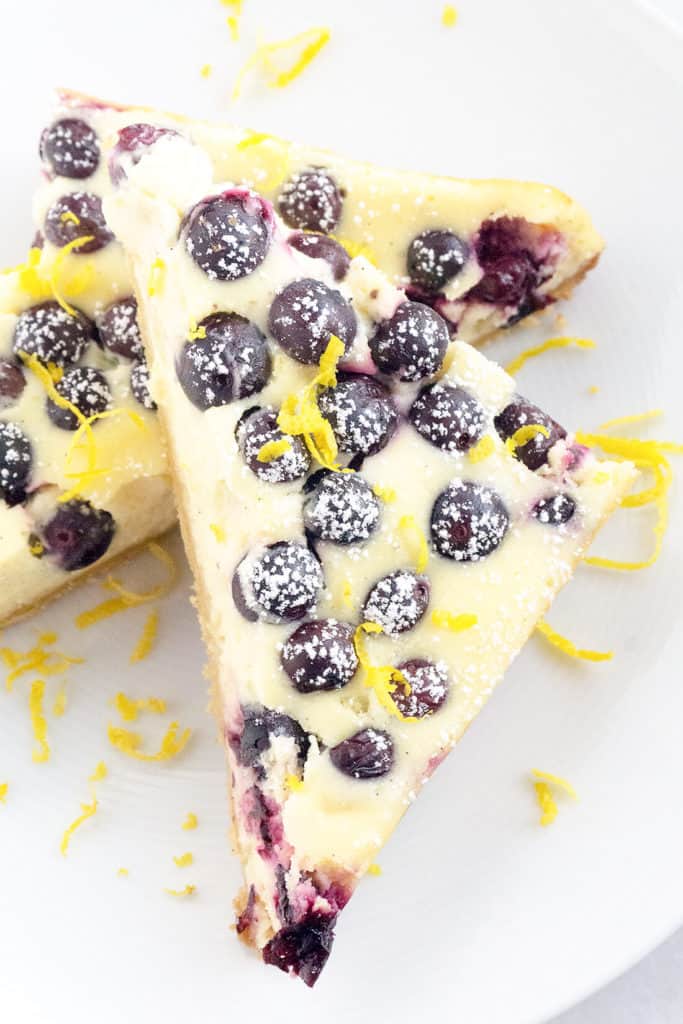
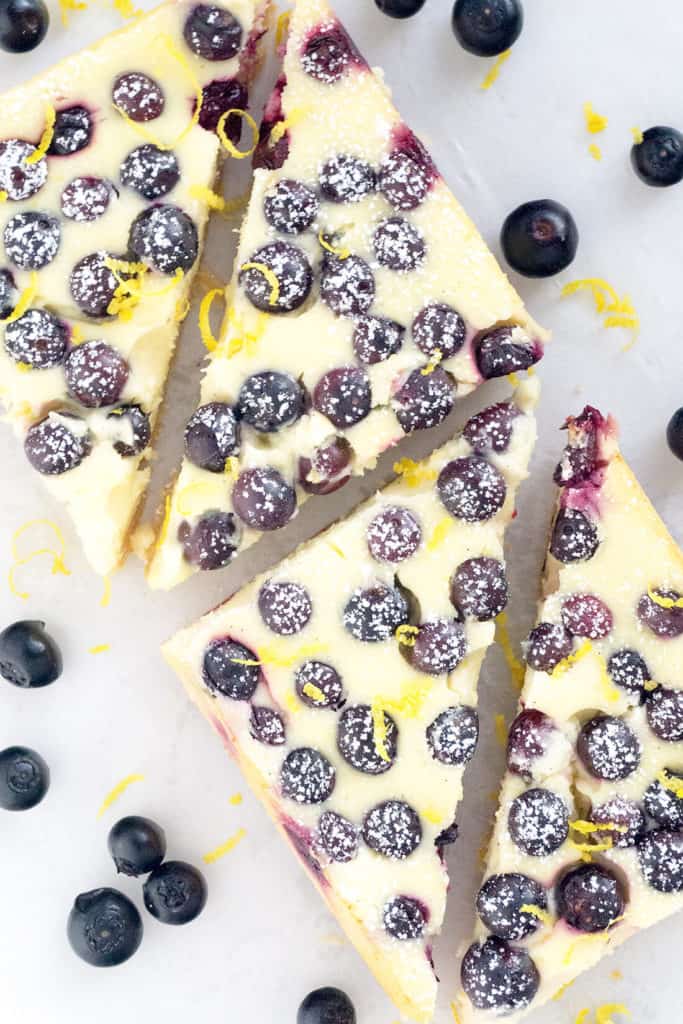
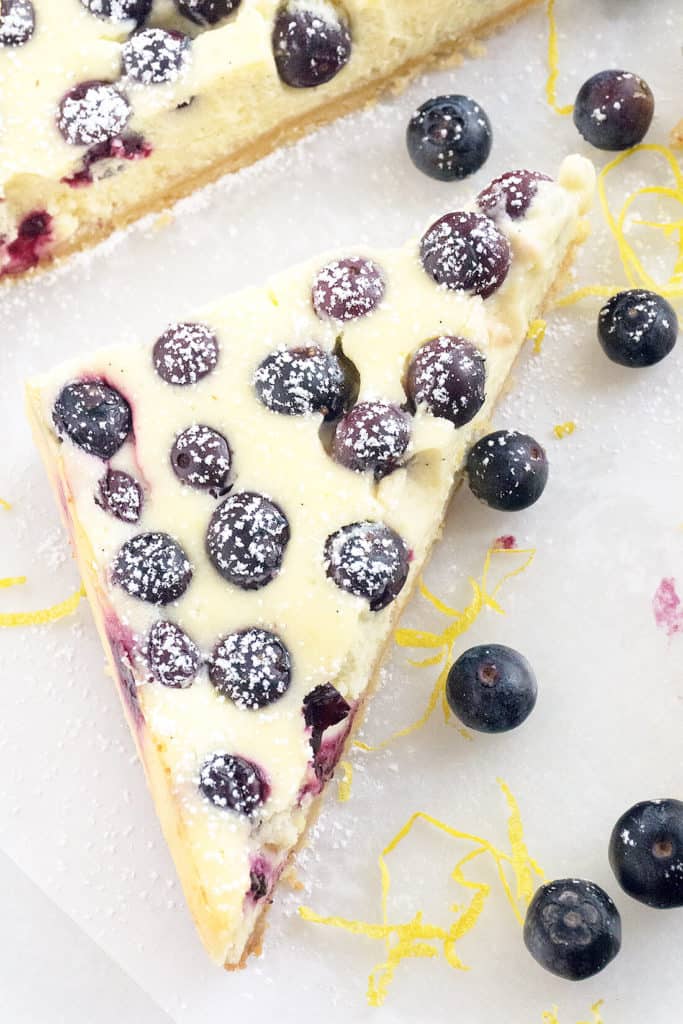
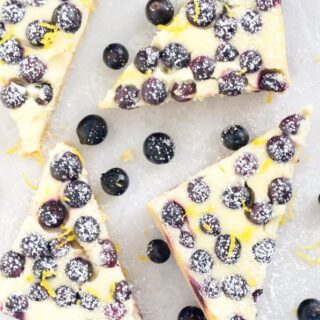
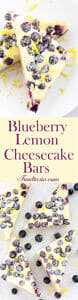
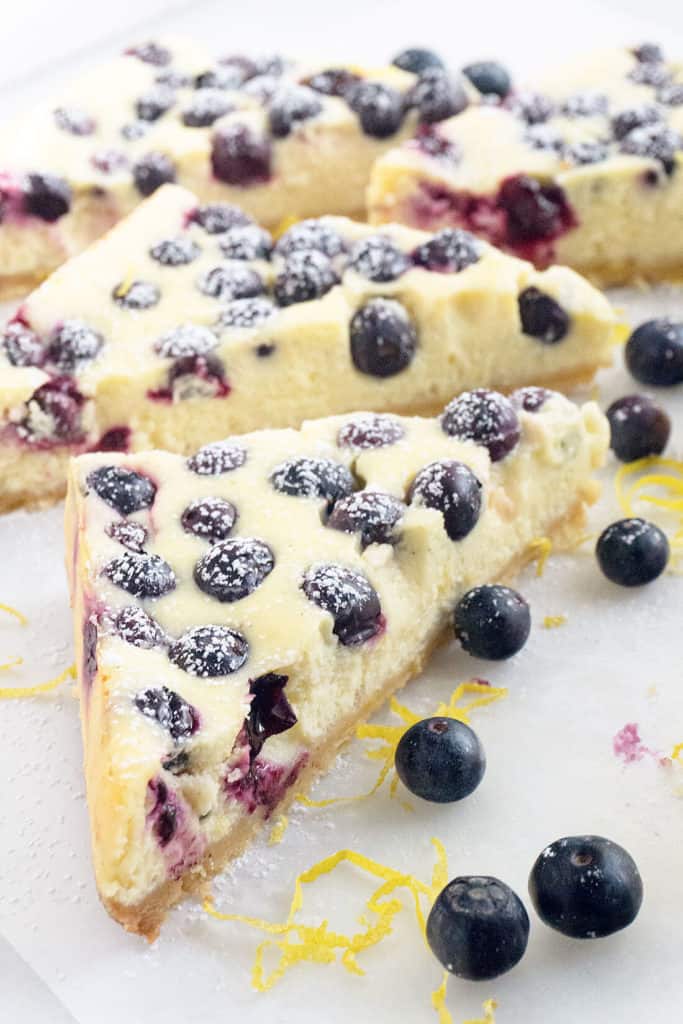
I've given these Lemon Blueberry Cheesecake Bars a buttery, shortbread crust - my favorite cheesecake crust for amazing taste and texture. The cheesecake is flavored with lemon juice and finely grated lemon zest in the perfect proportions - not too tangy or overpowering - just a bright, sunny, lemony flavor. Instead of mixing the berries into the cheesecake, I've just sprinkled them on top of the batter after putting it in the baking pan. The berries sink about halfway into the batter - giving these bars their beautiful, berry studded top.

    Lemon Blueberry Cheesecake Bars - rich, creamy cheesecake with flecks of lemon zest and studded with juicy blueberries on a shortbread crust. All the deliciousness of cheesecake in a quick and easy bar.

    These Lemon Blueberry Cheesecake Bars are quick and easy to make. The best part is there's no messing around with a water bath and long hours of cooking like there is for a regular cheesecake.

    Lemon Blueberry Cheesecake Bars - rich, creamy cheesecake with flecks of lemon zest and studded with juicy blueberries on a shortbread crust. All the deliciousness of cheesecake in a quick and easy bar. Lemon Blueberry Cheesecake Bars - rich, creamy cheesecake with flecks of lemon zest and studded with juicy blueberries on a shortbread crust. All the deliciousness of cheesecake in a quick and easy bar.

    Jump to Section

    • Recipe
    • Lemon Blueberry Cheesecake Bars

    Recipe

    lemon, blueberry, cheesecake bars

    Lemon Blueberry Cheesecake Bars

    Kelly
    Lemon Blueberry Cheesecake Bars -ย  rich, creamy cheesecake with flecks of lemon zest and studded with juicy blueberries on a shortbread crust. All the deliciousness of cheesecake in a quick and easy bar, with bright, sunny flavors. Perfect for spring!
    Print Recipe Pin Recipe
    Prep Time 10 minutes mins
    Cook Time 45 minutes mins
    3 hours hrs
    Total Time 3 hours hrs 55 minutes mins
    Course Dessert
    Cuisine American
    Servings 16 2-inch bars
    Calories 207 kcal

    Ingredients
      

    For the crust:

    • 1 ยฝ cups shortbread cookie crumbs finely ground (6.75oz, 191g)
    • 3 tablespoons butter melted (1.5oz, 43)

    For the filling:

    • 16 oz cream cheese softened (454g)
    • ยฝ cup sugar 3.5oz, 99g
    • 2 eggs
    • finely grated zest from 2 lemons about 1 ยฝ tablespoons
    • 1 tablespoon lemon juice
    • 1 teaspoon vanilla
    • 1 ยฝ cups fresh blueberries 8oz, 227g
    • confectioners' sugar for sprinkling on top

    Instructions
     

    For the crust:

    • Preheat oven to 350 degrees F.
    • Prepare an 8 inch baking pan with a removable bottom by lining with baking parchment and spraying with nonstick cooking spray.
    • Mix the cookie crumbs and the melted butter until well combined and moistened.
    • Press the crumbs into the bottom of the baking pan. Using a flat bottomed measuring cup, press the crust firmly and evenly into the bottom of the pan,
    • Bake until golden brown around the edges and fragrant, about 8 minutes. Set aside to cool.

    For the cheesecake:

    • In a stand mixer fitted with the paddle attachment, beat cream cheese until light and fluffy, about 2 minutes. Scrape down bowl.
    • Add sugar and beat another 2 minutes, scraping down bowl halfway through.
    • Add eggs, one at a time, mixing on low speed for 20 seconds after each egg. Scrape down bowl.
    • Add zest, lemon juice, and vanilla and mix until thoroughly combined.
    • Pour batter into pan. Sprinkle blueberries evenly on top, dropping them gently.
    • Bake until only slightly wobbly in the center, about 35 minutes.
    • Let cool to room temperature. Refrigerate until well chilled, about 3 hours before slicing.
    • Dust with confectioners' sugar before serving

    Notes

    • If you don't have a removable bottom baking pan, line pan with aluminum foil and let the sides overhang so that you can easily lift the bars out of the pan.
    • Don't cool the bars too quickly or they will crack. I learned this the hard way by letting them cool in front of a fan.

    Nutrition

    Calories: 207kcalCarbohydrates: 16gProtein: 3gFat: 15gSaturated Fat: 8gPolyunsaturated Fat: 1gMonounsaturated Fat: 4gTrans Fat: 0.1gCholesterol: 55mgSodium: 147mgPotassium: 66mgFiber: 0.5gSugar: 11gVitamin A: 492IUVitamin C: 2mgCalcium: 33mgIron: 0.4mg
    Keyword cheesecake bars, lemon blueberry cheesecake
    Tried this recipe?Let us know how it was!

    You might also like:

    Double Glazed Lemon Blueberry Cheesecake:

    Double Glazed Blueberry Lemon Pound Cake - A moist, tender pound cake, infused with the bright and sunny flavor of lemon, bursting with sweet juicy blueberries, and topped with two (2!) glazes - one vibrant and tangy, one creamy and sweet.

    Classic New York Cheesecake:

    White Chocolate Raspberry Cheesecake:

    Ultra-smooth, rich and creamy white chocolate cheesecake on a buttery shortbread cookie crust, topped with raspberry sauce and fresh raspberries, this White Chocolate Raspberry Cheesecake is a favorite flavor combination.

    Lemon Blueberry Cheesecake Bars - rich, creamy cheesecake with flecks of lemon zest and studded with juicy blueberries on a shortbread crust. All the deliciousness of cheesecake in a quick and easy bar.

    Double Glazed Blueberry Lemon Pound Cake

    March 30, 2018 by Kelly 4 Comments

    Double Glazed Blueberry Lemon Pound Cake - A moist, tender pound cake, infused with the bright and sunny flavor of lemon, bursting with sweet juicy blueberries, and topped with two (2!) glazes - one vibrant and tangy, one creamy and sweet.

    Happy Spring! A moist, tender pound cake, infused with the bright and sunny flavor of lemon, bursting with sweet juicy blueberries, and topped with two (2!) glazes - one vibrant and tangy, one creamy and sweet - this Double Glazed Blueberry Lemon Pound Cake is the perfect way to welcome spring!

    "in Just- spring when the world is mud-luscious...when the world is puddle-wonderful" ย  - E.E. Cummings

    Double Glazed Blueberry Lemon Pound Cake - A moist, tender pound cake, infused with the bright and sunny flavor of lemon, bursting with sweet juicy blueberries, and topped with two (2!) glazes - one vibrant and tangy, one creamy and sweet.
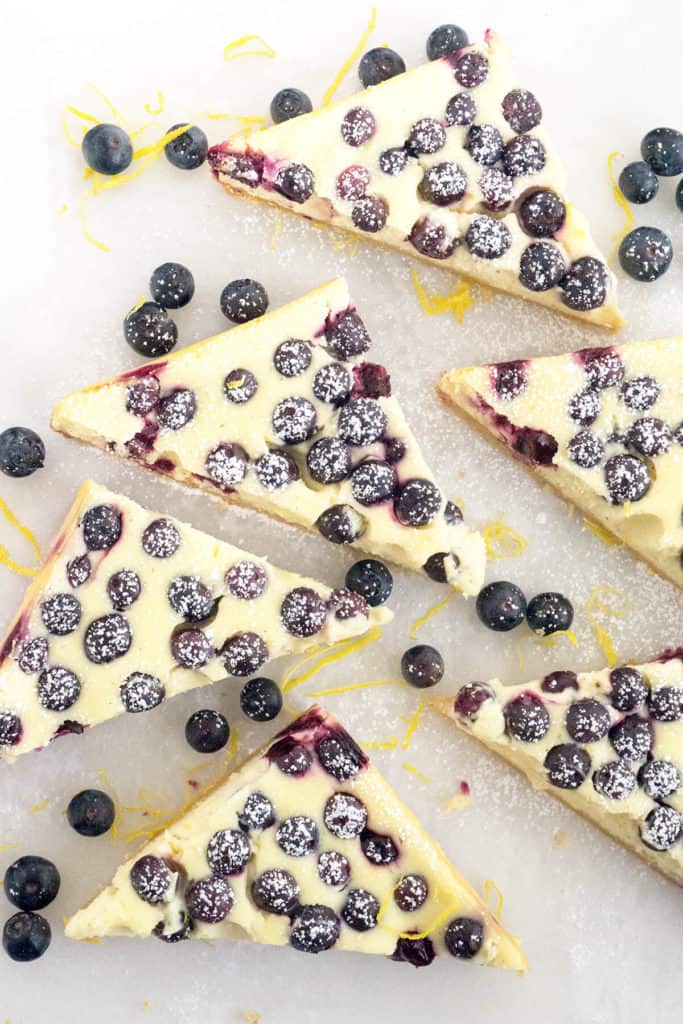
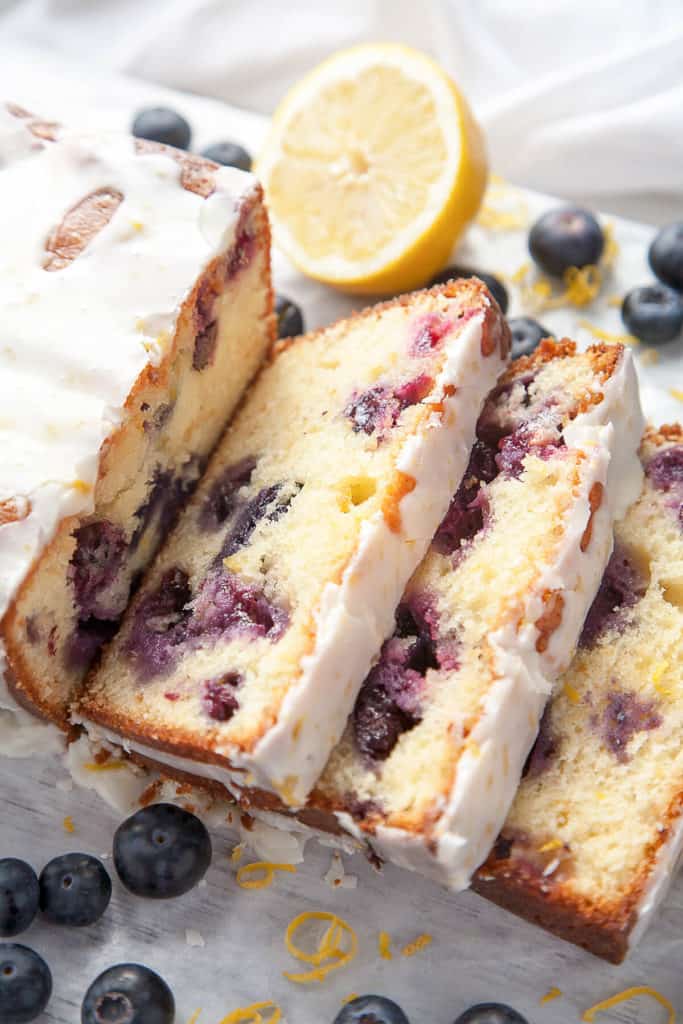
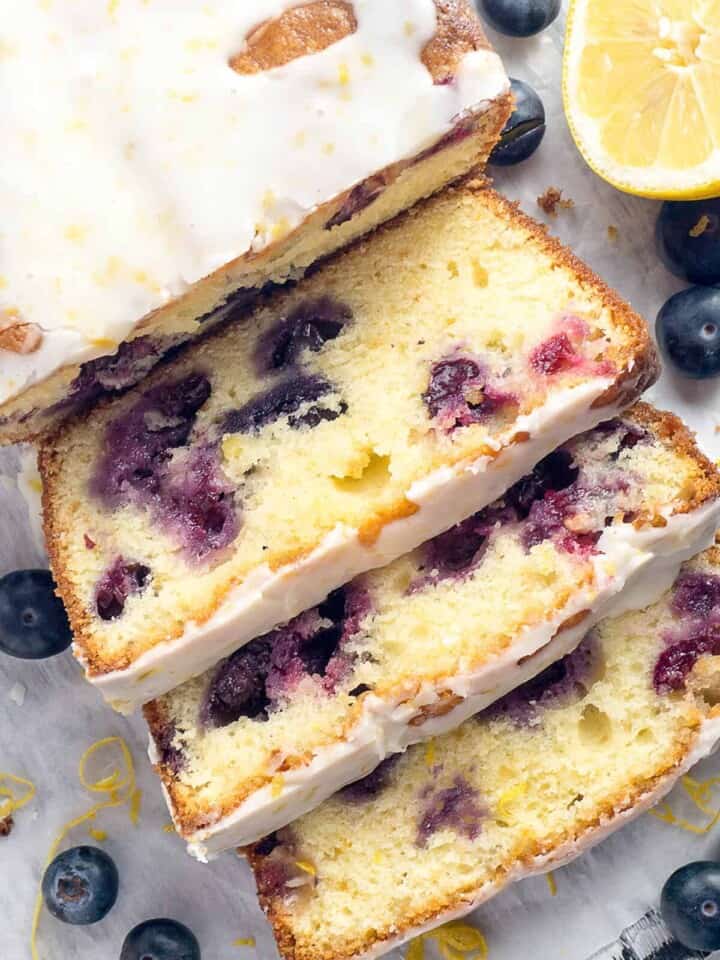
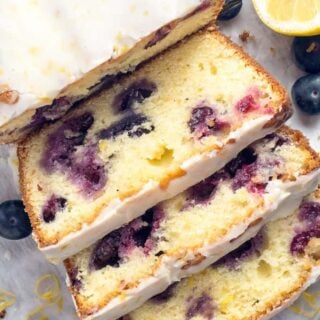
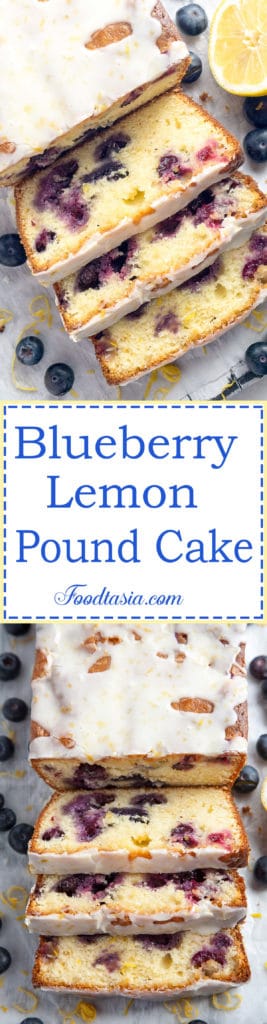
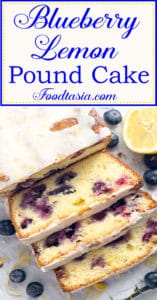
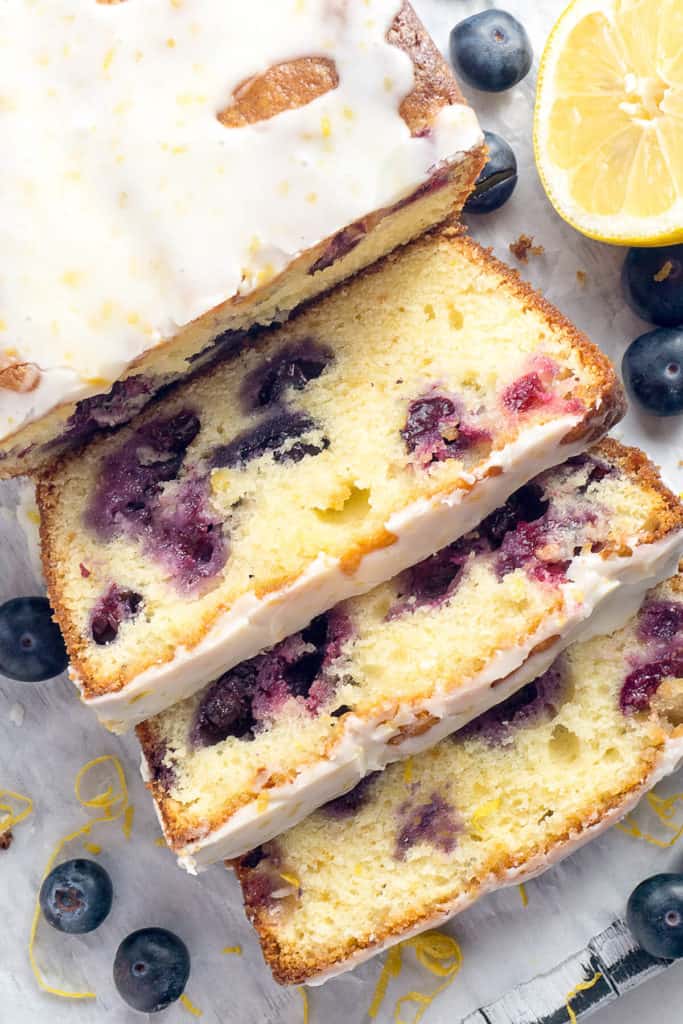
I've used two glazes on this Blueberry Lemon Pound Cake. One is a lemon wash - a syrup made of lemon juice and sugar that is brushed all over the top and sides of the cake when it is still warm from the oven. The lemon wash soaks into the cake giving it a lovely, tangy-sweet, lemon flavor and making it extra moist. The second glaze is creamy and sweet,ย  more like a pourable frosting with flecks of lemon zest. Together, they give this Blueberry Lemon Pound Cake amazing lemon flavor!

    Double Glazed Blueberry Lemon Pound Cake - A moist, tender pound cake, infused with the bright and sunny flavor of lemon, bursting with sweet juicy blueberries, and topped with two (2!) glazes - one vibrant and tangy, one creamy and sweet.

    This Blueberry Lemon Pound Cake is tender and moist, flavored with fresh lemon juice and flecks of lemon zest.ย Sour cream in the batter not only makes the cake rich and keeps it moist, it also allows the lemon flavor to really shine through. You can use fresh or frozen blueberries. If using frozen berries, don't thaw them out, use them straight from the freezer.

    Double Glazed Blueberry Lemon Pound Cake - A moist, tender pound cake, infused with the bright and sunny flavor of lemon, bursting with sweet juicy blueberries, and topped with two (2!) glazes - one vibrant and tangy, one creamy and sweet.Fresh, vibrant, and full of flavor but not overly sweet, this Blueberry Lemon Pound Cake is perfect for breakfast, snacking, or dessert. Enjoy!

    Double Glazed Blueberry Lemon Pound Cake - A moist, tender pound cake, infused with the bright and sunny flavor of lemon, bursting with sweet juicy blueberries, and topped with two (2!) glazes - one vibrant and tangy, one creamy and sweet.

    Jump to Section

    • Recipe
    • Double Glazed Blueberry Lemon Pound Cake

    Recipe

    slices of blueberry, lemon pound cake

    Double Glazed Blueberry Lemon Pound Cake

    Kelly
    A moist, tender pound cake, infused with the bright and sunny flavor of lemon, bursting with sweet juicy blueberries.
    Print Recipe Pin Recipe
    Prep Time 15 minutes mins
    Cook Time 1 hour hr 15 minutes mins
    Total Time 1 hour hr 30 minutes mins
    Course Dessert
    Cuisine American
    Servings 10 servings
    Calories 369 kcal

    Ingredients
      

    • Butter and flour for preparing pan

    For the cake batter:

    • 1 ยฝ cups all-purpose flour 213g
    • ยฝ teaspoon baking powder
    • โ…› teaspoon baking soda
    • ยฝ teaspoon salt
    • 8 tablespoons butter 113g
    • 1 ยฝ cups granulated sugar 298g
    • 3 large eggs
    • ยฝ cup sour cream 128g
    • 1 teaspoon vanilla
    • 1 tablespoon freshly squeezed lemon juice
    • finely grated zest from 2 lemons about 1 ยฝ tablespoons
    • 1 ยฝ cups blueberries 8oz, 227g
    • ยฝ tablespoon all-purpose flour for tossing

    For the Lemon Wash Glaze:

    • ยฝ cup sugar 99g
    • ยผ cup freshly squeezed lemon juice

    For the Creamy Lemon Glaze:

    • 1 cup confectioners' sugar 113g, sifted
    • Finely grated zest from 1 lemon
    • 1 tablespoon lemon juice
    • 1 tablespoon heavy cream

    Instructions
     

    • Preheat oven to 350 degrees F

    Prepare the baking pan:

    • Rub the inside of a 9in by 5in loaf pan with butter. Cut a piece of baking parchment to fit the bottom of pan and place inside. Grease paper. Dust the inside of pan with flour, tapping out any excess.

    For the cake batter:

    • Sift the flour, baking powder, baking soda, and salt into a bowl.
    • In the bowl of a standing mixer using the paddle attachment, cream butter for 2 minutes on medium-low speed. Scrape down bowl.
    • Slowly add sugar and continue mixing for 5 minutes, scraping down the bowl twice.
    • Add eggs, one at a time, mixing for 1 minute between each addition and scraping bowl between each addition.
    • On low speed, alternately add sifted ingredients in 3 additions and sour cream in 2 additions, beginning and ending with the dry ingredients. Mix until combined, scraping down bowl frequently.
    • Add vanilla, lemon juice, and lemon zest. Mix to combine.
    • Pour โ…“ of batter into prepared pan.
    • Toss berries with ยฝ tablespoon flour to coat. Gently stir into batter with a rubber spatula.
    • Pour rest of batter into prepared pan.
    • Bake until golden brown and done. A toothpick inserted into the middle should come out clean. About 1 hour 15 minutes.
    • Remove cake from oven and let cool on a rack for 10 minutes.
    • Carefully invert cake onto a cooling rack. Remove baking paper. Invert cake onto another cooling rack, right side up.
    • Using a toothpick, poke holes all over top and sides of cake.
    • Gently brush Lemon Wash Glaze over top and sides until all is absorbed.
    • Let cake cool completely.
    • Top with Creamy Lemon Glaze.

    For the Lemon Wash Glaze:

    • Combine sugar and lemon in a small saucepan. Bring to a boil, stirring to dissolve sugar. Turn off heat and set aside.

    For the Creamy Lemon Glaze:

    • Prepare just before using
    • Combine the confectioners' sugar, lemon zest, lemon juice, and cream in a mixing bowl. Whisk until smooth.

    Notes

    • I use a light colored baking pan so the sides don't get too brown.
    • If the top of the cake is getting too brown before the cake is done, lightly lay a piece of aluminum foil on top of cake.
    • Fresh or frozen blueberries can be used.

    Nutrition

    Calories: 369kcalCarbohydrates: 72gProtein: 4gFat: 14gSaturated Fat: 8gPolyunsaturated Fat: 1gMonounsaturated Fat: 4gTrans Fat: 0.4gCholesterol: 88mgSodium: 250mgPotassium: 88mgFiber: 1gSugar: 43gVitamin A: 467IUVitamin C: 6mgCalcium: 41mgIron: 1mg
    Keyword blueberry pound cake, lemon pound cake
    Tried this recipe?Let us know how it was!

    Double Glazed Blueberry Lemon Pound Cake - A moist, tender pound cake, infused with the bright and sunny flavor of lemon, bursting with sweet juicy blueberries, and topped with two (2!) glazes - one vibrant and tangy, one creamy and sweet.
    Double Glazed Blueberry Lemon Pound Cake - A moist, tender pound cake, infused with the bright and sunny flavor of lemon, bursting with sweet juicy blueberries, and topped with two (2!) glazes - one vibrant and tangy, one creamy and sweet.

    Over the Top Chunky, Chewy Peanut Butter Bars

    March 17, 2018 by Kelly Leave a Comment

    These Chunky, Chewy Peanut Butter Bars are so over the top! I packed in 18 (Eighteen!) full size Reese's peanut butter cups, peanut butter flavored chips, semi-sweet chocolate chips, and chunky peanut butter into a moist, chewy peanut butter bar. Extravagant? Definitely! But so delicious!

    Theseย Chunky, Chewy Peanut Butter Bars are so over the top! I packed in 18 (Eighteen!) full size Reese's peanut butter cups, peanut butter flavored chips, semi-sweet chocolate chips, and chunky peanut butter into a moist, chewy peanut butter bar. Extravagant? Definitely! But so delicious!

    These Chunky, Chewy Peanut Butter Bars are so over the top! I packed in 18 (Eighteen!) full size Reese's peanut butter cups, peanut butter flavored chips, semi-sweet chocolate chips, and chunky peanut butter into a moist, chewy peanut butter bar. Extravagant? Definitely! But so delicious!These Chunky, Chewy Peanut Butter Bars are so over the top! I packed in 18 (Eighteen!) full size Reese's peanut butter cups, peanut butter flavored chips, semi-sweet chocolate chips, and chunky peanut butter into a moist, chewy peanut butter bar. Extravagant? Definitely! But so delicious!
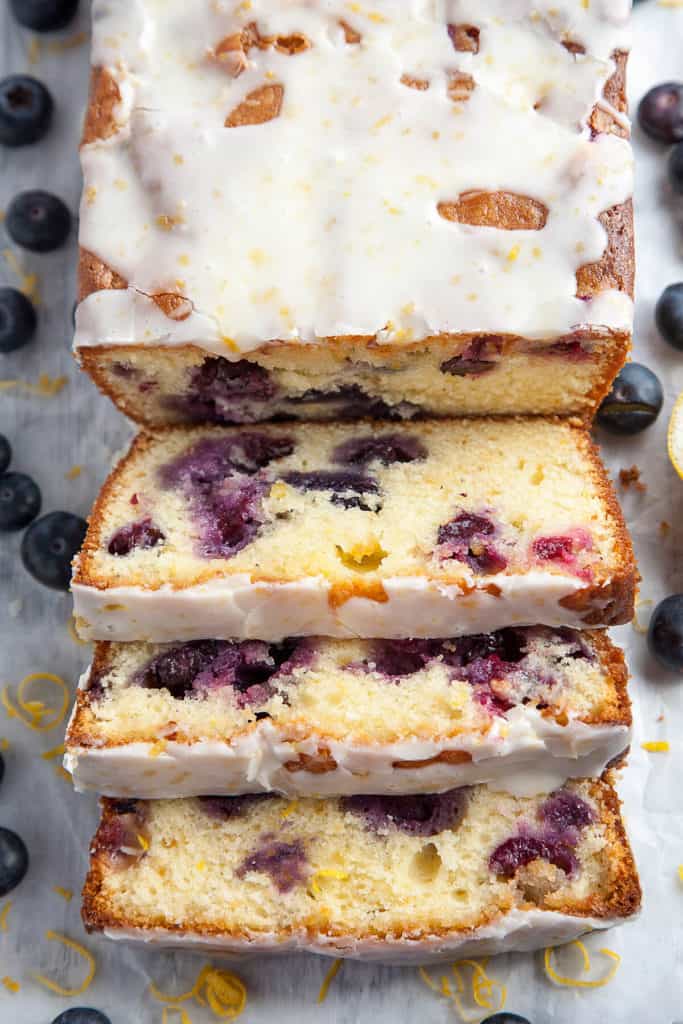
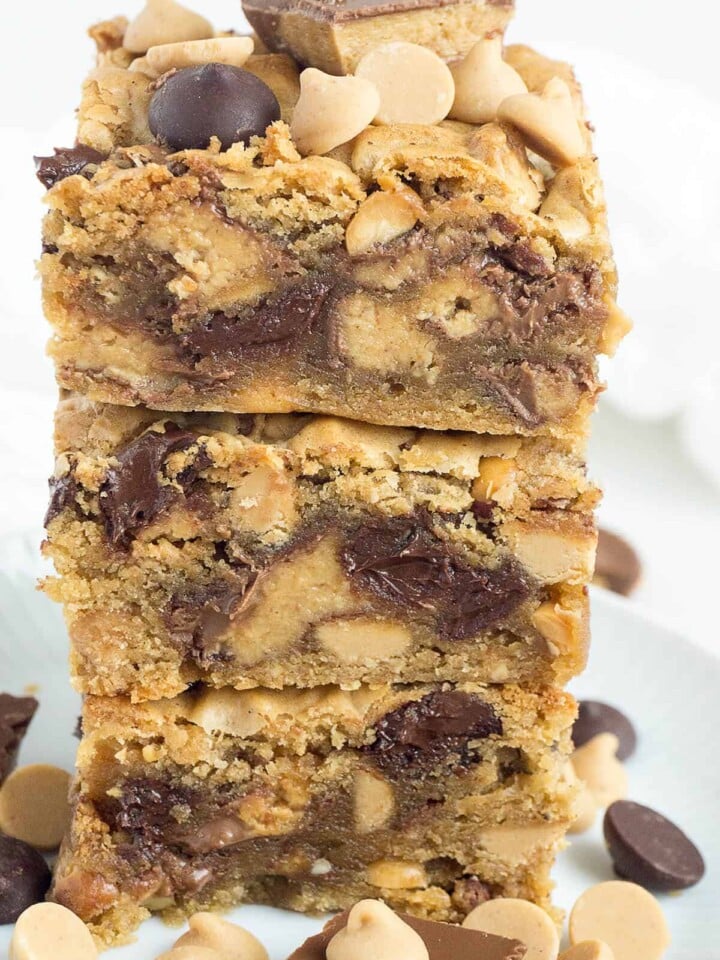
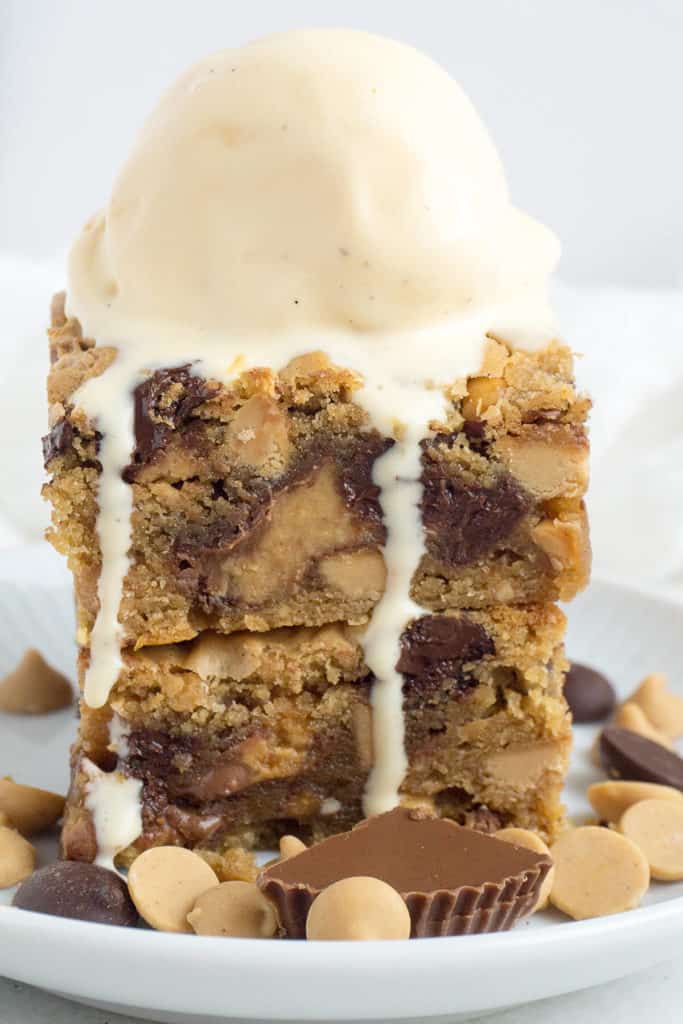
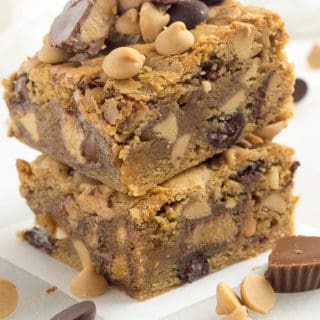
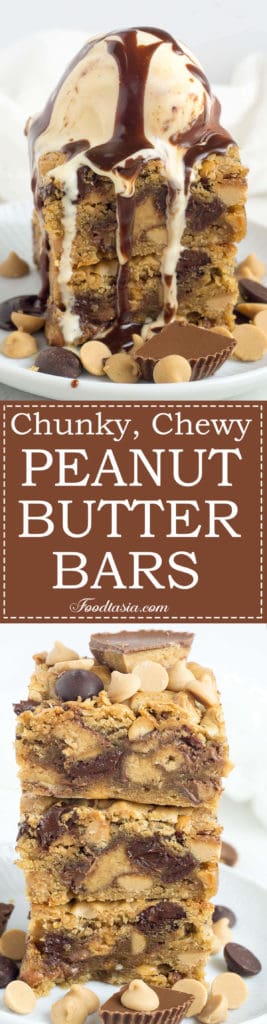
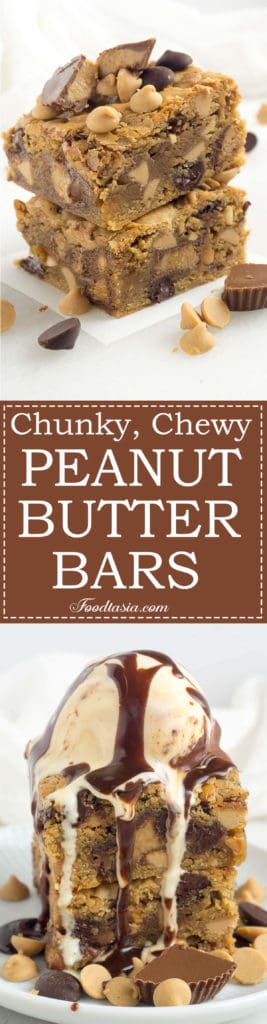
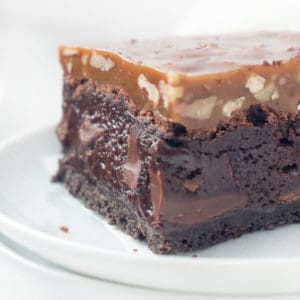
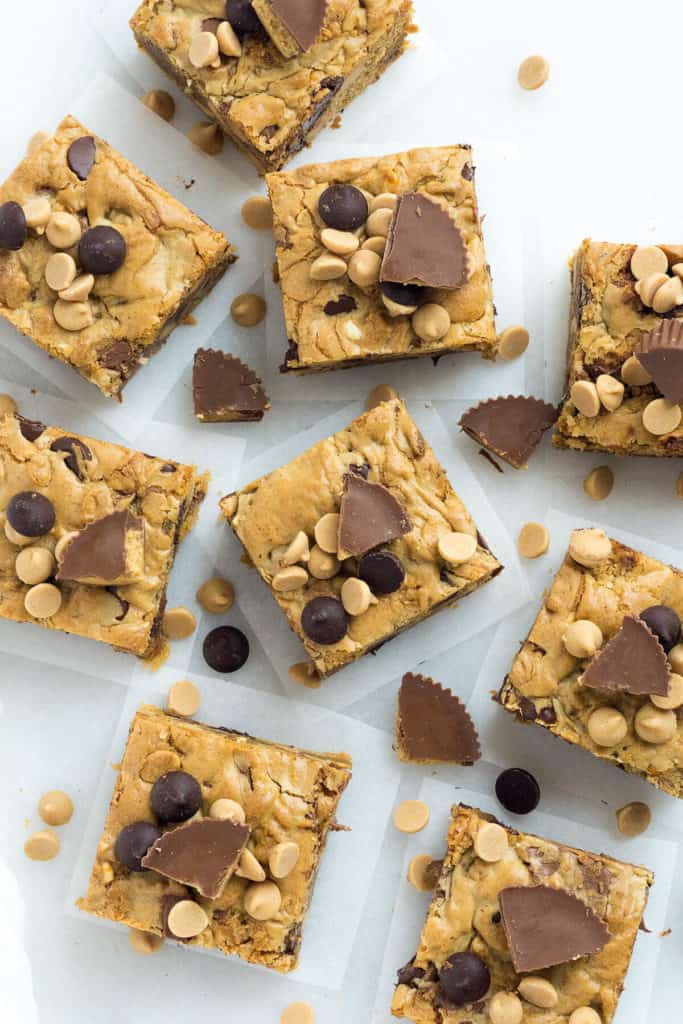
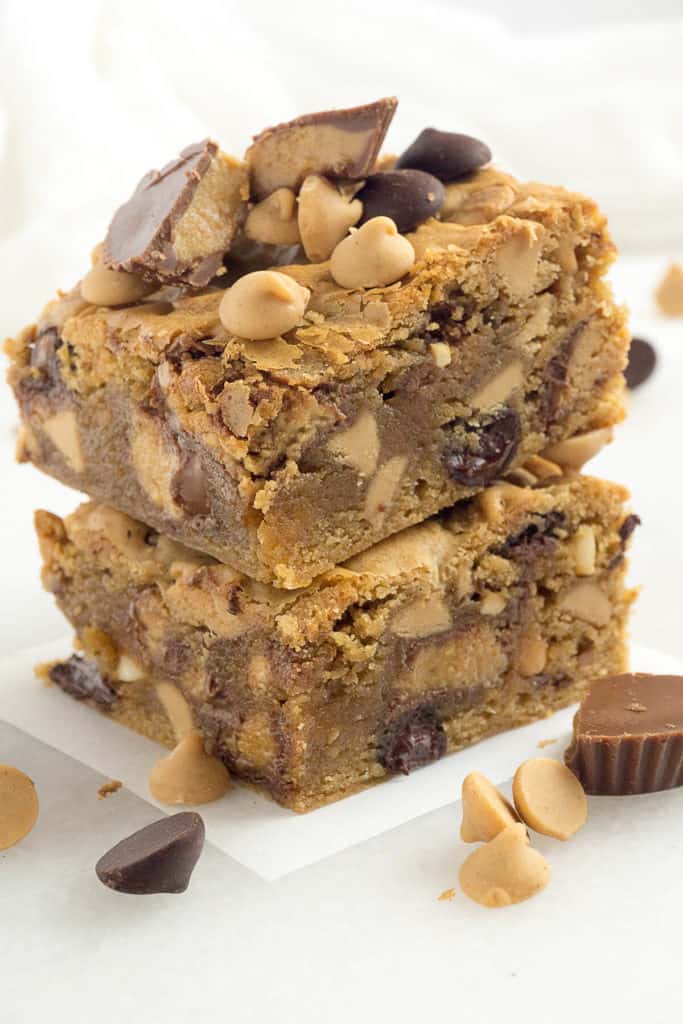
Just how I like my bars - lots and lots of candy and just enough batter to hold it all together! You'd think they would be overly sweet with all that candy inside, but the saltiness of the peanut butter makes a perfect balance.
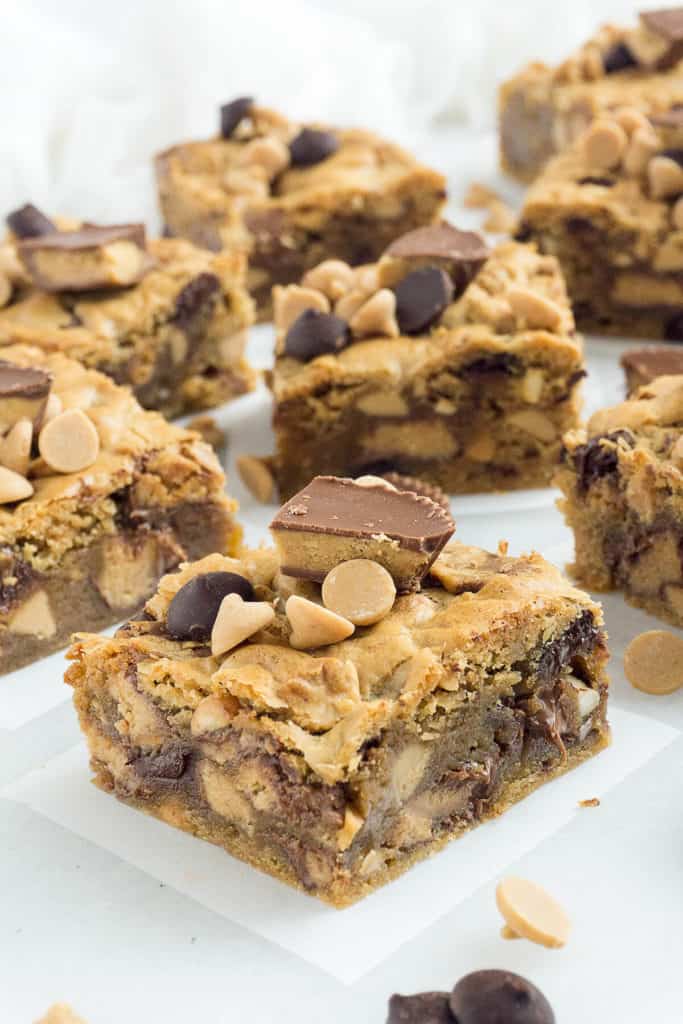
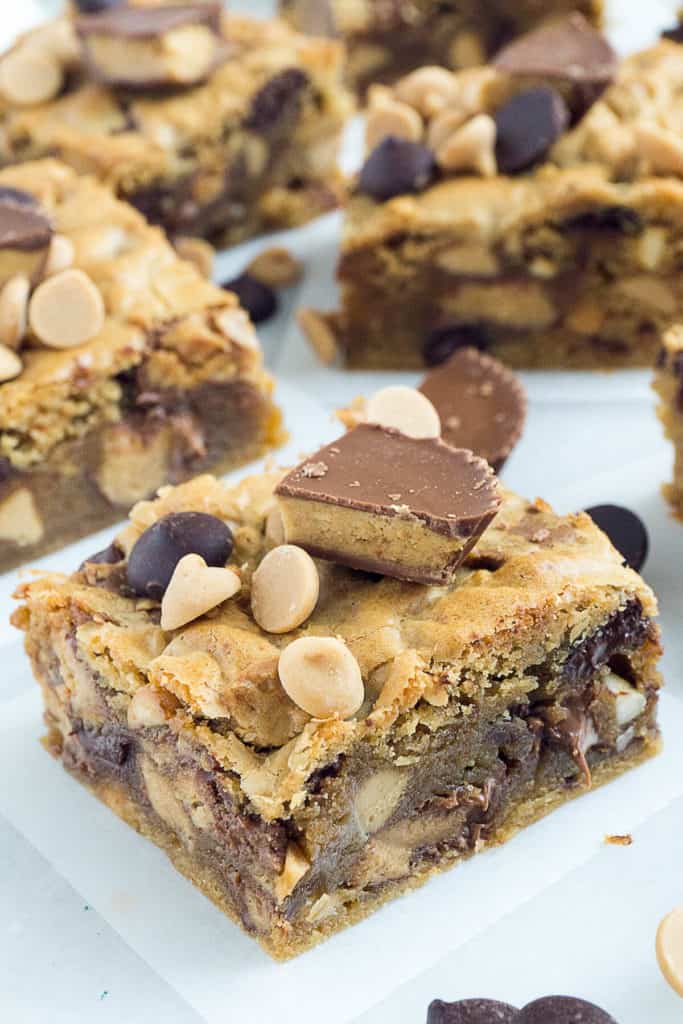
    These Chunky, Chewy Peanut Butter Bars are so over the top! I packed in 18 (Eighteen!) full size Reese's peanut butter cups, peanut butter flavored chips, semi-sweet chocolate chips, and chunky peanut butter into a moist, chewy peanut butter bar. Extravagant? Definitely! But so delicious! These Chunky, Chewy Peanut Butter Bars are so over the top! I packed in 18 (Eighteen!) full size Reese's peanut butter cups, peanut butter flavored chips, semi-sweet chocolate chips, and chunky peanut butter into a moist, chewy peanut butter bar. Extravagant? Definitely! But so delicious!The base for theseย Over the Top Chunky, Chewy Peanut Butter Bars is a moist, chewy blondie flavored with chunky peanut butter and brown sugar. Reese's Peanut Butter Cups and peanut butter flavored chips intensify the peanut flavor. Semi-sweet chocolate chips add richness and balance the slightly salty taste.
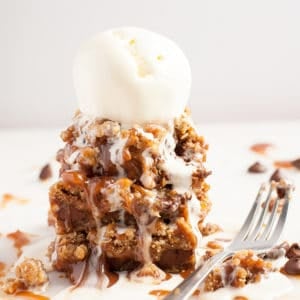
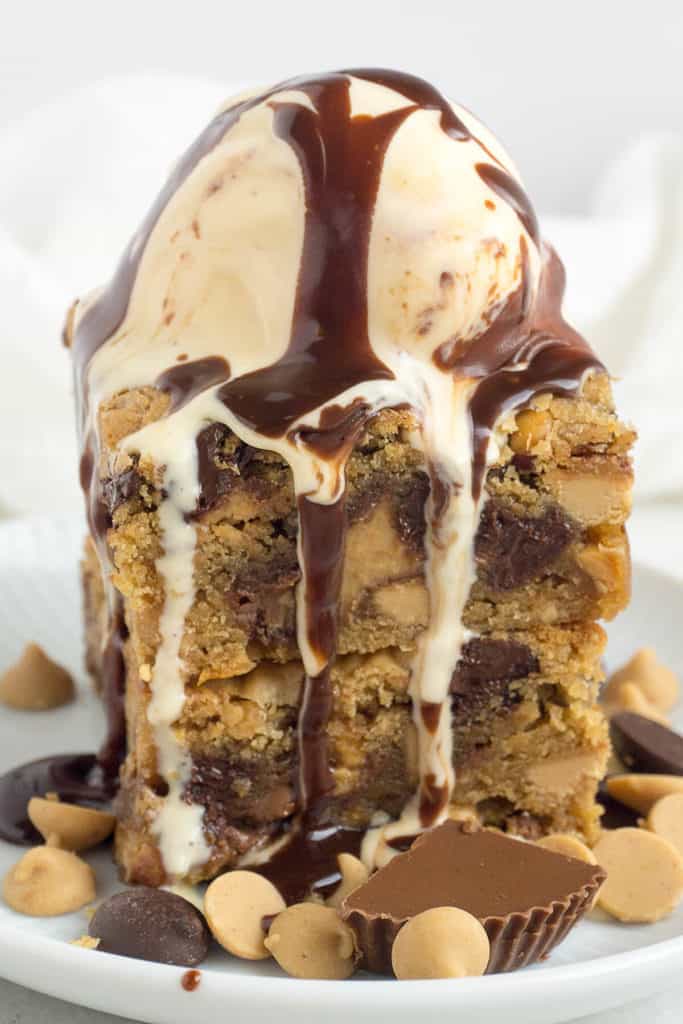
    These Chunky, Chewy Peanut Butter Bars are so over the top! I packed in 18 (Eighteen!) full size Reese's peanut butter cups, peanut butter flavored chips, semi-sweet chocolate chips, and chunky peanut butter into a moist, chewy peanut butter bar. Extravagant? Definitely! But so delicious! These Chunky, Chewy Peanut Butter Bars are so over the top! I packed in 18 (Eighteen!) full size Reese's peanut butter cups, peanut butter flavored chips, semi-sweet chocolate chips, and chunky peanut butter into a moist, chewy peanut butter bar. Extravagant? Definitely! But so delicious!I use ยผ to ยฝ teaspoon of salt in the blondie batter, depending on my mood. Using ยฝ a teaspoonย  gives a more salty-sweet combination and really brings out the peanut butter. Using ยผ teaspoon makes a milder, sweeter bar.

    These Chunky, Chewy Peanut Butter Bars are so over the top! I packed in 18 (Eighteen!) full size Reese's peanut butter cups, peanut butter flavored chips, semi-sweet chocolate chips, and chunky peanut butter into a moist, chewy peanut butter bar. Extravagant? Definitely! But so delicious! These Chunky, Chewy Peanut Butter Bars are so over the top! I packed in 18 (Eighteen!) full size Reese's peanut butter cups, peanut butter flavored chips, semi-sweet chocolate chips, and chunky peanut butter into a moist, chewy peanut butter bar. Extravagant? Definitely! But so delicious! 
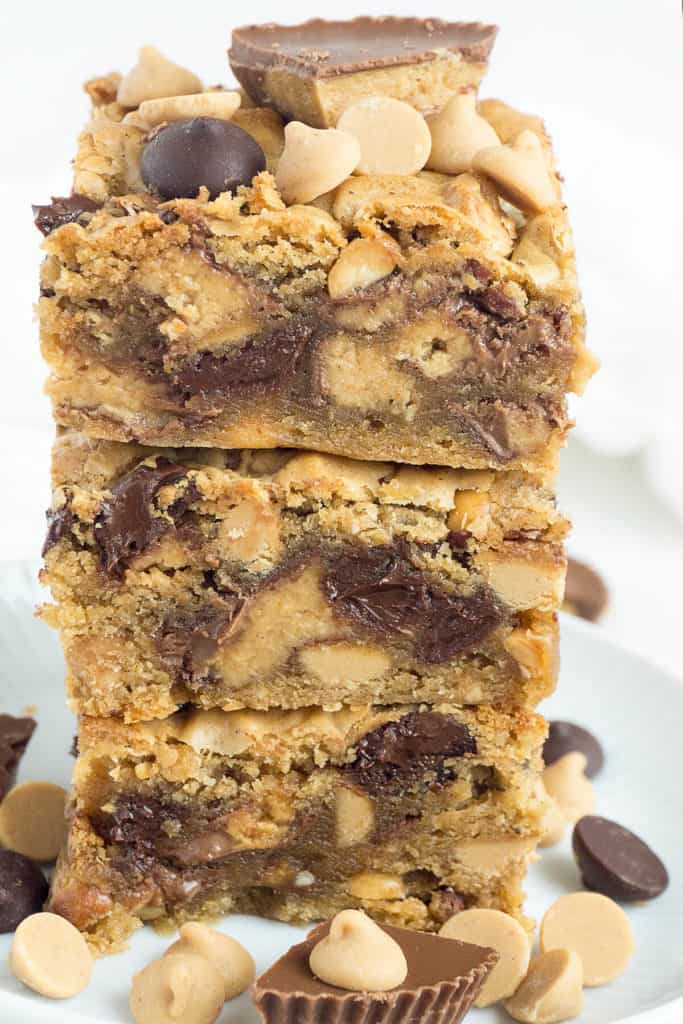
These Chewy, Chunky Peanut Butter Bars are delicious warm or cold. My favorite way eating them is cold, straight from the refrigerator when they are dense and fudgy. If you really want to go way over the top, serve them warm with a scoop ofย  French Vanilla Ice Cream ๐Ÿ™‚These Chunky, Chewy Peanut Butter Bars are so over the top! I packed in 18 (Eighteen!) full size Reese's peanut butter cups, peanut butter flavored chips, semi-sweet chocolate chips, and chunky peanut butter into a moist, chewy peanut butter bar. Extravagant? Definitely! But so delicious!

    Jump to Section

    • Recipe
    • Chunky, Chewy Peanut Butter and Chocolate Bars

    Recipe

    These Chunky, Chewy Peanut Butter Bars are so over the top! I packed in 18 (Eighteen!) full size Reese's peanut butter cups, peanut butter flavored chips, semi-sweet chocolate chips, and chunky peanut butter into a moist, chewy peanut butter bar. Extravagant? Definitely! But so delicious!

    Chunky, Chewy Peanut Butter and Chocolate Bars

    Kelly
    Chunky, Chewy Peanut Butter Bars with Reese's peanut butter cups, peanut butter flavored chips, semi-sweet chocolate chips, and chunky peanut butter.
    Print Recipe Pin Recipe
    Prep Time 15 minutes mins
    Cook Time 30 minutes mins
    Total Time 45 minutes mins
    Course Dessert
    Cuisine American
    Servings 16 bars
    Calories 347 kcal

    Ingredients
      

    • 1 ยผ cups all-purpose flour 177g
    • ยฝ teaspoon salt
    • ยพ teaspoon baking powder
    • ยผ teaspoon freshly grated nutmeg
    • 2 eggs
    • 1 cup firmly packed light brown sugar 215g
    • 8 tablespoons butter melted and cooled (113g)
    • 1 teaspoon vanilla
    • ยฝ cup chunky peanut butter 133g
    • 18 Reeseโ€™s Peanut Butter Cups cut in quarters
    • ยฝ cup peanut butter-flavored chips 85g
    • ยฝ cup semi-sweet chocolate chips 85g
    • extra peanut butter cups and chips for sprinkling on top

    Instructions
     

    • Preheat oven to 350 degrees F. Spray an 8-inch square baking pan with non-stick cooking spray. See note*
    • Combine the flour, salt, baking powder, and grated nutmeg in a bowl and whisk to combine.
    • In another mixing bowl, whisk eggs. Add brown, cooled melted butter, and vanilla. Whisk until smooth.
    • Add peanut butter and whisk until smooth.
    • Remove 1 tablespoon from the flour mixture and toss with peanut butter and chocolate chips.
    • Add flour mixture to wet mixture and stir with a wooden spoon until combined.
    • Add peanut butter chips, chocolate chips, and chopped Reeseโ€™s cups and stir gently to combine.
    • Transfer mixture to prepared baking pan and smooth.
    • Bake until set and golden on the edges, about 30 minutes. Do not overbake.
    • Let cool completely before cutting into squares.

    Notes

    • The key to success with these bars is to not overbake them.
    • I use a baking pan with a removable bottom so that the bars come out perfectly neat.
    • To make it easier to lift bars out of a normal pan, line pan with aluminum foil, leaving an inch or two over hang. When bars have cooled, just lift out of the pan before cutting into squares

    Nutrition

    Calories: 347kcalCarbohydrates: 41gProtein: 6gFat: 19gSaturated Fat: 8gPolyunsaturated Fat: 2gMonounsaturated Fat: 7gTrans Fat: 0.2gCholesterol: 37mgSodium: 274mgPotassium: 182mgFiber: 2gSugar: 30gVitamin A: 223IUVitamin C: 0.1mgCalcium: 51mgIron: 1mg
    Keyword chocolate peanut butter bars, peanut butter bars
    Tried this recipe?Let us know how it was!

    These Chunky, Chewy Peanut Butter Bars are so over the top! I packed in 18 (Eighteen!) full size Reese's peanut butter cups, peanut butter flavored chips, semi-sweet chocolate chips, and chunky peanut butter into a moist, chewy peanut butter bar. Extravagant? Definitely! But so delicious!
    These Chunky, Chewy Peanut Butter Bars are so over the top! I packed in 18 (Eighteen!) full size Reese's peanut butter cups, peanut butter flavored chips, semi-sweet chocolate chips, and chunky peanut butter into a moist, chewy peanut butter bar. Extravagant? Definitely! But so delicious!

    You might also like:

    Triple-layer Fudgy Caramel Pecan Turtle Brownies - a dense, fudgy brownie on top of an Oreo cookie crust topped with a chewy caramel and pecan topping.ย 
    Fudgy Caramel Pecan Turtle Brownies

    Salted Caramel Oatmeal Carmelitas
    Salted Caramel Oatmeal Carmelitas

    Chewy coconut, dense fudgy brownies, and smooth white chocolate - all on top of an Oreo cookie crust. Chewy, gooey, and crunchy in every bite!
    Fudgy Coconut Brownies

    Harira - Moroccan Lamb and Legume Soup

    February 18, 2018 by Kelly 16 Comments

    Harira - Moroccan Lamb and Legume Soup - is loaded with healthy chickpeas, lentils, and vegetables, scented with the exotic flavors of Morocco.

     Harira -  Moroccan Lamb and Legume Soup - is loaded with healthy chickpeas, lentils, and vegetables, scented with the exotic flavors of Morocco.

    Harira - Moroccan Lamb and Legume Soup - is loaded with healthy chickpeas, lentils, and vegetables, scented with the exotic flavors of Morocco.
    Harira - Moroccan Lamb and Legume Soup - is loaded with healthy chickpeas, lentils, and vegetables, scented with the exotic flavors of Morocco.

    Originating in Morocco but loved throughout the Middle East, Harira is a popular soup during the Islamic fasting month of Ramadan. While living in Dubai, we had the opportunity to witness first hand the magnificence with which the local residents celebrate this month of fasting. Food and drink are not allowed from dawn until sunset, however it's more than made up for after sunset. Schools and businesses have shortened hours to allow the people to catch up on sleep after long nights of feasting and gathering with friends and family. Restaurants and special festive tents offer every type of delicacy from sunset until dawn. The city is decorated and full of celebrations enjoyed by all, even those who aren't fasting!

    I was fortunate enough to have a Moroccan neighbor who invited me to her home at sunset during Ramadan at the time of breaking the fast. Her family breaks the fast relatively simply: dates, freshly squeezed orange juice, various meat and cheese filled pastries (including these fabulous Cheese Sambousek), and this delicious Harira.

    For more ideas for the Ramadan iftar table try theseย Afghan Bolani - potato, green onion, and cilantro stuffed flatbreadsย or theseย Turkish gozlemeย with your choice of four different fillings: spicy lamb or beef, spinach and feta, cheese and herb, and potato and cheese.ย And for something sweet tryย these walnut and rose water filled qatayef pastries.

    Harira - Moroccan Lamb and Legume Soup - is loaded with healthy chickpeas, lentils, and vegetables, scented with the exotic flavors of Morocco.

    Lamb is cooked in a flavorful broth until falling off the bone tender. I use a whole lamb shoulder but you can use any cut you like that is on the bone to give the broth flavor and that luscious mouth-feel that results from the gelatin in the bone. After the broth is ready, onion, celery, celery leaves, and parsley are sautรฉed in butter or ghee. The broth and tomato are added. You can use fresh or canned tomatoes, but I like the texture the tomato paste gives to the broth.

    Harira - Moroccan Lamb and Legume Soup - is loaded with healthy chickpeas, lentils, and vegetables, scented with the exotic flavors of Morocco.

    The broth is scented with traditional Moroccan spices: turmeric, cinnamon, coriander, and a pinch of saffron. The saffron is optional if you don't have any on hand. Some cooks don't use it, and the Harira is just as delicious without it. Another optional ingredient that I do use, although some other cooks don't, is powdered ginger. I love the brightness it adds to the soup.

    Harira - Moroccan Lamb and Legume Soup - is loaded with healthy chickpeas, lentils, and vegetables, scented with the exotic flavors of Morocco.

    Chick peas, lentils, and fine soup noodles are simmered in the broth until tender. Freshly squeezed lemon juice is the finishing touch and gives the Harira its tangy, lemony flavor.

    Harira - Moroccan Lamb and Legume Soup - is loaded with healthy chickpeas, lentils, and vegetables, scented with the exotic flavors of Morocco.

    Harira is great served with Cheese Sambousek. I hope you try it!

    Jump to Section

    • Recipe
    • ย Harira

    Recipe

    Harira - Moroccan Lamb and Legume Soup - is loaded with healthy chickpeas, lentils, and vegetables, scented with the exotic flavors of Morocco.

    ย Harira

    Kelly
    Harira - this authentic Morrocan Lamb Soup - is loaded with healthy chickpeas, lentils, and vegetables, scented with the exotic flavors of Morocco.
    5 from 1 vote
    Print Recipe Pin Recipe
    Prep Time 20 minutes mins
    Cook Time 3 hours hrs 30 minutes mins
    Total Time 3 hours hrs 50 minutes mins
    Course Soup
    Cuisine Moroccan
    Servings 10 servings
    Calories 301 kcal

    Ingredients
      

    ย For the Lamb broth:

    • 2 tablespoons vegetable oil
    • 2 ยฝ pounds lamb on bone approximately, I use a whole shoulder (1.1kg)
    • bones from the carcasses of 2 chickens or the equivalent
    • 1 stalk celery roughly chopped
    • 1 carrot roughly chopped
    • 1 onion roughly chopped
    • 1 bunch parsley
    • 2 cubes chicken bouillon
    • salt and pepper to taste

    For the Harira:

    • 2 tablespoons butter or ghee
    • 1 onion chopped
    • 2 stalks celery with leaves chopped
    • 1 cup fresh parsley chopped
    • 1 teaspoon turmeric
    • ยฝ teaspoon cinnamon
    • 1 teaspoon ground coriander
    • 1 teaspoon black pepper
    • ยฝ teaspoon ginger optional
    • pinch saffron optional
    • ยผ cup tomato paste
    • 1 cup dried red/brown lentils pick over and rinsed (7.2oz, 204g)
    • 15 oz chickpeas drained (425g)

    Instructions
     

    For the Lamb broth:

    • Heat oil in a large pan, stock pot, or pressure cooker. When hot, sear the lamb on both sides until browned.
    • Add the remaining broth ingredients and cover with water.
    • Bring to a boil then simmer until lamb is very tender, this can take several hours in a normal pan. Or cook in the pressure cooker for 1ยฝ hours.
    • Strain broth to make 2ยฝ quarts.

    For the Harira:

    • Melt butter in a large pan. Sautรฉ onion and celery until softened.
    • Add parsley and celery leaves and sautรฉ for 1 minute.
    • Add turmeric, cinnamon, ground coriander black pepper, ginger, saffron, and tomato paste. Stir for a minute until combined.
    • Add 2ยฝ quarts lamb broth and bring to a boil.
    • Add lentils and allow to cook until half way tender, about 15-20 minutes.
    • Add drained chickpeas and fine soup noodles. Cook until noodles and lentils are tender but not mushy.
    • Turn off heat. Add lemon juice to taste. It should be bright and lemony, but not overpowering.
    • Sprinkle with cilantro. Salt and pepper to taste.

    Notes

    • You can use fresh or canned tomatoes, but I like the texture the tomato paste gives to the broth.

    Nutrition

    Calories: 301kcalCarbohydrates: 29gProtein: 24gFat: 10gSaturated Fat: 3gPolyunsaturated Fat: 3gMonounsaturated Fat: 3gTrans Fat: 0.1gCholesterol: 52mgSodium: 145mgPotassium: 738mgFiber: 11gSugar: 5gVitamin A: 2249IUVitamin C: 21mgCalcium: 75mgIron: 5mg
    Keyword harira, moroccan soup
    Tried this recipe?Let us know how it was!

    You might also like:

    Cheese Sambousek:

    Harira - Moroccan Lamb and Legume Soup - is loaded with healthy chickpeas, lentils, and vegetables, scented with the exotic flavors of Morocco.

    Harira -  Moroccan Lamb and Legume Soup - is loaded with healthy chickpeas, lentils, and vegetables, scented with the exotic flavors of Morocco. #soup #souprecipes #soupinspiration #souprecipeshealthy #healthy #healthyeating #healthyrecipes #middleeastern #middleeasternfood #middleeasternrecipe #arabicfood
    • « Previous Page
    • 1
    • …
    • 16
    • 17
    • 18
    • 19
    • 20
    • …
    • 25
    • Next Page »
    Kelly Shaban

    Hi there! My name is Kelly Shaban. Here youโ€™ll find delicious, trusted recipes with easy step-by-step photos and videos. Read More About Me

    Game Day Favorites

    • plate of lemon ricotta pasta
      One-Pot Lemon Ricotta Pasta with Arugula
    • This Creamy Lemon Artichoke Pasta with Chicken, red peppers, and parsley has a bright, delicate lemon flavor in a creamy, garlicky parmesan sauce. An easy and flavorful one dish meal. Restaurant quality in under 30 minutes. #pasta #artichoke #quick #easy #chicken #dinner #creamy #redpepper #lemon #under30minutes #datenight
      Creamy Lemon Artichoke Pasta with Chicken
    • The BEST thick and chewy Sugar Cookie Bars with vanilla buttercream frosting. Quick and easy to make bar cookies recipe! #dessert #homemade #fromscratch
      Frosted Sugar Cookie Bars Recipe
    • a slice of mango cheesecake with a bite taken out
      The BEST Mango Cheesecake
    • Chocolate Cream Pie is the ultimate creamy, dreamy, decadent dessert. With an Oreo cookie crust, a velvety smooth chocolate custard filling, and billows of whipped cream, this Chocolate Cream Pie will leave you swooning! #chocolate cream pie #chocolate #pie #dessert #best #homemade #no bake #recipe #from scratch #oreo #video
      Chocolate Cream Pie {VIDEO}
    • Incredibly moist and so delicious! This is my favorite Carrot Cake recipe โ€“ a super moist and tender Carrot Cake bursting with flavor from pineapple and coconut, topped with the most heavenly cream cheese frosting. #easy #best #recipe #healthy #homemade #cupcakes #decoration #pineapple #creamcheesefrosting #dessert #spring #easter
      Favorite Carrot Cake
    • Lemon Blueberry Cheesecake Bars - rich, creamy cheesecake with flecks of lemon zest and studded with juicy blueberries on a shortbread crust. All the deliciousness of cheesecake in a quick and easy bar.
      Lemon Blueberry Cheesecake Bars
    • Double Glazed Blueberry Lemon Pound Cake - A moist, tender pound cake, infused with the bright and sunny flavor of lemon, bursting with sweet juicy blueberries, and topped with two (2!) glazes - one vibrant and tangy, one creamy and sweet.
      Double Glazed Blueberry Lemon Pound Cake

    Popular Posts

    • Classic Lasagna - layers of silky smooth, creamy parmesan bรฉchamel sauce, a slow simmered Bolognese meat sauce, sheets of pasta, and lots of mozzarella cheese make this the Worldโ€™s Best Lasagna recipe.
      Classic Lasagna Recipe (VIDEO)
    • Creamy Tuscan Chicken Pasta is loaded with the flavors of the Mediterranean โ€“ sundried tomato, baby spinach, garlic, red pepper, and parmesan. Itโ€™s super quick and easy. A restaurant quality dish on the table in under 30 minutes. #pasta #recipe #recipeeasyfast #chicken #chickenrecipes #chickendinner #chickendishes #easy #easyrecipe #easydinner
      Creamy Tuscan Chicken Pasta
    • Old-fashioned Chicken and Dumplings - soft, pillowy dumplings and tender chicken in a rich, flavorful broth. With both made from scratch and quick and easy versions. Truly comfort food at its finest!
      Old Fashioned Chicken and Dumplings
    • piece of chocolate lasagna with a bite taken out
      Chocolate Lasagna (Quick and Easy No-Bake Dessert) + Video
    • Italian Pignoli Cookies
      Easy Italian Pignoli Cookies Recipe (with VIDEO)
    • peanut butter fudge stacked on a plate
      Easy Peanut Butter Fudge Recipe (VIDEO)

    Footer


    as featured in

    buzzfeed logo
    greatest logo
    yummly logo
    huffpo logo
    foodista logo
    taste of home

    Accessibility Privacy Policy About Subscribe

    • Facebook
    • Instagram
    • Pinterest

    Copyright ยฉ 2023

    As an Amazon Associate I earn from qualifying purchases.